# MAML 概述
MAML 引擎脚本语言 MIUI Application Markup Language for MORE (MIUI MORE 引擎应用标记语言)
概述 最初用于百变锁屏,使用 xml 用特定的语法描述锁屏界面。后来不断增强功能,逐步演化成一套接近通用的界面描述语言和图形渲染引擎,在一定需求下可用于开发风格多变的用户界面。可方便地通过更换皮肤改变界面风格、动画甚至交互方式。
MAML 语言和 Android 的界面描述 xml 类似. 所不同的是 Android 描述的是静态界面,对界面元素的更改依赖 java 代码。MAML 描述的是静态界面+动态属性,UI 在时间线上按一定的帧率不断刷新,UI 显示根据元素属性的变量表达式的计算结果实时更新。MAML 语言和运行时引擎已经从锁屏中独立出来作为 MIUI 内置的通用框架,除了显示时间日期等,还支持查询标准 Content Provider 来获取各种信息如天气。显示图片文本等各种元素,各种动画,滑动点击等界面交互控件,适于实现展示信息或有简单交互操作的界面。比如时钟、天气小部件、闹钟响铃界面。
框架支持动态帧率,不必按照固定帧率不停渲染,在没有动画和更新的时侯停止渲染,此时仅占用极少资源,对于缓慢变化的动画使用低帧率渲染,高动态的动画开始后立即调整到高帧率全速渲染。全速渲染时全屏帧率基本可以达到 60-120 帧。合理使用可以既炫酷又不费电。
# 在个性化中的应用
# 百变锁屏
百变锁屏在主题包里的 lockscreen/advance 目录下,manifest.xml 文件是描述脚本,下面是百变锁屏根标签的定义。
<?xml version="1.0" encoding="utf-8"?>
<Lockscreen version="1" frameRate="30" useVariableUpdater="DateTime.Second" screenWidth="1080" useHardwareCanvas="true">
    <Image />
    <Image />
    <Unlocker/>
    <Unlocker/>
    <DateTime/>
    …
    <Text/>
</Lockscreen>
# 百变壁纸
百变壁纸在主题包的 miwallpaper 目录下,描述文件也是 manifest.xml。下面是根标签的定义,根标签支持属性与百遍锁屏一致
<MiWallpaper version="1" frameRate="30" useVariableUpdater="DateTime.Second" screenWidth="1080" useHardwareCanvas="true">
    <Image/>
    <Group/>
    …
</MiWallpaper>
要实现元素跟随手指滑动的效果,您可以使用 #wallpaper_offset_x 和 #wallpaper_offset_pixel_x 来实现。它们之间的关系可以通过以下公式表示:
#wallpaper_offset_x * 屏宽 = -1/#wallpaper_offset_pixel_x
在滑动时,您可以考虑以下情况:
- 在第一屏时,
wallpaper_offset_pixel_x = 0,wallpaper_offset_x = 0; - 滑到最后一屏时,
wallpaper_offset_pixel_x = -1*屏宽,wallpaper_offset_x = 1.0。
为了适配不同分辨率的机型,建议使用 #wallpaper_offset_x。以下是建议的设计方式:
- 将壁纸切成双屏宽(屏宽指的是
screenWidth)。 - 设定壁纸的定位:
x="-#wallpaper_offset_x * 屏宽"。 - 对于需要跟随滑动的元素,定位为:
x="-#wallpaper_offset_x * 屏宽 + 相对壁纸的位置"。
这样的设计方式可以确保在不同分辨率的设备上都能够正确显示,并实现元素随手指滑动的效果。
# 动态图标
动态图标在主题包 icons\fancy_icons\目录下,每个动态图标是一个文件夹,文件夹的名字是对应的 app 包名。例如日历的动态图标是一个叫"com.android.calendar"的文件夹,里面包含 manifest.xml 描述文件,以下是动态图标的根标签定义。
<Icon version="1" frameRate="30" useVariableUpdater="DateTime.Second" width="168" height="168" screenWidth="1080" useVariableUpdater="" hideApplicationMessage="">
    <Image/>
    <Text/>
    <DateTime/>
    …
</Icon>
# 根标签属性说明
| 属性 | 类型 | 表达式/变量 | 释义 |
|---|---|---|---|
| frameRate | int | x/x | 指定帧率,如果动画缓慢,可以指定小一点的值,省电。默认为 30。 |
| screenWidth | int | x/x | 设定屏幕宽度标准。如果指定为 720,锁屏中所有元素的位置都按 720p 的布局编写,1080p、480p 等分辨率的手机会自动进行缩放。 如果指定为 1080,锁屏中所有元素的位置都按 1080px 的布局编写,示例: screenWidth="1080",在720和1080像素下,MAML会根据屏幕尺寸自动适配不同分辨率。 |
| displayDesktop | boolean | x/x | 默认为 false,透视到桌面,如果没有锁屏壁纸或者锁屏壁纸可以被移开或透明时可以看到桌面 launcher 或者是锁屏前的应用程序。(目前系统已不支持)。 |
| showSysWallpaper | boolean | x/x | 默认为 false,是否在锁屏界面显示桌面壁纸。开启后如果没有指定锁屏壁纸<Wallpaper/>,会将桌面壁纸作为锁屏的壁纸(目前系统已不支持)。 |
| useHardwareCanvas | boolean | x/x | 为支持硬件加速的设备开启硬件加速。MIUI13新增 |
| width | int | x/x | 指定图标的宽度,这里设置为168像素。 |
| height | int | x/x | 指定图标的高度,这里设置为168像素。 |
| hideApplicationMessage | boolean | x/x | 控制是否隐藏应用程序的通知标志。默认为false,表示不隐藏。如果设置为 "true",则会隐藏应用程序的通知标志。动态图标独有 |
| useVariableUpdater | string | x/x | DateTime.Minute |
以下是对根标签useVariableUpdater值的说明
- Battery(电量信息):
- 如果你设置了 useVariableUpdater="Battery",变量更新器将在电池状态发生变化时触发。
- DateTime.Day(天):
- 如果你设置了 useVariableUpdater="DateTime.Day",变量更新器将会每天触发一次。
- DateTime.Hour(小时):
- 如果你设置了 useVariableUpdater="DateTime.Hour",变量更新器将每小时的触发一次。
- DateTime.Minute(分钟):
- 如果你设置了 useVariableUpdater="DateTime.Minute",变量更新器将每分钟的触发一次。
- DateTime.Second(秒):
- 如果你设置了 useVariableUpdater="DateTime.Second",变量更新器将每秒触发一次。 useVariableUpdater可组合使用,例如useVariableUpdater="Battery,DateTime.Minute",请合理设置useVariableUpdater,以节省系统资源降低功耗。
# 机型适配
一份 manifest 文件,可以同时运行在多个设备,只需要设置好在不同尺寸或密度的设备上使用的资源和缩放比例就可以了。
- 资源适配:
extraResources="sw1000-den320:den320:1.2,sw1000-den320::1.2,sw1000-den320-large:den320:1.2"
sw1000-den320:den320:1.2 在屏宽是 1000 密度是 320 的机型上,使用的是 den320 文件夹下的资源,并且放大 1.2 倍;
sw1000-den320::1.2 在屏宽 1000 密度 320 的机型上,使用的是默认的资源,并且放大 1.2 倍)
extraResources="sw2000-den480:1.8,sw1000-den320-large:1.8 这两句话中间都是只有一个冒号,意思是 sw2000-den480 的机型使用的资源就是在 sw2000-den480 这一同名文件夹下的资源,并且放大 1.8 倍)
- 布局适配:
extraScales="sw1000-den320:1.2,sw2000-den480-large:1.8"
适配原理:
- 首先把你所有自定义中出现的 den 和 sw 做一个列表 (比如这里
extraResources="sw1440-den440::0.916, sw720-den320::0.667, sw480-den240::0.444,涉及到的 den 有 440, 320, 240, 再加上一个默认的 480; sw 有 1440, 720, 480, 再加一个默认的 1080(与 den480 对应) ) - 然后当你的主题放到一个设备上时,首先拿你的设备密度去上面的 den 列表中找,找到最贴近的一个,然后如果同样 den 有多个 sw,那么再拿设备的屏宽去这几个 sw 中找最贴近的一个,这样就找到了最合适的 swXXX-denXXX
- 最后,资源就取这个 sw-den 对应的目录下的资源,及缩放比例 Sr。代码中数字的缩放比例就使用 sw-den 对应的 Ss.
- 最最后,就是缩放比例
如果按密度缩放(即scaleByDensity="true"):   资源真正的缩放比例是Sr * 设备den / 找到的den,代码中的数字缩放比例是Ss * 设备den / 找到的den
如果按屏宽缩放(即scaleByDensity="false"):  资源真正的缩放比例是Sr * 设备sw / 找到的sw  ,代码中的数字缩放比例是Ss * 设备sw / 找到的sw
# 锁屏入门教程
看本篇教程之前,建议先看一下入门教程:锁屏入门 (opens new window)
# 变量
变量的值可以在运行期间被更改,注意字符串类型的变量用@引用,数值类型的用#号引用,例如@string、#number。
# 数据类型
| 类型 | 释义 |
|---|---|
| int | 整数数据类型,代表整数值,例如-2、0、1、100等。 |
| number | 数字数据类型,代表数字值,包括整数和浮点数。 |
| number[] | 数字数组数据类型,代表数字值,包括整数和浮点数。 |
| string | 字符串数据类型,代表一个字符序列,例如“hello”、“world”等。字符串通常由一系列字符组成,这些字符可以是字母、数字或符号。 |
| string[] | 字符串数组数据类型,代表一个字符序列,例如“hello”、“world”等。字符串通常由一系列字符组成,这些字符可以是字母、数字或符号。 |
| boolean | 布尔数据类型,只有两个值:true(真) 和 false(假)。它用于表示逻辑值,例如条件语句的结果或开关状态。 |
| float | 浮点数据类型 |
| float[] | 浮点数组数据类型 |
# 常规变量
<!-- (变量用 Var 开头) -->
<Var name="" expression="" type="" const="" threshold=""/>
| 代码 | 类型 | 表达式/变量 | 释义 |
|---|---|---|---|
| name | string | x/x | 自定义变量名 |
| expression | number/string | o/o | 变量对应的表达式或常量。注意:字符串常量需要多一套单引号 例如expression="'我是文字'" |
| type | number/string number[]/string[] float/float[] | x/x | 定义数值变量或字符串变量 默认:number |
| const | boolean | x/x | 为 true 时变量会在初始化后不会重新计算,但是可以使用命令重新赋值,合理的使用const可以提高运行效率。 |
| persist | boolean | x/x | 变量持久化。指定为 true 后,如果没有重新给定该变量其他的值,那么这个值会一直保存,无论解锁后重新锁定或者重新应用主题都不会还原;默认 false |
| threshold | number | x/x | 阈值触发,当变量值的变化超过设定的阈值时,可以触发一些命令。 |
# 数组变量
在变量的类型中加上 []来申明这是一个数组type="number[]" 数字类型数组; type="string[]" 文本类型数组;
可以把数组看作是一个盒子,里面可以存放一系列相同类型的数据,例如一组数字或一组字符串等。每个数据项都有一个对应的编号,这个编号称为数组的索引。
可以通过name[索引]的方式获取数组中的值,例如下方#numVar[2]的值是500,@strVar[0]的值是水瓶座。需要注意的是[]中的索引顺序是从左到右并且从0开始的
<!-- 数字类型 -->
<Var name="numVar" type="number[]" const="true" expression="" values="100,150,500,550,800,850"/>
<!-- 文本类型;注意:文本类型 必须要 包含 expression="''" 属性 -->
<Var name="strVar" type="string[]" const="true" expression="''" values="'水瓶座','双鱼座','白羊座','金牛座','双子座','巨蟹座','双子座','处女座','天秤座','天蝎座','射手座','摩羯座'"/>
# 小部件持久化变量
OS新增,请在小部件中使用
<!-- 定义持久化变量,支持number和string类型 -->
<Permanence name="a_number" expression="9999" type="number"/>
<Permanence name="a_string" expression="'九九九九'" type="string"/>
<!-- 修改变量 -->
<PermanenceCommand name="a_number" expression="1111" requestUpdate="true" type="number" />
<PermanenceCommand name="a_string" expression="'一一一一'" requestUpdate="true" type="string" />
# 全局变量
触摸
| 变量名 | 描述 |
|---|---|
| #touch_x | 当前触摸点的 x 坐标 |
| #touch_y | 当前触摸点的 y 坐标 |
| #touch_begin_x | 按下屏幕时的初始 x 坐标 |
| #touch_begin_y | 按下屏幕时的初始 y 坐标 |
| #touch_begin_time | 按下屏幕时的时间 |
屏幕
| 变量名 | 描述 |
|---|---|
| #screen_width | 屏幕宽度 |
| #screen_height | 屏幕高度 |
| #view_width | 部件宽度(各插件中才使用,比如时钟) |
| #view_height | 部件高度 |
| #raw_screen_width | 物理宽度(当前设备的屏幕分辨率,不受根节点screenWidth的影响) |
| #raw_screen_height | 物理高度 |
| #view_x | 部件首次添加位置x |
| #view_y | 部件首次添加位置y |
| #wallpaper_offset_pixel_x | 屏幕偏移的像素数 (0 ~ -1*屏幕宽)。MIUI13以下版本支持 |
| #wallpaper_offset_x | 屏幕偏移百分比 (0 ~ 1.0)。MIUI13以下版本支持 |
日期
| 变量名 | 描述 |
|---|---|
| #time | 当前时间,long |
| #time_sys | 系统时间毫秒数 |
| #year | 年份 |
| #month | 月份(取值范围是 0~11,0表示一月,1表示二月,以此类推) |
| #month1 | 月份(取值范围是 1~12,1表示一月,2表示二月,以此类推) |
| #date | 日期(取值范围是 1~31,1表示1日,2表示2日,以此类推) |
| #day_of_week-1 | 星期(0表示星期日,1表示星期一,2表示星期二 ... 6表示星期六) |
| #hour12 | 12小时制 |
| #hour24 | 24小时制 |
| #minute | 分钟 |
| #second | 秒 |
| #ampm | 0:上午,1:下午 |
| #time_format | 0:12小时制,1:24小时制 |
农历
| 变量名 | 描述 |
|---|---|
| #year_lunar | 农历年份 |
| #year_lunar1864 | 用来计算天干地支 |
| #month_lunar | 农历月份(从0开始计) |
| #month_lunar_leap | 是否润月,0表示不是,1表示是 |
| #date_lunar | 农历日期(从1开始计) |
充电
| 变量名 | 描述 |
|---|---|
| #battery_level | 当前电量,取值范围1~100 |
| #battery_state | 电池状态,0表示正常,1表示充电,2表示电量低,3表示已充满 |
| #ChargeSpeed | 充电速度,0表示普通充电,1表示快充,2表示超级快充,3表示极速秒充(120w±)(MIUI 11 开发版支持) |
| #ChargeWireState | 充电方式,11表示有线充电,10表示无线充电,-1表示未充电(MIUI 11 开发版支持) |
图片
下面imageName需要替换成你自己图片标签的name,
例如你有一个<Image name="img" />,你在使用的时候就需要把imageName换成img
| 变量名 | 描述 |
|---|---|
| #imageName.actual_x | 图片实时位置的 x 坐标(获取(name="imageName")图片实时位置的 x 坐标) |
| #imageName.actual_y | 图片实时位置的 y 坐标 |
| #imageNmae.actual_w | 图片显示宽度(获取(name="imageName")图片实时宽度) |
| #imageNmae.actual_h | 图片显示高度 |
| #imageNmae.bmp_width | 图片文件的宽度(不受裁切、缩放的影响,只根据 src 找到指定的图片,并检测该文件的宽度) |
| #imageNmae.bmp_height | 图片文件的高度 |
文本
下面textName需要替换成你自己文本标签的name,
例如你有一个<Text name="aa" />,你在使用的时候就需要把textName换成aa
| 变量名 | 描述 |
|---|---|
| #textName.text_width | 文本宽度 |
| #textName.text_height | 文本高度 |
音乐
下面musicName需要替换成你自己音乐标签的name,
例如你有一个<MusicControl name="music" />,你在使用的时候就需要把musicName换成music
| 变量名 | 描述 |
|---|---|
| #musicName.music_state | 音乐当前播放状态:0暂停,1播放(musicName 是你为音乐模块定义的名称) |
| #musicName.user_rating_style | 播放源是否是系统默认音乐APP:0不是,1是 |
| @musicName.package | 当前播放源包名 |
| @musicName.class | 当前播放源类名 |
解锁
| 变量名 | 描述 |
|---|---|
| #unlocker.move_x | 解锁部件在 x 方向的偏移 |
| #unlocker.move_y | 解锁部件在 y 方向的偏移 |
| #unlocker.move_dist | 解锁部件移动的距离 |
| #unlocker.state | 解锁部件的状态:0表示正常,1表示按下,2表示已达到解锁状态 |
屏下指纹
| 变量名 | 描述 |
|---|---|
| #fod_enable | 系统是否启用了屏下指纹:0 关闭, 1 开启 |
| #fod_x | 指纹区域 x 坐标 |
| #fod_y | 指纹区域 y 坐标 |
| #fod_width | 指纹区域宽度 |
| #fod_height | 指纹区域高度 |
| #fod_state_msg | 指纹状态:1 手指按下,2 手指抬起,3 识别失败,4 识别成功 |
深色模式
| 变量名 | 描述 |
|---|---|
| #__darkmode_wallpaper | 是否开启深色模式且支持调暗壁纸:0 未开启,1 已开启 |
| #__darkmode | 是否开启深色模式:0 未开启,1 开启 |
| #applied_light_wallpaper | 壁纸主色调,仅在桌面时钟生效:0 深色,1 浅色 (有 miwallpaper 模块时不生效) |
其他
| 变量名 | 描述 |
|---|---|
| #sms_unread_count | 未读短信数 |
| #call_missed_count | 未接电话数 |
| @next_alarm_time | 下一个闹钟时间 |
| #volume_level | 现在音量 |
| #volume_level_old | 调节之前的音量,取值:1-15,根据二者比较判断是增大还是减小 |
| #volume_type | 音量类型:0 通话音量、1 系统音量、2 电话铃声、短信铃声、3 音乐播放器音量、4 闹钟音量、5 通知音量、6 连接蓝牙时的通话音量、7 在某些国家强制的系统音量、8 DTMF音量、9 TTS音量、10 FM音量,注意:一般锁屏下只能调3(音量播放器音量)。volume_type>=0 表示正在调节音量,调节完毕后值为-1,可根据这个显示或隐藏音量显示 |
| #frame_rate | 当前屏幕帧率 |
| @__miui_version_code | MIUI版本(MIUI9=6,MIUI10=8,MIUI11=9,MIUI12=10) |
# 运算符
| 操作符 | 优先级 | 释义 |
|---|---|---|
| + | 4 | 加 |
| - | 4 | 减 |
| * | 3 | 乘以 |
| / | 3 | 除以 |
| % | 3 | 取模(这里不是百分比,是取模,注意两者的区别) |
| ^ | 10 | 按位进行异或运算 |
| ~ | 2 | 按位进行取反运算 |
| {{ | 5 | 左移位运算符 |
| }} | 5 | 右移位运算符 |
| ! | 2 | 逻辑非,相当于以前的 not |
| == | 7 | 等于 |
| != | 7 | 不等于 |
| ** | 11 | 与,必须同时满足才为真 |
| || | 12 | 或,两个条件满足其中一个就为真 |
| } | 6 | 大于 |
| }= | 6 | 大于等于 |
| { | 6 | 小于 |
| {= | 6 | 小于等于 |
下面表格中的:eq、ne、ge、gt、le、lt、not 等为旧条件判断,目前 MIUI11 与 MIUI12 都已支持上面新表达式条件判断,建议使用新的方式。
| 参数 | 释义 |
|---|---|
| eq(x, y) | x==y(x 等于 y,结果为 1,否则为 0) |
| ne(x, y) | x!=y(x 不等于 y,结果为 1,否则为 0) |
| ge(x, y) | x>=y(x 大于等于 y,结果为 1,否则为 0) |
| gt(x, y) | x>y(x 大于 y,结果为 1,否则为 0) |
| le(x, y) | x<=y(x 小于等于 y,结果为 1,否则为 0) |
| lt(x, y) | x<y(x 小于 y,结果为 1,否则为 0) |
| not(x) | 逻辑非;x=0,not(x) 结果为 1;x=1,not(x) 结果为 0 |
| ifelse(x, y, z) | x>0(如果 x 大于 0,则结果为 y;否则取值 z) |
| ifelse(x1, y1, x2, y2, ... , z) | 如果 x1 大于 0,则结果为 y1;否则检测 x2,如果 x2 大于 0,则为 y2,以此类推,到最后才取 z |
| + | 可以拼接字符串;'qwe'+'asd' 结果为 'qweasd' |
| eqs(@string1, @string2) | 字符串比较函数,如:@string1 和 @string2 结果一致时,eqs(@string1, @string2) 结果为 1 ,否则为 0 |
<!--示列1:#num != #num-1-->
<Iamge src="icon.png" visibility="#num != #show"/>
<Iamge src="icon.png" visibility="ne(#num,#show)"/>
<!--示列2:#num ** #num-1-->
<Iamge src="icon.png" visibility="#num ** #show"/>
<!--示列3:#num == #num-1-->
<Iamge src="icon.png" visibility="#num == #show"/>
<Iamge src="icon.png" visibility="eq(#num,#show)"/>
# 内置函数
| 函数 | 作用 |
|---|---|
| sin(x) | 返回角度 x(弧度制)的正弦值 |
| cos(x) | 返回角度 x(弧度制)的余弦值 |
| tan(x) | 返回角度 x(弧度制)的正切值 |
| asin(x) | 返回 x 的反正弦值,结果在 -π/2 到 π/2 之间 |
| acos(x) | 返回 x 的反余弦值,结果在 0 到 π 之间 |
| atan(x) | 返回 x 的反正切值,结果在 -π/2 到 π/2 之间 |
| sinh(x) | 返回 x 的双曲正弦值 |
| cosh(x) | 返回 x 的双曲余弦值 |
| sqrt(x) | 返回 x 的平方根 |
| abs(x) | 返回 x 的绝对值 |
| min(x, y) | 返回 x 和 y 中的较小值 |
| max(x, y) | 返回 x 和 y 中的较大值 |
| pow(x, y) | 返回 x 的 y 次幂 |
| len(数字) | 获取变量和字符串位数 |
| digit(数字, 第几位) | 取给定数字的第几位 digit(12345, 2) = 4 (注意:原数字位数不能超过 10 位,下标从右向左,并且从 1 开始) |
| substr(原字符串,字串开始位置,字串长度) | substr('今天真热啊',1,2) = '天真'(注意:字符位置是从左至右,并从 0 开始) |
| strIsEmpty(字符串变量) | 判断字符串变量是否为空 strIsEmpty(@abc) 为空则为 1,不为空则为 0 |
| isnull(数字型变量) | 判断变量是否为空 isnull(#abc) 为空则为 1,不为空则为 0 |
| ceil() | 向上取整;如:6.1 或者 6.99 都取值为 7 |
| int() | 向下取整;如:6.1 或者 6.99 都取值为 6 |
| round() | 四舍五入取整 |
| rand() | 取 0 到 1 之间的随机数;如果需要随机生成 0-100 随机数,可以这样写 rand()*100 |
| formatDate('string',#time_sys) | 日期格式化成字符串;'string' 写作 'HH:mm' |
| strStartsWith('123456789','12') | 判断字符串是否是某字符串开头,是则为 1,不是则为 0 |
| strEndsWith('123456789','89') | 判断字符串是否是某字符串结束,是则为 1,不是则为 0 |
| strIndexOf(@string_a,'string_b') | 字符 string_b 第一次出现在字符串@string_a 中的位置 如: strIndexOf('string','str')=0 |
| strLastIndexOf(@string_a,'string_b') | 字符 string_b 最后出现在字符串@string_a 中的位置 如:strLastIndexOf('starina','a')=6 |
| strContains(@string_a,'string_b') | 字符串@string_a 是否包含字符 string_b 如: strContains('string','str')=1或(true) |
| strReplaceAll(@string_a,'string_b','string_c') | 用 string_c 替换@string_a 中所有的 string_b (strReplaceAll('abc','a','1')='1bc' ,支持正则表达式。 |
| preciseeval('@string_a',3) | 计算字符串的值,并精确到小数点后 3 位,如:preciseeval('5*5+0.333',3)==25.333 ,小数点后位数最小为1 |
| eval('1+2') | 计算字符串的值,需要注意处理浮点数时存在精度问题。 |
| formatFloat('%.3f',#accx) | 格式化小数点后几位,并转换成字符串(%.3f 代表四舍五入到小数点后 3 位)与preciseeval不同的是,formatFloat会占位,例如3.000 |
| strMatches(@str,'.[\+/-]$') | 正则表达式 |
| strTrim(' 123 ') | 裁切字符串的开头和尾部的空格、制表、回车符('123') |
| strReplaceFirst('ABCdefABC','ABC','666') | 替换第一个;666defABC |
| strToLowerCase('ABCdef') | 转换成小写;abcdef |
| strToUpperCase('ABCdef') | 转换成大写;ABCDEF |
| diffDate(目标时间ms,当前时间ms,重复类型) | 计算目标时间和当前时间差了多少天。重复类型:默认0,可选 0:不重复、1:年、2:月、3:周。MIUI14新增函数 小部件使用 |
# JSON数据支持
MAML新增对JSON数据处理 MIUI14新增 小部件使用
| 函数 | 描述 |
|---|---|
| jsonGetString(JSONObject, String) | 接受 JSON 对象和字符串键,返回指定键的字符串值。 |
| jsonGetBoolean(JSONObject, String) | 接受 JSON 对象和字符串键,返回指定键的布尔值,可能是 1 或 0。 |
| jsonGetInt(JSONObject, String) | 接受 JSON 对象和字符串键,返回指定键的整数值。 |
| jsonGetObject(JSONObject, String) | 接受 JSON 对象和字符串键,返回指定键的 JSON 对象。 |
| jsonGetArray(JSONObject, String) | 接受 JSON 对象和字符串键,返回指定键的 JSON 数组。 |
| jsonArrayGetIndex(JSONArray, int) | 接受 JSON 数组和整数索引,返回 JSON 数组中指定索引位置的 JSON 对象。 |
| newJsonObject() | 创建一个新的空 JSON 对象。 |
| newJsonArray() | 创建一个新的空 JSON 数组。 |
| getJsonArrayLength(JSONArray) | 接受 JSON 数组,返回 JSON 数组的长度。 |
| jsonObjectEquals(JSONObject, JSONObject) | 接受两个 JSON 对象,如果相等返回 1,否则返回 0。 |
| strToJson(String) | 接受字符串,将字符串解析为 JSON 对象。 |
| jsonToStr(JSONObject) | 接受 JSON 对象,将 JSON 对象转换为字符串。 |
| isJsonObject(Object) | 接受对象,如果是 JSON 对象返回 1,否则返回 0。 |
| isJsonArray(Object) | 接受对象,如果是 JSON 数组返回 1,否则返回 0。 |
<!-- 定义 JSON 数据变量,或从接口获取,自定义数据 记得把双引号 " 转译为" -->
<Var name="json_data" expression="'{"img_path": [{ "path": "Sep/img.png" }]}'"type="string" />
<Button x="0" y="0" w="#view_width" h="#view_height">
<Triggers>
<Trigger action="up">
<!-- 将 JSON 字符串解析为对象 -->
<VariableCommand name="dataToJson" expression="strToJson(@json_data)" type="jsonO" />
<!-- 从 JSON 对象中提取 img_path 数组 -->
<VariableCommand name="data" type="jsonA" expression="jsonGetArray($dataToJson,'img_path')" />
<!-- 获取 img_path 数组的长度 -->
<VariableCommand name="imgPathLength" type="number" expression="getJsonArrayLength($$data)" />
<!-- 提取指定索引位置的图像路径字符串 -->
<VariableCommand name="img_path_str" type="string" expression="jsonGetString(jsonArrayGetIndex($$data, 0), 'path')" />
</Trigger>
</Triggers>
</Button>
<Group name="debug" visibility="1">
<Text x="10" y="050" color="#ff0000" size="25" fontFamily="mipro-bold" textExp="'#imgPathLength ='+#imgPathLength" />
<Text x="10" y="080" color="#ff0000" size="25" fontFamily="mipro-bold" textExp="'@img_path_str ='+@img_path_str" />
</Group>
# 阈值
可以将阈值想象成一个界限,当某个值超过或达到这个界限时,就会触发某种事件或行动,下面是两个例子
<!-- #number的值变化1时,就会执行<Trigger/>里面的所有命令。具体变化多少由threshold的值决定。 -->
<Var name="time3" expression="#number" threshold="1">
     <Trigger>
        ...
     </Trigger>
</Var>

<!-- 字符串@string变化时,就会执行<Trigger/>里面的所有命令。 -->
<Var name="time3" expression="@string" >
     <Trigger>
        ...
     </Trigger>
</Var>
# 锁屏元素
# 锁屏添加壁纸
Wallpaper 元素引用系统设置的壁纸,除了不能指定图片源外其他和 Image 元素相同,可以有动画和其他属性控制。如果没有此元素则不显示壁纸。可以有多个。
示例:
<Wallpaper/>
<Wallpaper x="#screen_width/2" y="#screen_height/2" align="center" alignV="center" blur="100" alpha="255*#defaultScreen_x/2"/>
# 锁屏添加文字
<Text x="50" y="500" color="#ffffff" size="48" text="hello,world!" />
color           支持16进制颜色值:#FFFFFF;支持字符串变量,如:@abc;支持函数argb(255,255,255,255)
size            文字大小
text            文字内容
# 锁屏插入图片
<Image x="0" y="0" src="lock_bg.jpg" />
src 图片名称路径
元素相关内容详解
<Text x="50" y="500" align="center" alignV="center" color="#ffffff" size="48" text="hello,world!" alpha="255*0.8" visibility="1" />
<Image x="0" y="0" w="512" h="512" align="center" alignV="center" src="lock_bg.jpg" alpha="255*0.8" visibility="1" />
x y             相对于屏幕左上角的坐标
h w             宽和高(这个不用解释了吧)
align           坐标点水平对齐方式left, center, right
alignV          坐标点垂直对齐方式top, center, bottom
alpha           透明度0-255,小于等于0不显示
visibility      支持表达式,大于0时显示
时间、日期
<!--图片类写法-->
<Time x="540" y="400" align="center" alignV="center" src="time.png" space="0" format="HH:mm"/>
<!--文本类写法-->
<DateTime x="540" y="400" align="center" alignV="center" size="200" color="#ffffff" formatExp="ifelse(#time_format,'HH:mm','h:mm')" fontFamily="miui-thin" />
space           图片的间隙,可以使用这个功能来对时间图片进行排版,支持正负值
format          标准日期格式;时间类型为图片时,可以不写,默认跟随系统 是否为显示 24小时制
formatExp       日期表达式格式
fontFamily      指定字体,可使用的字体在后面“可调用字体预览”中
# 锁屏添加解锁
用 Button 滑动一段距离来解锁
虽然代码量比 Unlocker 要多,但其实它比 Unlocker 更加简单和容易理解一些,并且对之后的扩展带来可能性,比如做 左右滑动与上滑解锁 不冲突的手势。
<!--解锁文字提示-->
<Text x="#screen_width/2" y="#screen_height-100-#unlockMove" align="center" alignV="center" color="#ffffff" size="42" text="向上滑动解锁"/>
<!--解锁相关 变量、动画、按钮-->
<Group name="Unlock" >
    <!--实时变量-->
    <Var name="unlockMove" expression="ifelse(#unlockDown==1,max(#touch_begin_y-#touch_y,0),max(#touch_begin_y-#touch_y,0) { 300,max(#touch_begin_y-#touch_y,0)*(1-#unlockBack),0)" />
    <!--动画-->
    <Var name="unlockBack">
        <VariableAnimation initPause="true" loop="false">
            <Item value="0" time="0" easeType="BounceEaseOut" />
            <Item value="1" time="300" />
        </VariableAnimation>
    </Var>
    <!--解锁按钮-->
    <Button w="#screen_width" h="#screen_height" >
        <Triggers>
            <Trigger action="down">
                <VariableCommand name="unlockDown" expression="1"/>
            </Trigger>
            <Trigger action="up,cancel">
                <VariableCommand name="unlockDown" expression="0" />
                <Command target="unlockBack.animation" value="play" />
                <!--condition 执行条件,当 max(#touch_begin_y-#touch_y,0) 大于等于 300px 时 unlock-->
                <ExternCommand command="unlock" condition="max(#touch_begin_y-#touch_y,0) }= 300" />
            </Trigger>
        </Triggers>
    </Button>
</Group>
看不明白这个解锁?没关系,下一章详细介绍了 按钮 的各种用途和写法。这里还用到了一些变量,不明白的变量可以先简单阅读下全局变量
Unlocker 与 Slider
Unlocker 与 Slider 的用法是一样的,都是通过滑动来激活某些操作,只不过 Unlocker 能直接解锁, Slider 需要加入解锁命令。点击这里查看更加详细的介绍
<!--解锁文字提示-->
<Text x="#screen_width/2" y="#screen_height-100-#Unlocker.move_dist" align="center" alignV="center" color="#ffffff" size="42" text="向上滑动解锁"/>
<!--name="Unlocker" 解锁名称-->
<Unlocker name="Unlocker">
    <!--触摸开始区域-->
    <StartPoint x="0" y="0" w="1080" h="#screen_height" />
    <!--达到解锁区域,注意写坐标位置-->
    <EndPoint x="0" y="-#screen_height" w="1080" h="#screen_height-200">
        <Path tolerance="800">
            <!--解锁路径-->
            <Position x="0" y="0" />
            <Position x="0" y="-#screen_height" />
        </Path>
    </EndPoint>
</Unlocker>
MAML 练习题:试着把下列简单锁屏做出来

# 文本
Text 标签
<Text x="50" y="500" align="center" alignV="center" color="#ffffff" size="48" textExp="'hello,world!'"/>
| 属性 | 类型 | 表达式/变量 | 释义 |
|---|---|---|---|
| x | number | o/o | 相对于屏幕左上角的坐标 |
| y | number | o/o | 相对于屏幕左上角的坐标 |
| color | string | x/o | 文字颜色,支持常量:#ffffff;支持字符串变量,@abc;支持函数 argb(255,255,255,255)(argb(透明度,红,绿,蓝) ,不支持表达式。 |
| size | number | o/o | 文字大小 |
| bold | boolean | x/x | 粗体,true 表示加粗 |
| format | string/numbe | x/x | paras中变量是数字类型用%d,是字符串类型用%s |
| paras | string/number | o/o | 如果指定了 format , 需要在 paras 里指定 %d和%s 对应的变量表达式, 可以有多个变量表达式用"," 隔开 |
| text | string/number | x/x | 文字显示内容,后续带有 Exp 的参数,都表示该参数支持 表达式 |
| textExp | string/number | o/o | 文字显示内容表达式,可以直接调用变量等,示例:“现在时间是 9 点”,可以写成 textExp="'现在时间是'+#hour12+'点'" |
| width | number | o/o | 文字宽度,当文字超过指定宽度时会被切掉。如果指定了多行显示,则会折行显示。如果指定了文字滚动,则会在指定的位置滚动显示文字 |
| marqueeSpeed | number | x/x | 文字滚动速度,配合上面的宽度使用 marqueeSpeed="30" |
| marqueeGap | number | x/x | 滚动间隔。当文字显示完后再次出现的间隔,默认为四个汉字的宽度 |
| rotation | number | o/o | 旋转角度 |
| multiLine | boolean | x/x | true/false 是否支持多行显示,默认 false。开启后支持换行符( 和\n) |
| spacingMult | number | x/x | 行距倍数 默认 1 |
| spacingMultExp | number | o/o | 行距倍数 默认 1 ,支持表达式,变量 |
| spacingAdd | number | x/x | 行距增加量 默认 0 |
| spacingAddExp | number | o/o | 行距增加量 默认 0,支持表达式,变量 |
| shadowDx | number | x/x | 水平方向的阴影相对文字的偏移距离 |
| shadowDy | number | x/x | 竖直方向的阴影相对文字的偏移距离 |
| shadowRadius | number | x/x | 阴影的模糊半径,可以实现模糊的阴影效果 |
| align | string | x/x | 坐标点水平对齐方式 left, center, right |
| alignV | string | x/x | 坐标点垂直对齐方式 top, center, bottom |
| shadowColor | string | x/o | 阴影的颜色,支持透明度 |
| alpha | number | o/o | 不透明度 0 - 255 |
| visibility | number/string | o/o | 元素可见性支持 表达式 {=0 不可见,}0 可见 |
| text.text_width | number | x/x | 某行文本的宽度,可以用来排版 |
| text.text_height | number | x/x | 某行文本的高度,可以用来排版 |
| fontFamily | string | x/x | 支持指定系统字体;可查看: 可调用字体预览 |
注意: textExp中直接显示文字需要用单引号包裹,例如
textExp="'hello,world!'"textExp中使用string变量,需要用@引用,例如textExp="@变量名"。使用number,int,float变量,需要用#引用,例如textExp="#变量名"alpha值可以写一个简单的表达式,例如:alpha="255 * 0.8" 或 alpha="2.55 * 80",这表示80%的不透明度。 visibility: 在设置 visibility(可见性)时,支持表达式,其中 {=0 表示不可见,}0 表示可见。即使值为很小的数字(例如0.00001),仍然被视为可见。
几个文字标签实例:
文字阴影
<Text shadowDx="3" shadowDy="4" shadowRadius="6" shadowColor="#9c000000" .../>

显示下一个闹钟时间
<Text text="@next_alarm_time" .../>
<Text format="下一个闹钟:[%s] 电池:[%d%%]" paras="@next_alarm_time,#battery_level"/>

显示当前时间,#hour12 为系统全局变量
<Text x="50" y="500"  color="#ffffff" size="48" textExp="'现在时间是'+#hour12+'点'"/>

显示当前温度,#weather_temperature 为天气接口获取到的当前温度
<Text x="50" y="500"  color="#ffffff" size="48" textExp="'当前温度'+#weather_temperature+'°'"/>

文字超过设定宽度滚动
<Text x="50" y="500" w="300" color="#ffffff" size="50" marqueeSpeed="30" text="永远相信美好的事情即将发生"/>
# 可调用字体预览
| Mitype:仅支持数字类型 | 样式 | 小米兰亭Pro:支持中文/英文/数字类型 | 样式 |
|---|---|---|---|
| mitype-thin | 0123456789:%+-×÷ | mipro-thin | 0123456789:%+-×÷ |
| mitype-extralight | 0123456789:%+-×÷ | mipro-extralight | 0123456789:%+-×÷ |
| mitype-light | 0123456789:%+-×÷ | mipro-light | 0123456789:%+-×÷ |
| mitype-normal | 0123456789:%+-×÷ | mipro-normal | 0123456789:%+-×÷ |
| mitype-regular | 0123456789:%+-×÷ | mipro-regular | 0123456789:%+-×÷ |
| mitype-medium | 0123456789:%+-×÷ | mipro-medium | 0123456789:%+-×÷ |
| mitype-demibold | 0123456789:%+-×÷ | mipro-demibold | 0123456789:%+-×÷ |
| mitype-semibold | 0123456789:%+-×÷ | mipro-semibold | 0123456789:%+-×÷ |
| mitype-bold | 0123456789:%+-×÷ | mipro-bold | 0123456789:%+-×÷ |
| mitype-heavy | 0123456789:%+-×÷ | mipro-heavy | 0123456789:%+-×÷ |
# 时间日期
时间
这里说的时间,其实是由 10 个数字图片加“:”号图片依时间格式组成的图片组合。
<!--图片类写法-->
<Time x="540" y="400" align="center" alignV="center" src="time.png" space="0" format="HH:mm"/>
<!--文本类写法-->
<DateTime x="540" y="400" align="center" alignV="center" size="200" color="#ffffff" formatExp="ifelse(#time_format,'HH:mm','h:mm')" fontFamily="mitype-light" />
src 表示时间图片的前缀,如下表示使用 time_0.png, time_1.png, ... time_9.png, time_dot.png 坐标属性支持变量表达式 space 表示时间图片的间隙,我们可以使用这个功能来对时间图片进行排版,使用正值时图片间距变大,这时可以将图片切小,节省内存。对于有投影的图片,将 space 写成负值,可以使投影重叠以节省空间
# 日期格式
显示指定格式的日期:
    formatExp:  支持日期表达式格式(formatExp="ifelse(#time_format,'HH:mm','h:mm')")
    format:     支持标准日期格式(format="HH:mm")
Text 与 DateTime 的区别
DateTime 主要用于快速格式化显示时间,支持 Text 的所有参数,DateTime 直接用下列参数显示不同的时间参数。
| 代码 | 释义 | 示例可能出现的结果 |
|---|---|---|
| A | 十二生肖年 | 鼠、牛、羊 |
| G | 公元 | 公元 |
| Y | 汉字年(农历) | 二〇一五 |
| YY | 干支年 | 甲子 |
| yy | 数字年(2 位) | 20 |
| yyyy | 数字年 | 2020 |
| M | 月 | 1 |
| MM | 月( 1 - 9 月加 0) | 01 |
| MMM | 月(汉字) | 九 |
| MMMM | 完整月(汉字) | 九月 |
| N | 农历月 | 正,二,三 |
| NN | 干支月 | 乙丑 |
| NNNN | 农历完整日期+节气 | 八月廿八 秋分(只适用于DateTime) |
| D | 一年中的第几天 | 168 |
| d | 数字日 | 23 |
| e | 农历日 | 初三 |
| ee | 干支日 | 丙寅 |
| t | 二十四节气 | 冬至 |
| E | 星期 | 周三 |
| EEEE | 星期 | 星期三 |
| EEEEE | 星期 | 三 |
| H | 24 小时制 | 0~23 |
| h | 12 小时制 | 0~12 |
| HH | 24 小时制(两位) | 18 |
| hh | 12 小时制(两位) | 06 |
| I | 时辰地支 | 酉 |
| II | 时辰地支 | 丁酉 |
| m | 分钟 | 6 |
| mm | 分钟(两位) | 06 |
| s | 秒 | 6 |
| ss | 秒(两位) | 06 |
| S | 毫秒 | 666 |
| a | 上下午 | 上午,下午 |
| aa | 上下午(详细) | 上午,下午,傍晚,凌晨,晚上 |
| Z/ZZ/ZZZ | 时区 | +0800 |
| ZZZZ | 时区 | GMT+08:00 |
| ZZZZZ | 时区 | 08:00 |
| zzzz | 时区 | 中国标准时间 |
DateTime 实例 DateTime 可指定 value 值,当不指定时默认以当前时间戳来计算时间,当指定时间戳时,会按照指定的时间戳来计算时间
<!-- 二〇一五年八月初十23时42分(农历) -->
<DateTime x="20" y="450" color="#000000" size="40" format="Y年N月eH时m分" />
<!-- 今天日期:2020年09月15日 -->
<DateTime x="540" y="400" align="center" alignV="center" size="200" color="#ffffff" formatExp="'今天日期:yyyy年MM月dd日'"  />
<!-- 指定时间戳 -->
<DateTime x="540" y="400" align="center" alignV="center" size="200" color="#ffffff" formatExp="'明天日期:yyyy年MM月dd日'" value="#time_sys+86400000" />
# 图片
图片部件用来在锁屏界面上显示一个图片,可以指定各种属性
# 常规图片
<Image x="" y="" w="" h="" pivotX="" pivotY="" rotation="" src="" srcid="" alpha="" align="" antiAlias="" visibility=""/>
<Image x="" y="" w="" h="" pivotX="" pivotY="" pivotZ="" rotationX="" rotationY="" rotationZ="" src="" />
| 属性 | 类型 | 表达式/变量 | 释义 |
|---|---|---|---|
| x,y | number | o/o | 相对于屏幕左上角的坐标 |
| w,h | number | o/o | 宽和高 |
| pivotX,pivotY,pivotZ | number | o/o | 旋转中心 |
| rotation | number | o/o | 旋转角度,一周 360 度 |
| rotationX | number | o/o | X 轴旋转角度,一周 360 度 |
| rotationY | number | o/o | Y 轴旋转角度,一周 360 度 |
| rotationZ | number | o/o | Z 轴旋转角度,一周 360 度 |
| scale | number | o/o | 缩放 |
| scaleX | number | o/o | X 轴缩放0~1 |
| scaleY | number | o/o | Y 轴缩放0~1 |
| src | string | x/x | 图片名称路径 |
| srcX | int | o/o | 表示源图像中被提取的区域的左上角在 X 轴上的坐标 |
| srcY | int | o/o | 表示源图像中被提取的区域的左上角在 Y 轴上的坐标。 |
| srcW | int | o/o | 表示从源图像中提取的区域的宽度 |
| srcH | int | o/o | 表示从源图像中提取的区域的高度 |
| srcid | number/string | o/o | 图片序列后缀数字,一般用变量表示,可以根据变量显示不同的图片,如果 src="pic.png" srcid="1"则最后会显示图片"pic_1.png" |
| alpha | number | o/o | 透明度 0-255,小于等于 0 不显示 |
| antiAlias | boolean | x/x | true/false 抗锯齿,如果为 true 图片在变形旋转时不会有锯齿,但是速度会慢 |
| srcExp | number/string | o/o | 图片源表达式 |
| srcFormat | string | x/x | 图片源格式 srcParas中是number类型用%d,是string类型用%s |
| srcForamtExp | number/string | o/o | 图片源格式表达式 |
| srcParas | number/string | o/o | 图片源参数,多个参数用,分隔 |
| visibility | number | o/o | 支持表达式,大于 0 时则显示 |
| align/alignV | string | x/x | 对齐方式 |
| blur | int | x/x | 高斯模糊,切记值一定要小,不然会卡死 |
| useVirtualScreen | boolean | x/x | 启用虚拟屏幕,搭配VirtualScreen使用 |
| loadAsync | boolean | x/x | 异步加载 ,false:图片加载完成后执行(加载大型资源时很耗时,若aod序列帧动画卡顿可以尝试设为false)、true:执行过程中同步加载图片 |
| tint | string | x/o | 色调(染色);tint="#ffff0000" MIUI12 新增 支持变量不支持表达式。 |
| tintmode | int | o/o | 色调(染色)混合模式,需要与tint一起使用,效果同图片混合xfermodeNum一致。默认tintmode="5" MIUI12 新增 |
| cornerRadius | number | x/x | 图片圆角MIUI14新增 小部件使用 |
| cornerRadiusExp | number | o/o | 图片圆角表达式MIUI14新增 小部件使用 |
图片的几个应用实例:
<Image x="300" y="100" align="center" srcExp="'weather/weather_' + #weather_id + '.png'"/>

<Image x="300" y="100" align="center" src="weather/weather.png" srcid="#weather_id"/>

<!-- 获取app图标 srcExp="'应用包名,应用类名'" -->
<Image name="AppIcon" srcType="ApplicationIcon" srcExp="'string,string'" />
<!-- 获取设置图标 -->
<Image name="AppIcon" srcType="ApplicationIcon" srcExp="'com.android.settings,com.android.settings.MainSettings'" />
上面两个代码效果相同,都会读取 weather 目录下 weather_ 对应数字的 png 文件,例如 #weather_id 传递过来的数字是 3,则会读取 weather 目录下的 weather_3.png 这张图片,可以用来根据不同的天气显示对应图标等,天气数据的获取后面会讲到。srcid 引用图片序列时,图片必须命名为类似 pic_0.png pic_1.png 这样的格式,srcExp 则直接拼接图片的路径,srcExp 可以和 srcid 一起使用,如
<Image x="210" y="100" align="center" srcExp="'weather/'+#hour24}10+'/weather.png'" srcid="#weather_id"/>
#hour24}13 表示当前小时数(24 小时制,后面全局变量会讲到)大于 13 点时条件成立,输出值为 1,引用 weather/1/ 这个目录下的 weather_xx.png 的序列图片,当时间小于等于 13 点时 #hour24}13 条件不成立,输出值为 0,此时引用 weather/0/ 这个目录下的 weather_xx.png 的序列图片,可以用来判断不同时间段显示不同的图片,比如白天或者晚上显示不同的图片你可以这样写
<Image x="300" y="100" align="center" srcExp="'weather/'+#hour24}=6**#hour24{18+'/weather.png'" srcid="#weather_id"/>
表示从时间大于等于 6 点且小于 18 点时显示 weather/1/ 目录下的图片,其他时间则显示 weather/0/目录下的图片,当然你也可以用其他变量来代替 #hour24}=6**#hour24{18 的判断,后面会讲到变量及表达式的使用
# 数字图片映射
<!-- 继承Image标签属性 -->
<ImageNumber number="" src=""/>
| 属性 | 变量/表达式 | 释义 |
|---|---|---|
| number | o/o | 要显示的数字表达式 |
| space | o/x | 显示间隔 |
如果 src="number.png" 则会使用 number_0.png number_1.png ... 图片文件来绘制数字。
# 文本图片映射
简单说就是把图片拼接在一起显示;比如需要用图片显示 '2019.03.27'或者 'Wednesday 03.27' 时,之前用 ImageNumber 或者是 Time 控件都有缺陷,要么不能显示长字符,要么不能显示两个 '.',用 ImageChars 可以完美解决这个问题。
<!-- 继承Image标签属性 -->
<ImageChars x="540" y="300" align="center" alignV="center" src="num/string.png" string="formatDate('HH:mm MM.dd',#time_sys)" charNameMap=".spot,:colon,%pct, space"/>
| 属性 | 释义 |
|---|---|
| string | 字符串表达式 |
| number | 数字表达式 |
| space | 显示间隔 |
| charNameMap | 映射列表,用英文逗号分隔,每项第一个字符是原字符,后面的是映射字符串,可以映射到一个或多个字符 |
示例中映射图片名称有:
| 原字符 | 映射名称(图片后缀) | 释义 |
|---|---|---|
| . | spot | 点 |
| : | colon | 冒号 |
| % | pct | 百分比 |
| (注意这里是空格) | space | 空 |
注意:
- 因同一目录下图片名称不区分大小英文,所以大写英文命名为两个小写英文字符,以表示为大写;比如:A 图片名称为 num_aa.png
- 某些字符不能直接用,需要转义才可以使用;比如:&
# 虚拟屏幕
定义的图形元素集合,可以包含几何图形、文本、图片等,用于创建复杂的动画效果或图形布局,并在屏幕上作为整体进行渲染。
虚拟屏幕要有合理的宽高,有持续刷新动画+尺寸太大会导致虚拟屏幕闪烁。
<!-- 定义虚拟屏幕 -->
<VirtualScreen name="vs" w="440" h="440">
    <Rectangle x="220" y="220" align="center" alignV="center" w="440" h="440" fillColor="#ff0000" strokeColor="#00000000" weight="0" strokeAlign="inner" cornerRadius="0"/>
    <Circle x="220" y="220" r="100" fillColor="#000000" strokeColor="#00000000" />
    <Text x="220" y="220" color="#ffffff" size="80" textExp="'虚拟屏幕'" align="center" alignV="center" />
</VirtualScreen>
<!-- 使用虚拟屏幕 -->
<Image x="100" y="100" src="vs" useVirtualScreen="true" cornerRadius="100" blur="10"/>
# 音视频
MIUI14新增 音视频组件用于在百变壁纸和百变锁屏模块中使用音频或视频文件,可实现全屏动画效果。与图片序列帧相比,性能更佳。
新的Video标签类似于Layer标签,是一个独立刷新的元素,只能覆盖于其他元素之上或之下,不能被其他元素相夹。支持常见视频格式如mp4、avi以及常见音频格式如mp3、wav等。
在使用视频时,需要注意以下内容:
- 文件大小必须小于50MB。
- 在百变壁纸中,如果视频在其他元素之下,需要设置layerType="bottom",同时在根节点增加transparentSurface="true",否则视频不可见。
| 属性 | 参数 | 描述 |
|---|---|---|
| layerType | top | 将当前元素置于其他元素之上,显示在最前面。 |
| layerType | bottom | 将当前元素置于其他元素之下,显示在最后面。 |
以下是一些播放控制命令的使用示例:
<!-- 在百变锁屏中 -->
<Lockscreen version="2" frameRate="30" screenWidth="1080">
  <Video name="mamlVideo" layerType="bottom"/>
</Lockscreen>

<!-- 在百变壁纸中 -->
<MiWallpaper version="2" frameRate="30" screenWidth="1080" transparentSurface="true">
  <Video name="mamlVideo" layerType="bottom"/>
</MiWallpaper>

<!-- 配置文件;路径、循环、缩放模式 -->
<VideoCommand target="mamlVideo" command="config" path="'video/file_1.mp4'" loop="1" scaleMode="2"/>
<!-- 播放命令 -->
<VideoCommand target="mamlVideo" command="play"/>
<!-- 暂停命令 -->
<VideoCommand target="mamlVideo" command="pause"/>
<!-- 音量设置 -->
<VideoCommand target="mamlVideo" command="setVolume" volume="1"/>
<!-- 跳转到指定时间(ms);time="10000" 跳转到10000ms -->
<VideoCommand target="mamlVideo" command="seekTo" time="10000"/>
| 属性 | 类型 | 描述 | |
|---|---|---|---|
| layerType | string | top:在其他元素之上;bottom:在其他元素之下 | |
| target | string | 要控制的元素名称 | |
| command | string | pause 暂停 play 播放 seekTo 定位到某个时间 config 配置文件 volume 音量 | |
| Path | string | 文件路径;command="config" 独有,支持表达式 | |
| loop | Int | 循环模式;command="config" 独有0 播放一次;1 循环播放 | |
| scaleMode | Int | 缩放模式;command="config" 独有1 拉伸;2 填充(等比缩放);3 按比例缩放到长或宽 | |
| volume | float | 音量大小;command="setVolume" 独有,0~1 | |
| time | Number | 定位时间(ms);command="seekTo" 独有 |
音量默认为 0,如需要有播放声音的需求,设置音量为 1 即可。注意:音量大于 0 时,如有其他音源正在播放,会暂停播放其他音源的声音。
相关全局变量:
| video相关变量 | 类型 | 描述 |
|---|---|---|
| videoName.playState | string | 获取视频播放状态 state_error 出错 state_idle 空闲中 state_preparing 加载中 state_prepared 加载完成 state_playing 播放 state_paused 暂停 state_playback_completed 播放结束 |
| videoName.duration | number | 文件长度(ms),执行过 config 命令后更新此变量 |
| videoName.position | number | 播放位置(ms),播放时动态更新 |
示例代码:
<Lockscreen frameRate="60" screenWidth="1080" version="2">
<ExternalCommands>
<Trigger action="init">
<!-- 初始化配置视频文件 -->
<VideoCommand target="mamlVideo" command="config" path="'video/file_1.mp4'"/>
</Trigger>
<Trigger action="resume">
<!-- 开屏播放文件 -->
<VideoCommand target="mamlVideo" command="play"/>
</Trigger>
</ExternalCommands>
<!-- 视频层;layerType="bottom" 最底层 -->
<Video name="mamlVideo" layerType="bottom"/>
<!-- 时间和日期 -->
<DateTime x="540" y="200" align="center" color="#ffffffff" size="180" formatExp="ifelse(#time_format,'HH:mm','hh:mm')" fontFamily="mitype-clock"/>
<DateTime x="540" y="410" align="center" color="#ffffffff" size="45" format="MM月dd日 EEEE"/>
</Lockscreen>
# 混合模式
下面两个例子实现的结果是一样的,都是遮罩效果,即按照 mask.png 的形状对 test.png 进行裁剪。
<!-- 例子:(使用时,混合范围要尽可能小,否则会卡) -->
<Group x="300" y="500" w="200" h="200" layered="true">
    <Image src="test.png"/>
    <Image src="mask.png" xfermode="dst_in" />
</Group>
<!-- 或者 -->
<Group x="300" y="500" w="200" h="200" layered="true">
    <Image src="test.png"/>
    <Image src="mask.png" xfermodeNum="6" />
</Group>
| 变量名 | 类型 | 变量/表达式 | 描述 |
|---|---|---|---|
| layered | string | x/x | 和 Group 里面的 xfermode 配合使用,增加该属性旨在让 xfermode 只作用于 Group 内部的元素。 |
| xfermode | string | x/x | 混合模式,取值有:clear, src, dst, src_over, dst_over, src_in, dst_in, src_out, dst_out, src_atop, dst_atop, xor,add,Multiply,Screen,Overlay,Darken,Lighten |
| xfermodeNum | int | o/o | 混合模式支持变量表达式。表达式的取值对应一种混合模式,src, dst, src_over,...lightEn 依次取值 1,2,3 ...17 |
注意事项: 在 Group 使用 layered 时,请务必指定作用区域 w h,否则无法生效(使用时,混合范围要尽可能小,否则会卡) 一个组里可以有 }=2 张图,最后一个有 xfermode 的 Image 会将这个组内前面所有的图片看作一个整体的 Image ,按照 xfermode 的取值与之混合
对应关系:
上图中被混合处理的两张图
# 笔刷
笔刷绝对是一个很神奇的功能,与混合功能搭配,可以做出刮奖、擦玻璃的效果
笔刷代码:
<Paint x="0" y="0" w="1080" h="1920" color="#ff6600" weight="40" />
| 属性 | 释义 |
|---|---|
| weight | 笔刷宽度,支持表达式 |
| xfermoderow | 混合模式,参考 Image |
| w,h | 宽高,定义此笔刷能涂抹的区域 |
与图片混合功能搭配的示例:
<Wallpaper />                                                   // 调用系统壁纸,在这里是你手指擦过后露出的背景图
<Group x="0" y="0" w="1080" h="1920" layered="true">            // 图片混合
    <Image x="0" y="0" src="fg.png"/>                           // fg.png是被擦的图片(高斯模糊+水珠雾气效果)
    <Paint weight="50" w="1080" h="1920" xfermode="clear" />    // clear能产生擦除效果
</Group>
示图:

# 图片变形
示例主题:摇一摇 demo【图片变形】.mtz (opens new window)
如图:

注意了:控制图片节点用的数组,它的类型必须为 float[],这样 但是在后面计算中暂时用 number[] 图片变形暂时要自己计算在其它分辨率下的缩放比,示例:
<Var name="img_w" expression="400" const="true" />
<Var name="img_h" expression="400" const="true" />
<Var name="img_m" expression="2" const="true" />
<Var name="img_n" expression="2" const="true" />

<!-- mesharr[]数组中,同时要有X坐标、Y坐标,所以申明范围时是:(#img_m+1)*(#img_n+1)*2=18-->
<Var name="mesharr" type="float[]" size="18" />
<ExternalCommands>
    <Trigger action="init">
        <VariableCommand name="scale_wh" expression="int(#raw_screen_width/1.08)/1000" />      //(你锁屏按1080p写的就用这个计算)
        <!-- 先分网格 -->
        <LoopCommand count="(#img_m+1)*(#img_n+1)" indexName="__a">
            <VariableCommand name="mesharr" type="float[]" index="#__a*2" expression="int(#img_w/#img_m)*(#__a%(#img_m+1))" />
            <VariableCommand name="mesharr" type="float[]" index="#__a*2+1" expression="int(#img_h/#img_n)*int(#__a/(#img_m+1))" />
        </LoopCommand>
        <VariableCommand name="mesh5_x" expression="#mesharr[4*2]" />
        <VariableCommand name="mesh5_y" expression="#mesharr[4*2+1]" />
    </Trigger>
</ExternalCommands>
<Var name="mesharr" type="float[]" index="8" expression="#mesh5_x+int(#touch_x-#touch_begin_x)" />
<Var name="mesharr" type="float[]" index="9" expression="#mesh5_y+int(#touch_y-#touch_begin_y)" />
<Image x="0" y="0" scale="#scale_wh" src="bg3.jpg" mesh="2,2" meshVertsArr="mesharr" />
附件:img0927.mtz (opens new window)
# Graphics画布
MIUI14新增支持Graphics
<ExternalCommands>
    <Trigger action="init" >
        <!-- 使用draw方法绘制test -->
        <GraphicsCommand target="test" command="setRenderListener" paramsExp="'draw'"/>
    </Trigger>
</ExternalCommands>

<Var name="moveX" expression="(#touch_x - 540)/10" />
<Var name="moveY" expression="(#touch_y - 1170)/10" />
<Var name="lineColor" values="0xFFFF0000, 0xFF00FF00, 0xFF0000FF" type="int[]" />
<Var name="lineColorStop" values="0, 0.6, 1" type="float[]" />

<Graphics name="test" w="1080" h="2000">
    <OnDraw>
        <!-- 创建渐变矩形 -->
        <GraphicsCommand target="test" command="createGradientBox" paramsExp="300, 300, 500, 500, 'circleMatrix'"/>
        <!-- 设置线条样式 -->
        <GraphicsCommand target="test" command="lineStyle" paramsExp="30"/>
        <!-- 设置线性渐变样式 -->
        <GraphicsCommand target="test" command="lineGradientStyle" paramsExp="1, 'circleMatrix', 'circleShader', 0" colorArrayNameExp="'lineColor'" stopArrayNameExp="'lineColorStop'"/>
        <!-- 开始填充图形 -->
        <GraphicsCommand target="test" command="beginFill" colors="#FFFF0000"/>
        <!-- 绘制实心圆 -->
        <GraphicsCommand target="test" command="drawCircle" paramsExp="400+#moveX, 400+#moveY, 100"/>
        <!-- 创建渐变矩形 -->
        <GraphicsCommand target="test" command="createGradientBox" paramsExp="200-#moveY*2, 0-#moveX*3, 0-#moveY, 200-#moveX*4, 'rectMatrix'"/>
        <!-- 设置线条样式 -->
        <GraphicsCommand target="test" command="lineStyle" paramsExp="5" colorExp="0x7FFF0000"/>
        <!-- 开始渐变填充 -->
        <GraphicsCommand target="test" command="beginGradientFill" paramsExp="1, 'rectMatrix', 'rectShader', 2" colors="#FFFF0000, #FF00FFFF" stopsExp="0, 1"/>
        <!-- 绘制矩形 -->
        <GraphicsCommand target="test" command="drawRect" paramsExp="#moveX, #moveY, 400, 400"/>
    </OnDraw>
</Graphics>

<Function name="draw">
    <IfCommand ifCondition="1">
        <Consequent >
            <!-- 设置线条样式 -->
            <GraphicsCommand target="test" command="lineStyle" paramsExp="5" colors="#FFFFFFFF"/>
            <!-- 移动到指定点 -->
            <GraphicsCommand target="test" command="moveTo" paramsExp="540 - 400, 670 - 200"/>
            <!-- 绘制二次贝塞尔曲线 -->
            <GraphicsCommand target="test" command="curveTo" paramsExp="540 + #moveX * 20, 670 + #moveY * 20, 540 + 400, 670 - 200"/>
            <!-- 绘制直线 -->
            <GraphicsCommand target="test" command="lineTo" paramsExp="540 + 400, 670 + 200"/>
            <!-- 绘制三次贝塞尔曲线 -->
            <GraphicsCommand target="test" command="cubicCurveTo" paramsExp="540 + #moveX * 20, 670 + #moveY * 20, 540 + #moveX * 20, 670 + #moveY * 20, 540 - 400, 670 + 200"/>
            <!-- 绘制直线 -->
            <GraphicsCommand target="test" command="lineTo" paramsExp="540 - 400, 670 - 200"/>
            <IfCommand ifCondition="0">
                <Alternate>
                    <!-- 设置线条样式 -->
                    <GraphicsCommand target="test" command="lineStyle" paramsExp="4" colors="#FFFFFFFF"/>
                    <!-- 开始填充圆角矩形 -->
                    <GraphicsCommand target="test" command="beginFill" colors="#7FFF0000"/>
                    <GraphicsCommand target="test" command="drawRoundRect" paramsExp="200, 600, 800, 400, 30 + #moveX * 2, 30 + #moveX * 2"/>
                    <!-- 设置线条样式 -->
                    <GraphicsCommand target="test" command="lineStyle" paramsExp="4" colors="#FFFFFFFF"/>
                    <!-- 开始填充椭圆 -->
                    <GraphicsCommand target="test" command="beginFill" colors="#7FFF0000"/>
                    <GraphicsCommand target="test" command="drawEllipse" paramsExp="600, 1500, 800, 400"/>
                </Alternate>
            </IfCommand>
        </Consequent>
    </IfCommand>
</Function>
# GraphicsCommand 元素说明
<GraphicsCommand target="test" command="命令类型" paramsExp="参数表达式数组" colors="颜色类型(#或@或argb格式)数组", stopsExp="控制点表达式数组" colorArrayNameExp="颜色数组名字表达式" stopArrayNameExp=“控制点数组名字表达式” colorExp=“单个颜色变量表达式 比如0xFFFFFFF”/>
target: 绘制目标对象的名称。command: 绘制命令类型。paramsExp: 参数表达式数组,根据不同命令类型有不同的参数要求。colors: 颜色类型数组,用于指定颜色。stopsExp: 控制点表达式数组,用于指定渐变的控制点。colorArrayNameExp: 颜色数组名字表达式,指定颜色数组的名称。stopArrayNameExp: 控制点数组名字表达式,指定控制点数组的名称。colorExp: 单个颜色变量表达式,比如0xFFFFFFF。
# GraphicsCommand 命令类型
# createGradientBox
- 设置渐变样式
<GraphicsCommand target="test" command="createGradientBox" paramsExp="起点x表达式, 起点y表达式, 终点x表达式, 终点y表达式, 矩阵名字表达式"/>
# lineGradientStyle
- 设置线性渐变样式
<!-- 颜色必须>=2, 控制点要么不设,要么和颜色一样多 -->
<GraphicsCommand target="test" command="lineGradientStyle" paramsExp="渐变类型表达式 1代表线性渐变,2代表放射渐变 , 矩阵名字表达式, 着色器名字表达式 , 填充模式表达式 0代表clamp拉伸,1代表repeat拉伸,2代表mirror拉伸,默认0"
     colors或者colorArrayNameExp stopsExp或者stopArrayNameExp/>
# drawRoundRect
- 绘制圆角矩形,指定左上角坐标、宽度、高度和圆角半径。
<GraphicsCommand target="test" command="drawRoundRect" paramsExp="x表达式, y表达式, 宽度表达式, 高度表达式, x轴半径表达式 , y轴半径表达式"/>
# drawCircle
- 绘制圆,指定圆心坐标和半径。
<GraphicsCommand target="test" command="drawCircle" paramsExp="x表达式,y表达式,半径表达式"/>
# lineTo
- 绘制直线,指定终点坐标。
<GraphicsCommand target="test" command="lineTo" paramsExp="终点x表达式, 终点y表达式"/>
# lineStyle
- 设置线条样式,包括描边宽度、线段末端样式、线段相交样式、尖角长度限制和颜色。
- Cap(线条端点形状):
BUTT (0): 线条的端点直接结束,不突出路径之外。ROUND (1): 线条的端点以半圆形状延伸,中心在路径的末尾。SQUARE (2): 线条的端点以正方形形状延伸,中心在路径的末尾。
- Join(线条相交方式):
MITER (0): 相交点为尖角,外边缘以锐角相遇。ROUND (1): 相交点为圆角,外边缘以圆弧相遇。BEVEL (2): 相交点以直线相遇,外边缘以平直线相遇。
<GraphicsCommand target="test" command="lineStyle" paramsExp="描边宽表达式 , cap表达式, join表达式, miter表达式" colorExp或者colors(取第一位)"/>
# beginFill
- 开始填充图形,指定填充颜色。
<GraphicsCommand target="test" command="beginFill" colorExp或者colors(取第一位)/>
# beginGradientFill
- 开始渐变填充,指定渐变类型、矩阵、着色器、填充模式、颜色和控制点。
<!-- 颜色必须>=2, 控制点要么不设,要么和颜色一样多 -->
<GraphicsCommand target="test" command="beginGradientFill"  paramsExp="渐变类型表达式, 矩阵名字表达式, 着色器名字表达式 , 填充模式表达式" colors或者colorArrayNameExp stopsExp或者stopArrayNameExp/>
# drawRect
- 绘制矩形,指定左上角坐标、宽度和高度。
<GraphicsCommand target="test" command="drawRect" paramsExp="x表达式, y表达式, 宽度表达式, 高度表达式"/>
# moveTo
- 移动到指定点,作为下一段线条的起点。
<GraphicsCommand target="test" command="moveTo" paramsExp="x表达式, y表达式"/>
# curveTo
- 绘制二次贝塞尔曲线,指定控制点和锚点。
<GraphicsCommand target="test" command="curveTo" paramsExp="控制点x表达式, 控制点y表达式, 锚点x表达式, 锚点y表达式"/>
# cubicCurveTo
- 绘制三次贝塞尔曲线,指定两个控制点和一个锚点。
<GraphicsCommand target="test" command="cubicCurveTo" paramsExp="控制点1x表达式, 控制点1y表达式, 控制点2x表达式, 控制点2y表达式, 锚点x表达式, 锚点y表达式"/>
# 几何图形
目的:在一些内存要求高的场景下,使用绘制几何图形的方式替代<Image>以减小内存。
Rectangle(矩形、圆角矩形)
<Rectangle x="10" y="20" w="100" h="200" cornerRadius="5,10" strokeColor="#ff00ff00" fillColor="#ff000000" weight="5" cap="round" dash="1,2,3,4" strokeAlign="center">
    <!-- FillShaders 填充着色;StrokeShaders 描边着色 -->
    <FillShaders>
        <!-- 线性渐变 -->
        <LinearGradient x="#screen_width" y="0" x1="0" y1="#screen_height" tile="clamp">
            <GradientStop color="#050B2A" position="0"/>
            <GradientStop color="#81425D" position="0.5"/>
            <GradientStop color="#C87960" position="1"/>
        </LinearGradient>
        <!-- 放射渐变 -->
        <RadialGradient x="" y="" rX="" rY="" tile="">
            <GradientStop color="" position=""/>
            <GradientStop color="" position=""/>
        </RadialGradient>
        <!-- 扫描渐变 -->
        <SweepGradient x="" y="" rotation="" tile="">
            <GradientStop color="" position=""/>
            <GradientStop color="" position=""/>
        </SweepGradient>
    </FillShaders>
    <StrokeShaders>
    </StrokeShaders>
</Rectangle>
| 属性 | 类型 | 表达式/变量 | 释义 |
|---|---|---|---|
| x y | number | o/o | 图形起始点;Rectangle 为左上角,其余的几何图形均为 中心点 |
| strokeColor | string | x/o | 描边颜色。支持多种 color 指定方式,以下所有 color 类的属性都是如此。 |
| fillColor | string | x/o | 填充色 |
| weight | number | o/o | 描边的线宽 |
| cap | string | x/x | 线头形状。butt 无线头(默认), round(半圆), squre(方形) |
| dash | number | x/x | 虚线模式。格式“线长,间隔,线长,间隔....”,e.g. dash="1,2,3,4":1 像素宽的线段,2 像素的间隔,3 像素的线段,4 像素的间隔,如此重复... |
| strokeAlign | string | x/x | 描边对齐方式,inner 内描,center 中心描边,outer 外描(默认) |
| xfermode | int | o/o | 混合模式,与<Image/>相同 |
| cornerRadius | number | x/x | 倒角半径;格式"x 向半径,y 向半径" |
| cornerRadiusExp | number | o/o | 倒角半径;支持表达式,格式"x 向半径,y 向半径" |
FillShaders 与 StrokeShaders
填充着色器 和 描边着色器 语法一致:支持线性渐变着色,放射渐变着色(径向渐变),扫描渐变着色(圆周渐变),位图着色。
- LinearGradient 线性渐变
| 属性 | 类型 | 表达式/变量 | 释义 |
|---|---|---|---|
| x y x1 y1 | number | o/o | 渐变轴线(x , y) --> (x1 , y1) |
| tile | string | x/x | 铺展模式;clamp 拉伸(默认),mirror 镜像,repeat 重复 |
- RadialGradient 放射渐变
| 属性 | 类型 | 表达式/变量 | 释义 |
|---|---|---|---|
| x y | number | o/o | 圆心位置 |
| rX rY | number | o/o | x y 方向的半径 |
- SweepGradient 扫描渐变
| 属性 | 类型 | 表达式/变量 | 释义 |
|---|---|---|---|
| x y | number | o/o | 中心点位置 |
| rotation | number | o/o | 旋转角 |
- GradientStop 渐变点;在指定的几个渐变点颜色之间做渐变
| 属性 | 类型 | 表达式/变量 | 释义 |
|---|---|---|---|
| color | string | x/o | 渐变点的颜色 |
| position | number | o/o | 渐变点位置,0~1.0 的浮点数 |
Ellipse(椭圆)
<Ellipse x="10" y="20" w="100" h="200" strokeColor="#ff00ff00" fillColor="#ff000000" weight="5" cap="round" dash="1,2,3,4" strokeAlign="center" >
    <StrokeShaders>
    </StrokeShaders>
    <FillShaders>
    </FillShaders>
</Ellipse>
x y     椭圆的中心位置;注意:这里是椭圆的中心点,而不是左上角的起点
w h     椭圆的宽,高
Circle(圆)
<Circle x="10" y="20" r="50" strokeColor="#ff00ff00" fillColor="#ff000000" weight="5" cap="round" dash="1,2,3,4" strokeAlign="center">
    <StrokeShaders>
    </StrokeShaders>
    <FillShaders>
    </FillShaders>
</Circle>
x y     圆心位置
r       半径
Arc(扇形、弧线)
<Arc x="10" y="20" w="100" h="200" startAngle="10" sweep="50" close="true" strokeColor="#ff00ff00" fillColor="#ff000000" weight="5" cap="round" dash="1,2,3,4" strokeAlign="center">
    <StrokeShaders>
    </StrokeShaders>
    <FillShaders>
    </FillShaders>
</Arc>
x y w h         定位方式与 Ellipse 相同
startAngle      起始角
sweep           扫描角(扇形的角度)
close           是否闭合,true 闭合是扇形,false 不闭合是弧线
Line(直线)
<Line x="10" y="20" x1="100" y1="200" strokeColor="#ff00ff00" weight="5" cap="round" dash="1,2,3,4" strokeAlign="center">
    <StrokeShaders>
    </StrokeShaders>
</Line>
x y x1 y1 直线起点(x,y),终点(x1,y1)
注意事项:
- 对齐方式 align alignV:只有 Rectangle 支持,其他的都不支持,它们的 x y 都是指的中心点位置,不需要对齐方式。
- 填充:线条类的图形忽略 fillColor 和
<FillShaders>;有面积的图形同时支持 stroke 和 fill,分别用于描边和填充。- 优先级:当 strokeColor 和
<StrokeShaders>同时存在时,优先使用<StrokeShaders>;fillColor 和<FillShaders>亦如此。- 描边颜色:如果要出现描边,则 strokeColor 和
<StrokeShaders>必须至少一个存在;都不存在就会没有描边。- 渐变定位:
<LinearGradient x="" y="">... 中的 x y 都是相对它所在的图形元素定位的。
# 组的运用
# Group
<Group name="" x="" y="" w="" h="" clip="true" layered="true" visibility="">
    <PositionAnimation/>
    <SizeAnimation/>
    <Image/>
    <Time/>
    <DateTime/>
    <Text/>
</Group>
Group       组的意思,相当于一个容器,用来包含住其他元素,如图片,时间,控件……等
            可理解为一个图层,能便捷地调整内部多个元素的位置和大小,与Image一样添加各种动画,内部元素的坐标是相对坐标(相对于组坐标)
clip        true/false,为true时,会裁剪掉超出w h标注范围的内容,不给予显示(有clip与layered时,必须添加w h)
# 命令组
如果某组操作会被很多处调用,可以将这组操作写到一个空的 Group 中作为一个 trigger action,然后可以被多处调用。
<!-- 命令组 -->
<Group name="triggersContainer" >
    <Triggers>
        <Trigger action="content_1" >
            <AnimationCommand target="numAni" command="play" />
            <VariableCommand name="number001" expression="1"/>
        </Trigger>
        <Trigger action="content_2" >
            <VariableCommand name="month_num" expression="#month_num+1" />
        </Trigger>
    </Triggers>
</Group>
<!-- 执行命令组 -->
<Button x="540" y="0" w="540" h="540">
    <Triggers>
        <Trigger action="up">
            <MethodCommand target="triggersContainer" method="performAction" paramTypes="String" params="'content_1'"/>
            <MethodCommand target="triggersContainer" method="performAction" paramTypes="String" params="'content_2'"/>
        </Trigger>
    </Triggers>
</Button>
# 自定义函数
增加伪函数元素,作为函数式调用,不支持传参 MIUI12.5新增
<!--Function为仿照函数的元素, 包含各种ActionCommand-->
<Function name="XXXX">
    <VariableCommand />
    <XXXXCommand/>
    <!-- 条件执行命令 子元素Consequent和Alternate -->
    <IfCommand ifCondition="XXXX">
        <!-- Consequent 满足ifCondition执行 -->
        <Consequent>
            <VariableCommand />
            <AnimationCommand />
            <XXXXCommand/>
        </Consequent>
        <!-- Alternate 不满足ifCondition执行 -->
        <Alternate>
            <VariableCommand />
            <AnimationCommand />
            <XXXXCommand />
        </Alternate>
    </IfCommand>
</Function>
<!-- 增加一个command 用来调用Function -->
<FunctionCommand target="XXX" />
# 动画
# 变量动画
<!-- 定义一个名为numAni的动画,numAni在0ms时值为0,300ms时值为100 -->
<Var name="numAni">
    <VariableAnimation initPause="true" loop="false">
        <Item value="0" time="0" />
        <Item value="100" time="300" />
    </VariableAnimation>
</Var>
<!-- 播放动画  -->
<Button x="0" y="0" w="1080" h="#screen_height">
    <Triggers>
        <Trigger action="up">
            <AnimationCommand target="numAni" command="play" />
        </Trigger>
    </Triggers>
</Button>
| 属性 | 值 | 释义 |
|---|---|---|
| initPause | true/false | initPause="true" 无命令执行这个动画时,它停在初始态 |
| loop | true/false | 是否循环,默认 true,loop="false" 时,播放一次就停了 |
| time | 数字 | 毫秒时间,不支持表达式 。绝对时间 |
| dtime | 数字 或者 表达式 | 毫秒时间,支持表达式(新)。相对时间(相对上一个的时间) |
dtime和time的区别
<!-- 两段动画结果一致 -->
<Var name="numAni_0">
    <VariableAnimation initPause="false" loop="true">
        <Item value="0" time="0" />
        <Item value="100" time="1000" />
    </VariableAnimation>
</Var>
<Var name="numAni_1">
    <VariableAnimation initPause="false" loop="true">
        <Item value="0" dtime="0" />
        <Item value="50" dtime="500" />
        <Item value="100" dtime="500" />
    </VariableAnimation>
</Var>
灵活运用示例:
<Var name="numAni">
    <VariableAnimation name="numAniVar" initPause="true" loop="false">
        <Item value="0" time="0" />
        <Item value="100" time="300" />
        <Triggers>
            <!-- 动画播放完时,若#numAni等于100,则执行名为 moveAni 的动画 -->
            <Trigger action="end" condition="#numAni==100">
                <AnimationCommand target="moveAni" command="play" />
            </Trigger>
            <!-- 或者:动画时间#numAniVar等于-1时,执行名为 moveAni 的动画 -->
            <Trigger action="end" condition="#numAniVar.current_frame==-1">
                <AnimationCommand target="moveAni" command="play" />
            </Trigger>
        </Triggers>
    </VariableAnimation>
</Var>
# 数组动画
<!-- 自由选择播放 -->
<Array count="6" indexName="_ani">
    <Var name="arrayAni" size="6" index="#_ani" type="number[]">
        <VariableAnimation initPause="true" loop="false">
            <Item value="0" time="0" easeType="CubicEaseOut"/>
            <Item value="1" time="600"/>
        </VariableAnimation>
    </Var>
</Array>
<!-- 点击触发 -->
<Button x="540" y="0" w="540" h="540">
    <Triggers>
        <Trigger action="up">
            <!-- targetIndex="0"播放第一个动画;targetIndex 从 0 开始到 5,共 6 个 -->
            <AnimationCommand target="arrayAni" targetIndex="0" command="play" />
            <!-- targetIndex="1"播放第二个动画 -->
            <AnimationCommand target="arrayAni" targetIndex="1" command="play" delay="300"/>
            <!-- 播放全部动画 -->
            <AnimationCommand target="arrayAni" command="play" />
        </Trigger>
    </Triggers>
</Button>
# 元素动画
所有元素都支持动画(下面用 Image 来举例);动画分为:图片源,位置,大小,旋转,透明度
每种动画相互独立,各自循环播放,动画由若干关键帧组成,关键帧包括帧属性和时间,除图片源动画外,其它动画会根据当前时间找到相邻的两个关键帧,然后线性插值计算当前的属性。 如果第一帧时间不从 0 开始,则默认时间为 0 的第一帧为图片原始属性,时间单位为毫秒。 位置动画中的位置是相对于图片自身的坐标。
<Image x="0" y="0" pivotX="50" pivotY="50" src="bg.png">
    <!-- 源动画 -->
    <SourcesAnimation>
        <Source x="0" y="0" src="bg1.png" time="0"/>
        <Source x="0" y="0" src="bg2.png" time="100"/>
        <Source x="0" y="0" src="bg3.png" time="200"/>
    </SourcesAnimation>
    <!--位移-->
    <PositionAnimation>
        <Item x="10" y="0" time="100" />
        <Item x="10" y="200" time="1000"/>
    </PositionAnimation>
    <!--平面旋转-->
    <RotationAnimation>
        <Item value="0" time="0" />
        <Item value="360" time="2000"/>
    </RotationAnimation>
    <!-- 等比缩放 -->
    <ScaleAnimation loop="false">
        <Item value="0" time="0" />
        <Item value="1" time="1000" />
    </ScaleAnimation>
    <!--非等比缩放-->
    <SizeAnimation>
        <Item w="100" h="100" time="0"/>
        <Item w="200" h="400" time="1000"/>
        <Item w="100" h="100" time="2000"/>
    </SizeAnimation>
    <!--透明度-->
    <AlphaAnimation>
        <Item value="255" time="0"/>
        <Item value="100" time="1000"/>
        <Item value="255" time="2000"/>
    </AlphaAnimation>
</Image>
例子:位置动画表示 1秒 从屏幕最左端到最右端,停留1秒,透明度动画表示开始透明度为175,在从最左端到最右端过程中透明度不变,到达最右端后0.5秒渐变为不透明,然后 500毫秒 变为透明消失。然后循环播放。
<Image x="0" y="#screen_height-177" src="charging_light.png" category="Charging">
    <PositionAnimation>
        <Item x="0" y="0" time="1000"/>
        <Item x="1080" y="0" time="2000"/>
    </PositionAnimation>
    <AlphaAnimation>
        <Item value="175" time="0"/>
        <Item value="175" time="1000"/>
        <Item value="255" time="1500"/>
        <Item value="0" time="2000"/>
    </AlphaAnimation>
</Image>
# 动画控制
<Image name="wao" x="0" y="0" w="1080" h="114" src="dst.png" >
    <PositionAnimation tag="show1" initPause="true" loop="false" >
        <Item y="0" time="0" easeType="ExpoEaseOut"/>
        <Item y="300" time="300"/>
    </PositionAnimation>
</Image>
<Image name="goal" x="0" y="0" w="1080" h="114" src="dst.png" >
    <PositionAnimation tag="show1" initPause="true" loop="false" >
        <Item y="0" time="0" easeType="ExpoEaseOut"/>
        <Item y="300" time="300"/>
    </PositionAnimation>
    <PositionAnimation tag="show2" initPause="true" loop="false">
        <Item y="300" time="0" easeType="ExpoEaseOut"/>
        <Item y="600" time="300"/>
    </PositionAnimation>
</Image>
<Button x="0" y="0" w="1080" h="#screen_height">
    <Triggers>
        <Trigger action="up" >
            <AnimationCommand target="wao" command="play(0,300)" />
            <AnimationCommand target="goal" command="play" tags="show2" />
        </Trigger>
    </Triggers>
</Button>
| 属性 | 释义 |
|---|---|
| AnimationCommand | 播放动画现在统一用这个标签,原因是旧标签不支持 tags,你怀旧的话可以记两个 |
| target | 控制的动画目标名 |
| Index | 为数组动画添加索引;既Index="#__ani"需要索引数组开头中indexName属性的名称;数组介绍可查看:元素数组;动画示例可查看:数组动画 |
| targetIndex | 数组动画索引角标,表示数组动画索引值为 1;例如targetIndex="1"则表示控制数组动画的第二个动画(索引从 0 开始) |
| command | play (从头播放), pause(暂停), resume(从当前位置继续播放) |
| tag | 用此标签可以实现 一个元素预置多个动画效果,用 tags 来选择性地播放其中一种 |
play(startTime,endTime,loop,delay)  4个参数都支持表达式,可只写前面的参数,后面的忽略
startTime   动画开始时间
endTime     动画结束时间
loop        是否循环播放,默认为0,需要写数字 0,1 或者数值表达式,如果为0表示只播放一遍就停止
delay       是否支持delay,默认0,需要写数字 0,1 或者数值表达式
| 示例 | 释义 |
|---|---|
| play(100) | 从 time 100 开始播放到结束,不循环播放 |
| play(100, 500) | 从 time 100 开始播放到 500,停止 |
| play(100,500,1) | 从 time 100 开始播放到 500,循环播放 |
# 关键帧动画
MIUI13新增 关键帧动画,就是给需要 做动画的元素(矩形、图片、文本等),设定一组与时间相关的值;这些值都是在动画序列中 比较关键的帧里面提取出来的,而其他时间帧中的值,可以用这些关键值,采用特定的插值方法计算得到,从而达到比较流畅的动画效果。
AnimState标签
AnimState 动画元素的 状态。
<AnimState name="keyState" x="200" y="300" w="400" h="500"/>
| 名称 | 说明 | 参数 | 其他 |
|---|---|---|---|
| name | 该标签的名称 | String | 必须有此属性 |
| x,y | 坐标,对应元素属性x,y | 数字表达式 | 当圆的时候为中心点 |
| w,h | 宽度、高度,对应元素属性w,h | 数字表达式 | |
| rotation | 旋转角度,对应元素属性rotation | 数字表达式 | |
| alpha | 透明度,对应元素属性alpha | 数字表达式 | 0~255 |
| rotationX | x轴旋转角度,对应元素属性rotationX | 数字表达式 | |
| rotationY | y轴旋转角度,对应元素属性rotationY | 数字表达式 | |
| rotationZ | z轴旋转角度,对应元素属性rotationZ | 数字表达式 | |
| scaleX | x轴缩放比例,对应元素属性scaleX | 数字表达式 | 当无scale属性时生效 |
| scaleY | y轴缩放比例,对应元素属性scaleY | 数字表达式 | 当无scale属性时生效 |
| tintColor | 染色颜色;对应元素属性tint | 数字表达式 | 例 0xffffffff |
| pivotX | x轴旋转中心;对应元素属性pivotX | 数字表达式 | |
| pivotY | y轴旋转中心;对应元素属性pivotY | 数字表达式 | |
| pivotZ | z轴旋转中心;对应元素属性pivotZ | 数字表达式 |
以上为基本属性,可见的元素都有此属性
| 名称 | 说明 | 参数 | 其他 |
|---|---|---|---|
| r | 圆的半径;对应元素属性r,圆形独有 | 数字表达式 | |
| textSize | 文字大小;对应元素属性size,文字独有 | 数字表达式 | |
| textColor | 文字颜色;对应元素属性color,文字独有 | 数字表达式 | 例 0xffffffff |
| textShadowColor | 文字阴影颜色 | 数字表达式 | 例 0xffffffff |
| fillColor | 填充颜色;对应元素属性fillColor,几何图形独有 | 数字表达式 | 例 0xffffffff |
| strokeColor | 描边颜色;对应元素属性strokeColor,几何图形独有 | 数字表达式 | 例 0xffffffff |
| cornerRadiusX | 矩形圆角;圆角矩形独有 | 数字表达式 | |
| cornerRadiusY | 矩形圆角;圆角矩形独有 | 数字表达式 | |
| strokeWeight | 描边宽度;几何图形独有 | 数字表达式 |
AnimState 标签中颜色值相关的属性(tintColor/textColor/textShadowColor/fillColor/strokeColor ),必须用 0xffffffff 方式来定义颜色值,不能使用 #ffffffff
AnimState 标签提供了命令可以进行 update/remove/clear(更新/去除/清空) 操作
假设有 AnimState 标签如下:
<AnimState name="keyState" w="200" h="200"/>
update命令
使用方式1:使用 attrsExp 和 valuesExp 来替换所需要的属性和值,没有会自动增加对应的属性,attrsExp 为字符串表达式集合,valuesExp 为数字表达式集合。
<AnimStateCommand target="keyState" command="update" attrsExp="'x', 'y'" valuesExp="100, 300"/>
使用方式2:使用 两个数组替换 属性和值; attrArrayNameExp 和 valueArrayNameExp 是来替换所需要的属性和值,计算的结果是数组的名称。
<Var name="stateAttr" type="String[]" values="'x', 'y','w', 'h', 'fillColor', 'rotation', 'alpha', 'scaleX', 'scaleY', 'pivotX', 'pivotY', 'pivotZ', 'rotationX', 'rotationY', 'rotationZ', 'strokeColor', 'cornerRadiusX', 'cornerRadiusY', 'strokeWeight'" />

<Var name="stateValue" type="number[]" values="300, 300, 500, 500, 0xfff00000, 100, 20, 0.3, 0.3, 100, 100, 100, 200, 200, 200, 0xffffff00, 100 ,100, 100" />
<AnimStateCommand target="keyState" command="update" attrArrayNameExp="'stateAttr'" valueArrayNameExp="'stateValue'"/>
remove命令
<AnimStateCommand target="keyState" command="remove" attrsExp="'x', 'y'" />
<AnimStateCommand target="keyState" command="remove" attrArrayNameExp="'stateAttr'" />
clear命令
<AnimStateCommand target="keyState" command="clear" />
AnimConfig标签
AnimConfig 关键帧动画 配置项,配置 关键帧动画的运动曲线、时长 等。
<AnimConfig name="keyConfig" ease="-2, 1, 1"/>

<!-- 有Special子标签 -->
<AnimConfig name="keyConfig" property="'x', 'y'" ease="-2,0.1, 2">
	<Special name="s1" property="'w', 'h'" ease="5, 500" fromSpeed="500" />
</AnimConfig>
Special 子标签必须有 名称;
special 里面的属性 按照特殊的设定执行,其他属性遵循统一的设定执行。
系统会自动建立以下变量
config.property (字符串数组变量)
config.property.length (数字变量,数组长度,可以通过数组长度访问数组内的值)
config.ease (数字数组变量)
config.ease.length (数字变量,数组长度,可以通过数组长度访问数组内的值)
config.fromSpeed (数字变量)

config.s1.property
config.s1.property.length
config.s1.ease
config.s1.ease.length
config.s1.fromSpeed
| 名称 | 说明 | 参数 | 其他 |
|---|---|---|---|
| delay | 延时 | 数字表达式 | |
| ease | 曲线 | 数字表达式集合 | ease="曲线类型,参数1,参数2"曲线类型,取值范围:-4 ~ 19 比如设置spring_phy曲线,damp 为 0.5,response 为 0.9, 则为 ease="-2, 0.5, 0.9" |
| fromSpeed | 初始速度 | 数字表达式 | |
| name | 标签名称 | 字符串 | |
| onBegin | 注册回调 | onBegin="'FunctionA'"字符串表达式集合 | 开始时;参考 示例2 中的用法 |
| onComplete | 注册回调 | onComplete="'FunctionB'"字符串表达式集合 | 结束时;参考 示例2 中的用法 |
| onUpdate | 注册回调 | onUpdate="'FunctionC'"字符串表达式集合 | 更新、进行中;参考 示例2 中的用法 |
| property | FolmeState 中属性的名称 | property="'x','y'"字符串表达式集合 | 列如:'x','y','fillColor' |
曲线类型介绍
| 曲线名称 | 类型编号 | 介绍 | 使用说明 |
|---|---|---|---|
| friction | -4 | 物理摩擦曲线 | ease="-4,参数1",参数1:阻力摩擦系数(0 ~ 1) |
| accelerate | -3 | 物理加速曲线 | ease="-3,参数1",参数1:加快 (Kpixels/s^2) |
| spring_phy | -2 | 物理弹簧曲线(保留运动状态) | ease="-2,参数1,参数2"参数1:阻尼(damping); 参数2:响应(response) |
| duration | -1 | 物理线性曲线 | ease="-1,参数1",参数1:持续时间 (ms) |
| spring | 0 | 弹簧曲线(保留运动状态) | ease="0,参数1,参数2"参数1:阻尼(damping); 参数2:响应(response) |
| linear | 1 | 线性曲线 | ease="1,参数1",参数1:持续时间 (ms) |
| quadIn | 2 | Quad,factor = 1 插值器 | ease="2,参数1",参数1:持续时间 (ms) |
| quadOut | 3 | Quad,factor = 1 插值器 | ease="3,参数1",参数1:持续时间 (ms) |
| quadInOut | 4 | Quad,factor = 1 插值器 | ease="4,参数1",参数1:持续时间 (ms) |
| cubicIn | 5 | Cubic,factor = 1.5 插值器 | ease="5,参数1",参数1:持续时间 (ms) |
| cubicOut | 6 | Cubic,factor = 1.5 插值器 | ease="6,参数1",参数1:持续时间 (ms) |
| cubicInOut | 7 | Cubic,factor = 1.5 插值器 | ease="7,参数1",参数1:持续时间 (ms) |
| quartIn | 8 | Quart,factor = 2 插值器 | ease="8,参数1",参数1:持续时间 (ms) |
| quartOut | 9 | Quart,factor = 2 插值器 | ease="9,参数1",参数1:持续时间 (ms) |
| quartInOut | 10 | Quart,factor = 2 插值器 | ease="10,参数1",参数1:持续时间 (ms) |
| quintIn | 11 | Quint,factor = 2.5 插值器 | ease="11,参数1",参数1:持续时间 (ms) |
| quintOut | 12 | Quint,factor = 2.5 插值器 | ease="12,参数1",参数1:持续时间 (ms) |
| quintInOut | 13 | Quint,factor = 2.5 插值器 | ease="13,参数1",参数1:持续时间 (ms) |
| sinIn | 14 | sin.easeIn 插值器 | ease="14,参数1",参数1:持续时间 (ms) |
| sinOut | 15 | sin.easeOut 插值器 | ease="15,参数1",参数1:持续时间 (ms) |
| sinInOut | 16 | sin.easeInOut 插值器 | ease="16,参数1",参数1:持续时间 (ms) |
| expoIn | 17 | expo.easeIn 插值器 | ease="17,参数1",参数1:持续时间 (ms) |
| expoOut | 18 | expo.easeOut 插值器 | ease="18,参数1",参数1:持续时间 (ms) |
| expoInOut | 19 | expo.easeInOut 插值器 | ease="19,参数1",参数1:持续时间 (ms) |
AnimConfig 标签提供了命令可以进行 update/remove/clear(更新/去除/清空) 操作
假设有 AnimConfig标签 如下:
<AnimConfig name="keyConfig" property="'x', 'y'" ease="-2,0.1, 2" fromSpeed="0">
	<Special name="s1" property="'w', 'h'" ease="5, 500" fromSpeed="500" />
</AnimConfig>
update命令
使用 attrsExp 和 valuesExp 来替换所需要的属性和值,没有会自动增加,attrsExp 为字符串表达式,valuesExp 为表达式集合。
<AnimConfigCommand target="keyConfig" command="update" attrsExp="'ease'" valuesExp="-2, 1, 1"/>
<AnimConfigCommand target="keyConfig" command="update" subNameExp="s1" attrsExp="'prperty'" valuesExp="'rotationX', 'rotationY'"/>
remove命令
<AnimConfigCommand target="keyConfig" command="remove" attrExp="'ease'" />
<AnimConfigCommand target="keyConfig" command="remove" subNameExp="s1" attrExp="'ease'" />
clear命令
<AnimConfigCommand target="keyConfig" command="clear" />
关键帧播放命令
前面已经定义了 AnimState 和 AnimConfig,通过 FolmeCommand 命令来播放这个动画。
<Rectangle name="keyRec" x="540" y="300" w="400" h="300" align="center" fillColor="#ffffffff" folmeMode="true"/>

<Trigger action="up">
	<!-- FolmeCommand命令 -->
	<FolmeCommand target="keyRec" command="to" states="'keyState'" config="'keyConfig'"/>
</Trigger>
folmeMode="true"时,系统会为name="keyRec"元素自动建立 keyRec.x ... keyRec.h 等所有可用的变量,可直接访问这些变量得到值。
<!-- command 和 target 为字符串,config 为字符串表达式,states 为字符串表达式集合。 -->
<FolmeCommand target="做动画元素名称" command="to/setTo/fromTo/cancel" states="state元素名称表达式集合" config="config元素名称" params=""/>

<FolmeCommand target="test" command="to" states="'stateTo'" config="'configA'" />
<FolmeCommand target="test" command="setTo" states="'stateTo'" />
<FolmeCommand target="test" command="fromTo" states="'stateFrom', 'stateTo'" config="'configA'"/>
<FolmeCommand target="test" command="cancel" />
<FolmeCommand target="test" command="cancel" params="'x', 'y'"/>
示例1:
<Lockscreen frameRate="60" screenWidth="1080" version="2">
	<Wallpaper />

	<!-- 关键帧 -->
	<AnimState name="keyState" />
	<!-- 关键帧动画 配置项;配置全部属性动画 或者 特殊属性动画(Special) -->
	<AnimConfig name="keyConfig" ease="-2,1,1"/>

	<Rectangle name="keyRec" w="300" h="300" fillColor="#ffffffff" folmeMode="true" touchable="true">
		<Triggers>
			<Trigger action="up">
				<!-- 更新state的数据 -->
				<AnimStateCommand target="keyState" command="update" attrsExp="'x','y','w','h'" valuesExp="400,600,400,400" condition="#aniRec.x { 200" />
				<AnimStateCommand target="keyState" command="update" attrsExp="'x','y','w','h'" valuesExp="0,0,300,300" condition="#keyRec.x } 200"/>
				<!-- 关键帧动画;播放 to  -->
				<FolmeCommand target="aniRec" states="'keyState'" command="to" config="'keyConfig'"/>
			</Trigger>
		</Triggers>
	</Rectangle>
</Lockscreen>
示例2:
<Lockscreen frameRate="60" screenWidth="1080" version="2">
	<Wallpaper />

	<Var name="stateAttr" type="String[]" const="true" values="'x', 'y','w', 'h', 'fillColor', 'rotation', 'alpha', 'scaleX', 'scaleY', 'pivotX', 'pivotY', 'pivotZ', 'rotationX', 'rotationY', 'rotationZ', 'strokeColor', 'cornerRadiusX', 'cornerRadiusY', 'strokeWeight'" />
	<Var name="stateValue" type="number[]" const="true" values="300, 300, 500, 500, 0xfff00000, 0, 200, 1, 1, 300, 300, 0, 0, 0, 180, 0xffffff00, 10 ,10, 6" />

	<!-- 关键帧 -->
	<AnimState name="keyState"/>
	<!-- 关键帧动画 配置项;配置全部属性动画 或者 特殊属性动画(Special) -->
	<AnimConfig name="keyConfig" ease="-2, 1, 0.6" onBegin="'FunctionA'" onComplete="'FunctionB'" onUpdate="'FunctionC'"/>

	<!-- Function 为 MAML2.0 新增的函数标签,可以理解为组操作 -->
	<Function name="FunctionA">
		<VariableCommand name="onBeginNum" expression="0"/>
		<VariableCommand name="onCompleteNum" expression="0"/>
		<VariableCommand name="onUpdateNum" expression="0"/>
		<VariableCommand name="onBeginNum" expression="#onBeginNum+1"/>
	</Function>
	<Function name="FunctionB">
		<VariableCommand name="onCompleteNum" expression="#onCompleteNum+1"/>
		<AnimStateCommand target="keyState" command="update" attrsExp="'y','fillColor','alpha','strokeWeight'" valuesExp="700,0xffffffff,255,0"/>
		<FolmeCommand target="aniRec" states="'keyState'" command="to" config="'keyConfig'"/>
	</Function>
	<Function name="FunctionC">
		<VariableCommand name="onUpdateNum" expression="#onUpdateNum+1"/>
	</Function>

	<Rectangle name="keyRec" w="300" h="300" fillColor="#ffffffff" folmeMode="true" touchable="true">
		<Triggers>
			<Trigger action="up">
				<!-- 更新state的数据 -->
				<AnimStateCommand target="keyState" command="update" attrArrayNameExp="'stateAttr'" valueArrayNameExp="'stateValue'" />
				<!-- Folme动画;播放 to  -->
				<FolmeCommand target="keyRec" states="'keyState'" command="to" config="'keyConfig'"/>
			</Trigger>
		</Triggers>
	</Rectangle>

	<Text x="100" y="1600"  color="#ffff0000" size="42" textExp="'动画开始时:'+#onBeginNum"/>
	<Text x="100" y="1650"  color="#ffff0000" size="42" textExp="'动画结束后:'+#onCompleteNum"/>
	<Text x="100" y="1700"  color="#ffff0000" size="42" textExp="'动画更新中:'+#onUpdateNum"/>
</Lockscreen>
# 缓动函数
<!-- easeType实现,使用内置函数 -->
<Image name="wao" x="0" y="0" w="1080" h="114" src="dst.png" >
    <PositionAnimation tag="show1" initPause="true" loop="false" >
        <Item y="0" time="0" easeType="ExpoEaseOut"/>
        <Item y="300" time="300"/>
    </PositionAnimation>
</Image>

<!-- easeExp实现,自定义缓动效果 -->
<Var name="easeAni">
    <VariableAnimation loop="false" initPause="true">
        <Item value="0" time="0" easeExp="#__ratio*#__ratio"/>
        <Item value="100" time="2000"/>
    </VariableAnimation>
 </Var>
easeType 缓动类型,对照表
SineEaseIn
SineEaseOut
SineEaseInOut
QuadEaseIn
QuadEaseOut
QuadEaseInOut
CubicEaseIn
CubicEaseOut
CubicEaseInOut
QuartEaseIn
QuartEaseOut
QuartEaseInOut
QuintEaseIn
QuintEaseOut
QuintEaseInOut
ExpoEaseIn
ExpoEaseOut
ExpoEaseInOut
CircEaseIn
CircEaseOut
CircEaseInOut
BackEaseIn
BackEaseOut
BackEaseInOut
ElasticEaseIn
ElasticEaseOut
ElasticEaseInOut
BounceEaseIn
BounceEaseOut
BounceEaseInOut
- 用easeType方式,内置缓动函数可带参数
- BackEase 可以带 1 个参数,overshot
- ElasticEase 可以带 2 个参数,priod 和 amplitude
- 参数为常数,比如 BackEaseIn(1.5) ElasticEase(2,3)
- 用 easeExp 来填表达式的方式,引用一个内置变量 #__ratio ,可以自定义缓动函数
- 比如 easeType="QuadEaseIn" 也可以用
easeExp="#__ratio*#__ratio"来实现 - 当有 easeExp 时,easeType 不起作用
- 属性作用于从该帧到下一帧,最后一帧没用
# 命令汇总
需要注意命令应该放在Trigger标签内,否则不会生效。
示例:
<Button x="0" y="0" w="1080" h="#screen_height">
    <Triggers>
        <Trigger action="up">
            <!-- 控制对应name元素可见性 如控制name为test_a元素可见性的两种方式 -->
            <Command target="test_a" property="visibility" value="true/false" />
            <Command target="test_a.visibility" value="true/false" />
            <!-- 控制对应name播放动画 如控制name为test_b元素播放动画的两种方式 -->
            <Command target="test_b.animation" value="play" />
            <AnimationCommand target="test_b" command="play" />
            <!-- 变量赋值,将name为test1的变量赋值为0,注意变量类型, -->
            <VariableCommand name="test1" expression="0" />
            <!-- 播放声音文件 -->
            <SoundCommand sound="famous.wav" volume="0.5" loop="false" keepCur="true" />
            <!-- 关闭系统充电动画 -->
            <ExternCommand command="disableChargeAnim" numPara="1"/>
            <!-- 开启系统充电动画 -->
            <ExternCommand command="disableChargeAnim" numPara="0"/>
            <!-- 关闭屏下指纹 -->
            <ExternCommand command="disableFod" numPara="1"/>
            <!-- 开启屏下指纹 -->
            <ExternCommand command="disableFod" numPara="0"/>
            <!-- 关闭指纹识别动画 -->
            <ExternCommand command="disableFodAnim" numPara="1"/>
            <!-- 开启指纹识别动画 -->
            <ExternCommand command="disableFodAnim" numPara="0"/>
            <!-- 解锁 -->
            <ExternCommand command="unlock" />
        </Trigger>
    </Triggers>
</Button>
# 可见性命令
<Command target="test_a" property="visibility" value="true" />
<Command target="test_a.visibility" value="true" />
(注意:上面只不过是两种不同的写法,效果一样)
| 代码 | 释义 |
|---|---|
| Command | 基础命令,可以通过对象名和对象的属性来控制界面里的其他元素。通常控制的是元素的可见性(visibility)和动画播放(animation)。 |
| target | 控制目标名 |
| property | 属性名,目前支持:visibility |
| value | 属性值,目前针对 boolean 有: true, false, toggle |
# 动画命令
<Command target="test_c.animation" value="play" />
<AnimationCommand target="test_c" command="play"/>
上面两行是播放动画的两种写法,效果一样!
# 声音命令
<SoundCommand sound="famous.wav" volume="0.5" loop="false" keepCur="true" />
| 代码 | 释义 |
|---|---|
| sound | 填声音文件路径名 |
| volume | 声音大小,0 - 1 的一个浮点数 |
| loop | 是否循环播放,true/false,默认是 false. |
| keepCur | 播放此音频时,是否保持当前正在播放的声音,true/false,默认 false |
注意:声音文件的大小要求不超过 500kB,时长不超过 10 秒(10 秒之后的声音播放不出来)。
# 变量命令
<!--VariableCommand:用来控制变量(Var)的值-->
<VariableCommand name="w" expression="#screen_width" delay="100" condition="#switch" />
| 代码 | 释义 |
|---|---|
| name | 变量名 |
| expression | 赋值表达式 |
| condition | 条件判断,支持表达式。当 condition 里的条件判断为真时,执行命令;为假时,不执行。 |
| delay | 延迟,以毫秒记。读取该命令后延迟一段时间再执行 |
| delayCondition | 是延时判断,在 delay 的时间之后再进行判断 |
# 通用命令
1.ExternCommand:用来向外部程序发送命令
<ExternCommand command="命令名" numPara="参数1,数字表达式" strPara="参数2,字符串表达式"/>
<!-- 解锁命令,100 毫秒后解锁 -->
<ExternCommand command="unlock" delay="100" />
<!-- 清理缓存 帧动画播放结束后执行可释放内存 -->
<ExternCommand command="__clearResource" />
2.ExternalCommand与 ExternCommand相对,ExternalCommand是用来接收外部命令的命令,典型的用法:在锁屏中,通常用来接收开屏/关屏动作,从而执行一些命令;在桌面插件中,用来检测切屏从而执行命令。
需要注意一个XMl文件只支持一个ExternalCommands。
<!--resume 曝光时执行的命令,pause 关屏时执行的命令-->
<ExternalCommands>
    <Trigger action="resume">
        <Command target="target.animation" value="play"/>
    </Trigger>
    <Trigger action="pause">
        <VariableCommand name="pause_time" expression="#time_sys"/>
    </Trigger>
</ExternalCommands>
<!--桌面插件切屏时使用的示例-->
<ExternalCommands>
    <Trigger action="resume">
        <Command target="__root.animation" value="play"/>
    </Trigger>
    <Trigger action="pause">
        <Command target="__root.animation" value="play"/>
    </Trigger>
</ExternalCommands>
# 打开程序
<IntentCommand action="android.intent.action.MAIN" package="com.android.thememanager" class="com.android.thememanager.ThemeResourceTabActivity" />
<ExternCommand command="unlock" delay="100" />
要记得加上解锁命令,否则只是在后台打开了,还要解锁才能看到。
不解锁打开手电筒:
<!-- 使用2张切图通过#lightSwitch引用可展模拟开与关的状态,切图命名为:flashlight_0.png,flashlight_1.png -->
<Image x="800" y="#screen_height-150" src="flashlight.png" srcid="#lightSwitch"/>
<Button x="800" y="#screen_height-150" w="150" h="150" >
    <Triggers>
        <Trigger action="up">
            <VariableCommand name="lightSwitch" expression="!(#lightSwitch)" />
            <IntentCommand action="miui.intent.action.TOGGLE_TORCH" broadcast="true" >
                <Extra name="miui.intent.extra.IS_ENABLE" type="boolean" expression="ifelse(int(@__miui_version_code)}=8,#lightSwitch,1)" />
            </IntentCommand>
        </Trigger>
    </Triggers>
</Button>
常用的几个系统开关写法,以及支持版本
1.开关蓝牙 锁屏正常支持,MIUI14以下版本小部件支持
<!-- 打开蓝牙 -->
<Command target="Bluetooth" value="on"/>
<!-- 关闭蓝牙 -->
<Command target="Bluetooth" value="off"/>
<!-- 切换蓝牙状态 -->
<Command target="Bluetooth" value="toggle"/>
2.开关数据 MIUI13以下版本锁屏支持,小部件不支持
<!-- 打开数据连接 -->
<Command target="Data" value="on"/>
<!-- 关闭数据连接 -->
<Command target="Data" value="off"/>
<!-- 切换数据连接状态 -->
<Command target="Data" value="toggle"/>
3.切换铃声模式 锁屏正常支持,小部件在MIUI14以下版本支持正常和震动切换
<!-- 切换铃声模式(正常、静音、振动)-->
<Command target="RingMode" value="toggle"/>
<!-- 也可以使用以下方式实现相同效果 -->
<Command target="RingMode" value="normal,silent,vibrate"/>
<!-- 仅正常和静音切换 -->
<Command target="RingMode" value="normal,silent"/>
<!-- 仅正常和振动切换 -->
<Command target="RingMode" value="normal,vibrate"/>
<!-- 仅切换到静音 -->
<Command target="RingMode" value="silent"/>
4.开关WiFi
<!-- 打开WiFi -->
<Command target="Wifi" value="on"/>
<!-- 关闭WiFi -->
<Command target="Wifi" value="off"/>
<!-- 切换WiFi状态 -->
<Command target="Wifi" value="toggle"/>
| 属性 | 名词 | 释义 |
|---|---|---|
| bluetooth_state | 蓝牙状态 | 0 关,1 开,2 连接中 |
| data_state | 数据状态 | 0 关,1 开 |
| ring_mode | 声音模式 | 0 静音,1 振动,2 正常 |
| wifi_state | wifi 状态 | 0 禁用,1 启用,2 问题,3 连接中 |
注意:上面四个开关的状态变量必须有相应的按钮才会正常显示
实例
<!-- 4个系统常用开关 -->
<Group nmame="toggle_four" x="0" y="0" >
    <!-- 1 正常/静音开关;切图为:ring_0.png、ring_1.png -->
    <Image x="94" y="500" src="toggle/ring.png" srcid="ifelse(#ring_mode==2,0,1)"/>
    <Button x="94" y="500" w="178" h="178">
        <Triggers>
            <Trigger action="up">
                <Command target="RingMode" value="normal,silent"/>
            </Trigger>
        </Triggers>
    </Button>
    <!-- 2 蓝牙开关;切图为:bluetooth_0.png、bluetooth_1.png -->
    <Image x="332" y="500" src="toggle/bluetooth.png" srcid="#bluetooth_state!=0"/>
    <Button x="332" y="500" w="178" h="178">
        <Triggers>
            <Trigger action="up">
                <Command target="Bluetooth" value="toggle"/>
            </Trigger>
        </Triggers>
    </Button>
    <!-- 3 wifi开关;切图为:wifi_0.png、wifi_1.png -->
    <Image x="570" y="500" src="toggle/wifi.png" srcid="#wifi_state!=0"/>
    <Button x="570" y="500" w="178" h="178">
        <Triggers>
            <Trigger action="up">
                <Command target="Wifi" value="toggle"/>
            </Trigger>
        </Triggers>
    </Button>
    <!-- 4 数据开关;切图为:data_0.png、data_1.png -->
    <Image x="808" y="500" src="toggle/data.png" srcid="#data_state"/>
    <Button x="808" y="500" w="178" h="178">
        <Triggers>
            <Trigger action="up">
                <Command target="Data" value="toggle"/>
            </Trigger>
        </Triggers>
    </Button>
</Group>
示例附件:常用开关示例 lock915.mtz (opens new window)
# 充电动画
随着手机充电方式的强大,快充、超级快充、无线充电、有线充电,各种效果的添加,大家是不是也希望主题可以做到各种效果呢?(参数仅在 MIUI11 开发版之后的版本支持,跨版本时请注意兼容性)
- 锁屏支持 显示/关闭 进入充电状态时刻的默认充电动画
| 属性 | 释义 |
|---|---|
| disableChargeAnim | 0 显示,1 不显示(默认为 0) |
示例:
<!-- 关闭系统充电动画 -->
<ExternCommand command="disableChargeAnim" numPara="1"/>
<!-- 开启系统充电动画 -->
<ExternCommand command="disableChargeAnim" numPara="0"/>
- 获取充电状态
#ChargeSpeed            0 普通充电, 1 快充, 2 超级快充,3 极速秒充(120w±)
#ChargeWireState        11 有线充电, 10 无线充电, -1 未充电
# 屏下指纹
目前部分小米手机已支持屏下指纹功能,屏下指纹开启时,可能会影响百变锁屏上的内容展示或带来较差的用户体验。
为此,百变锁屏支持关闭屏下指纹功能。
注意⚠️:仅支持产生必要交互时关闭指纹功能(如 锁屏进入相机、进入负一屏时、进入锁屏游戏等情况),
禁止默认非交互场景下关闭指纹功能。
锁屏默认的状态时 开启屏下指纹功能,每次解锁后锁屏会重置这个状态,所以每次加载锁屏后如果要关掉功能均需下发命令给锁屏。
控制屏下指纹功能和动画是否开启(关闭功能指纹图标会消失)
| ExternCommand 命令 | 说明 | 参数 |
|---|---|---|
| disableFod | 指纹开关 | 0开启;1关闭 |
| disableFodAnim | 指纹识别动画开关 | 0开启;1关闭 |
示例:
<Trigger>
    <!-- 关闭屏下指纹 -->
    <ExternCommand command="disableFod" numPara="1"/>
    <!-- 关闭指纹识别动画 -->
    <ExternCommand command="disableFodAnim" numPara="1"/>
</Trigger>

<Trigger>
    <!-- 开启屏下指纹 -->
    <ExternCommand command="disableFod" numPara="0"/>
    <!-- 开启指纹识别动画 -->
    <ExternCommand command="disableFodAnim" numPara="0"/>
</Trigger>
新增 指纹相关全局变量
| 属性 | 释义 |
|---|---|
| fod_enable | 系统是否启用了屏下指纹:0 关闭, 1 开启 |
| fod_x | 指纹区域 x 坐标 |
| fod_y | 指纹区域 y 坐标 |
| fod_width | 指纹区域 宽度 |
| fod_height | 指纹区域 高度 |
| fod_state_msg | 指纹状态:1 手指按下,2 手指抬起,3 识别失败,4 识别成功 |
演示 demo.mtz (opens new window)
# 控件用法
按钮
Trigger 在按钮、Unlocker、Slider、命令组调用中的用法基本一样,但各控件有它们各自的特性和各条件下命令的不同用法,这里给大家详细讲下
# 按钮
按钮元素可以用来接收 点击、按下、双击、移动 等事件,并可根据 trigger 的定义来控制界面上其他元素
| 属性 | 释义 |
|---|---|
| x, y, w, h | 指定坐标、区域大小 |
| haptic | haptic="true"时振动 ,前提是用户没有在系统设置中关闭 |
| alignChildren | true/false,默认为 false,当为 true 时,内部元素按绝对坐标排布,反之是相对坐标 |
| action | down (按下);move(移动); up (抬起);double (双击) |
| interceptTouch | 是否截获以后的触摸事件,避免被其他 View 捕获,例如在自由桌面 widget 中可以防止在 widget 上进行触摸操作时桌面滚动和进入编辑模式 |
| Normal | 正常状态,所包含的元素只有在此状态下显示 |
| Pressed | 按下状态,所包含的元素只有在此状态下显示 |
注意:
    1.按钮中trigger被triggers包含
    2.Button中 Image等各元素的坐标和Button自己的坐标是独立的,都是相对于Button的父元素。
<Button x="" y="" w="" h="" interceptTouch="true">
    <Triggers>
        <Trigger action="down">
            <VariableCommand name="test1" expression="0" />
        </Trigger>
        <Trigger action="up">
            <VariableCommand name="test2" expression="0" />
        </Trigger>
        <Trigger action="double">
            <VariableCommand name="test3" expression="0" />
        </Trigger>
    </Triggers>
    <Normal>
        <Image/>
        <Text/>
    </Normal>
    <Pressed>
        <Image/>
        <Text/>
    </Pressed>
</Button>
打开应用程序
<Button name="WeChatButton" x="#screen_width/2" y="#screen_height/2" w="182" h="182" alignChildren="true" >
    <!-- 正常显示状态 -->
    <Normal>
        <!-- 这里写 正常显示的元素,比如图片、文字等 -->
    </Normal>
    <!-- 按下显示状态 -->
    <Pressed>
        <!-- 这里写 按下显示的元素,比如图片、文字等 -->
    </Pressed>
    <Triggers>
        <Trigger action="up">
            <!-- 执行解锁命令;要记得加上解锁命令,否则只是在后台打开了,还要解锁才能看到 -->
            <ExternCommand command="unlock" />
            <!-- 根据 action & package(包名) & class(类名) 启动 应用程序 -->
            <IntentCommand action="android.intent.action.MAIN" package="com.tencent.mm" class="com.tencent.mm.ui.LauncherUI" />
        </Trigger>
    </Triggers>
</Button>
【condition:条件】;满足 condition 条件时,执行 command,command="unlock" 解锁命令
<Button w="#screen_width" h="#screen_height" >
    <Triggers>
        <!--down (按下);move(移动); up (抬起);double (双击)-->
        <Trigger action="up,cancel">
            <!--condition;当 #touch_begin_y-#touch_y 大于等于 300 时,解锁-->
            <ExternCommand command="unlock" condition="#touch_begin_y-#touch_y }= 300" />
        </Trigger>
    </Triggers>
</Button>
用 Button 来做一个上滑手势,并解锁
<!--解锁文字提示-->
<Text x="#screen_width/2" y="#screen_height-100-#unlockMove" align="center" alignV="center" color="#ffffff" size="42" text="向上滑动解锁"/>
<!--解锁相关 变量、动画、按钮-->
<Group name="unlock" >
    <!--实时变量-->
    <Var name="unlockMove" expression="ifelse(#unlockDown==1,max(#touch_begin_y-#touch_y,0),max(#touch_begin_y-#touch_y,0) { 300,max(#touch_begin_y-#touch_y,0)*(1-#unlockBack),0)" />
    <!--动画-->
    <Var name="unlockBack">
        <VariableAnimation initPause="true" loop="false">
            <Item value="0" time="0" easeType="BounceEaseOut" />
            <Item value="1" time="300" />
        </VariableAnimation>
    </Var>
    <!--解锁按钮-->
    <Button w="#screen_width" h="#screen_height" >
        <Triggers>
            <Trigger action="down">
                <VariableCommand name="unlockDown" expression="1"/>
            </Trigger>
            <Trigger action="up,cancel">
                <VariableCommand name="unlockDown" expression="0" />
                <Command target="unlockBack.animation" value="play" />
                <!--condition 执行条件,当 max(#touch_begin_y-#touch_y,0) 大于等于 300px 时 unlock-->
                <ExternCommand command="unlock" condition="max(#-#touch_y,0) }= 300" />
            </Trigger>
        </Triggers>
    </Button>
</Group>
unlockMove  数值变量;
unlockBack  动画变量,播放时,值从 0-1 ;
Button      按钮的大小,通过 condition(条件) 来判断是否解锁 。
down 时 unlockDown 等于 1,up,cancel 时 unlockDown 等于 0

从 unlockMove 开始解释,别被变量吓到了,简化之后实际是这样的 ifelse(x0,y0,x1,y1,0)

unlockDown==1 时, unlockMove 值等于 max(#touch_begin_y-#touch_y,0),
#touch_begin_y 减去 #touch_y 等于滑动距离,
max(#touch_begin_y-#touch_y,0) 小于 300 时,unlockMove 值等于max(#touch_begin_y-#touch_y,0)*(1-#unlockBack),否则结果为 0

按钮执行的命令
1.down 时 unlockDown 等于 1,up,cancel 时 unlockDown 等于 0
2.播放动画 unlockBack.animation
3.condition;当 max(#touch_begin_y-#touch_y,0) 大于等于 300 时,解锁
注意:
- 按钮中 trigger 被 triggers 包含
- 当定义 alignChildren="true" 时,Button 内的元素坐标都是基于按钮的坐标来计算;否则坐标均是独立计算
<ExternCommand command="unlock" />解锁命令;要记得加上,否则只是在后台打开了
# 滑动
Unlocker,Slider
请先看《百变锁屏入门》-解锁 Unlocker (opens new window)
Unlocker 与 Slider 的用法是一样的,都是通过滑动来激活某些操作,只不过 Unlocker 能直接解锁。
| 属性 | 释义 |
|---|---|
| StartPoint | 起始点 |
| EndPoint | 目标点 |
| haptic | haptic="true"时振动 ,前提是用户没有在系统设置中关闭 |
| alignChildren | true/false,为 true 时,内部元素按绝对坐标排布 |
| bounceInitSpeed(旧方案) | 回弹动画初始速度(距离单位为像素,时间单位为秒),支持表达式 |
| bounceAcceleration(旧方案) | 回弹动画加速度(距离单位为像素,时间单位为秒),支持表达式 |
| easeType=“”或 easeExp=“” (新方案) | 缓动类型;可查看:缓动函数 |
| easeTime=“”(新方案) | 缓动时间 |
| alwaysShow | true/false" 默认是 false,当一个 Slider 可见时,其他 Slider 消失。 |
| normalSound(StartPoint 下) | 指定在 normal 状态播放的音效 |
| pressedSound(StartPoint 下) | 指定在 press 状态播放的音效 |
| reachedSound(EndPoint 下) | 到达该 endpoint 后播放的音效 |
| NormalState | 正常状态 |
| PressedState | 按下状态 |
| ReachedState | 激活状态 |
注意:
- Unlocker 与 Slider 都有三种状态(NormalState、PressedState、ReachedState),都可以包含任意界面元素,如 Image Text 等,也可以不指定,相关元素在该状态下才显示
- 示例中,起始点(StartPoint)和目标点(EndPoint)它们都可以包含 NormalState、PressedState、ReachedState 三个状态,但是在起始点(StartPoint)中的按下状态(PressedState)包含的元素会随你手指移动
示例:
<Slider name="slider">
    <StartPoint x="0" y="1600" w="1080" h="320" easeType="QuadEaseOut" easeTime="1000">
        <NormalState>
            <Image x="31" y="#screen_height-117" src="unlock_button.png" />
        </NormalState>
        <!-- Trigger Slider的状态切换时,支持Trigger触发 -->
        <PressedState>
            <Text x="640" y="240" w="640"  color="#FE9D01" size="28" text="小米主题" />
        </PressedState>
        <ReachedState>
            <DateTime/>
            <Trigger>
                <SoundCommand sound="reached.mp3" volume="1"/>
            </Trigger>
        </ReachedState>
    </StartPoint>
    <EndPoint x="359" y="#screen_height-117" w="90" h="90">
        <Path x="0" y="#screen_height-117">
            <Position x="31" y="0" />
            <Position x="359" y="0" />
        </Path>
        <NormalState>
        </NormalState>
        <PressedState>
        </PressedState>
        <ReachedState>
        </ReachedState>
    </EndPoint>
</Slider>
# 音乐播放器
<MusicControl name="music_control" y="800" w="1080" h="226" autoShow="true" defAlbumCover="music/default_bg.jpg" enableLyric="true" updateLyricInterval="100" visibility="false" >
    <!-- 音乐窗口背景 -->
    <Image x="40" y="0" w="1000" h="226" src="music/music_bg.9.png" />
    <!-- 专辑图 -->
    <Group x="40" w="226" h="226" layered="true">
        <Image name="music_album_cover" w="226" h="226" />
        <Image w="226" h="226" src="music/music_bg.9.png" xfermode="dst_in" />
    </Group>
    <!-- 歌曲名、歌手名、播放时间 -->
    <Text x="296" y="61" w="674" alignV="center" textExp="ifelse(strIsEmpty(@music_control.title),'暂无音乐',@music_control.title)" color="#000000" size="39" marqueeSpeed="30" bold="true"/>
    <Text x="296" y="117" w="350" alignV="center" textExp="ifelse(strIsEmpty(@music_control.artist),'--',@music_control.artist)" color="#000000" size="36" marqueeSpeed="30" alpha="128" />
    <Text x="296" y="169" w="350" alignV="center" textExp="ifelse(strIsEmpty(@music_control.title),'--:--/--:--',formatDate('mm:ss / ',#music_control.music_position)+formatDate('mm:ss',#music_control.music_duration))" color="#000000" size="33" marqueeSpeed="30" alpha="128" />
    <!-- 上一曲、播放、暂停、下一曲 -->
    <Button name="music_prev" x="#screen_width - 308" y="76" w="120" h="150" align="right" alignChildren="true">
        <Normal>
            <Image x="60" y="75" align="center" alignV="center" src="music/prev.png" />
        </Normal>
        <Pressed>
            <Image x="60" y="75" align="center" alignV="center" src="music/prev.png" alpha="128"/>
        </Pressed>
    </Button>
    <Button name="music_play" x="#screen_width - 188" y="76" w="120" h="150" align="right" alignChildren="true">
        <Normal>
            <Image x="60" y="75" align="center" alignV="center" src="music/play.png" />
        </Normal>
        <Pressed>
            <Image x="60" y="75" align="center" alignV="center" src="music/play.png" alpha="128"/>
        </Pressed>
    </Button>
    <Button name="music_pause" x="#screen_width - 188" y="76" w="120" h="150" align="right" alignChildren="true">
        <Normal>
            <Image x="60" y="75" align="center" alignV="center" src="music/pause.png" />
        </Normal>
        <Pressed>
            <Image x="60" y="75" align="center" alignV="center" src="music/pause.png" alpha="128"/>
        </Pressed>
    </Button>
    <Button name="music_next" x="#screen_width - 68" y="76" w="120" h="150" align="right" alignChildren="true">
        <Normal>
            <Image x="60" y="75" align="center" alignV="center" src="music/next.png" />
        </Normal>
        <Pressed>
            <Image x="60" y="75" align="center" alignV="center" src="music/next.png" alpha="128"/>
        </Pressed>
    </Button>
</MusicControl>
示例:音乐播放器 示例 lock915.mtz (opens new window)
| 属性 | 释义 |
|---|---|
| autoShow | 是否根据系统播放音乐自动展现和关闭音乐组件 |
| defAlbumCover | 指定默认专辑图片,填路径文件名 |
| enableLyric | true/false,是否开启歌词支持。开启歌词后会有一定性能的损失,不需要歌词的时候不要打开 |
| updateLyricInterval | 音乐信息的更新间隔。间隔越小,更新越及时,但带来的性能损失也越大,适当将间隔设小 |
| music_album_cover | 专辑图 |
| clip | Group 内的元素只显示 w h 规定的区域,超出部份切除 |
| musicName.title | 歌曲名称;获取 name="musicName" 标题文本 |
| musicName.artist | 歌手名称;获取 name="musicName" 专辑文本 |
| musicName.album | 专辑名称;ps:专辑名可能会无数据 |
| musicName.lyric_before | 已播放的歌词 |
| musicName.lyric_after | 未播放的歌词 |
| musicName.lyric_last | 上一句歌词 |
| musicName.lyric_current | 正在播放的歌词 |
| musicName.lyric_next | 下一句歌词 |
| musicName.lyric_current_line_progress | 当前行歌词的行内播放进度,浮点数 0 ~ 1.0 |
| musicName.music_duration | 歌曲长度,单位 ms |
| musicName.music_position | 歌曲当前播放位置,单位 ms |
| musicName.package | 当前播放的音乐应用包名 |
| musicName.class | 当前播放的音乐应用类名 |
要点:
在从未开始播放音乐前,歌曲信息无法获取到,可以为 歌曲、歌手、专辑、时间 等文本写一个为空时判断,以显示无数据状态下的信息。示例:
ifelse(strIsEmpty(@musicName.title),'暂无音乐',@musicName.title);当strIsEmpty(@musicName.title)==1时,显示 '暂无音乐',否则显示 @music.title音乐播放时长和总时长,可以用 DateTime 标签来写,示例:
<DateTime x="" y="" color="" size="42" format="mm:ss" value="#musicName.music_position"/>
- 专辑图为一张比例为 1:1 的图,可以用 图片混合 方式做成任意形状;比如:矩形圆角、圆盘;也可以给专辑图加上旋转,可以使专辑图在播放音乐时有旋转效果。
# 日历
<!-- layer对内部刷新不高的元素有着非常大的优化作用,但有一点要注意:它会自动移至当前界面图层的最上方 -->
<Layer x="200" y="300" width="560" height="560" frameRate="0" >
    <!-- 每月的第一天在日历表第一排的位置 -->
    <Var name="dw0_1" expression="(7-(#date-#day_of_week)%7)%7+1" const="true" />
    <!-- 闰年么? -->
    <Var name="leap_year" expression="eq((#year%4),0)*ne((#year%100),0)+eq((#year%400),0)" const="true" />
    <!-- 这个月有多少天 -->
    <Var name="max_date" expression="28+ne(#leap_year+ne(#month+1,2),0)+ne((#month+1),2)+ne(#month,1)*ne(#month,3)*ne(#month,5)*ne(#month,8)*ne(#month,10)" const="true" />
    <Array name="fde" count="42" indexName="__i" >
        <Text textExp="substr('日一二三四五六',#__i,1)" size="36" x="20+#__i%7*80" y="0"  color="#ffffff"  visibility="lt(#__i,7)" />
        <Rectangle x="#__i%7*80" y="int(#__i/7)*80+70" w="79" h="79" fillColor="argb(55,255,255,255)" visibility="int(#__i-#dw0_1+2)!=#date" />
        <!-- 当天背景 -->
        <Rectangle x="#__i%7*80" y="int(#__i/7)*80+70" w="79" h="79" fillColor="argb(255,50,177,105)" visibility="int(#__i-#dw0_1+2)==#date" />
        <DateTime format="d" value="#time_sys+(#__i+2-#date-#dw0_1)*86400000" size="36" x="40+#__i%7*80" y="int(#__i/7)*80+70" align="center" color="#ffffff" alpha="int(120+135*eq(#__i-#dw0_1+2,#date))"  visibility="int(#__i-#dw0_1+2)*le(int(#__i-#dw0_1+2),#max_date)" />
        <!-- 农历 -->
        <DateTime formatExp="ifelse(eqs(formatDate('e',#time_sys+(#__i+2-#date-#dw0_1)*86400000),'初一'),'N月e','e')"  value="#time_sys+(#__i+2-#date-#dw0_1)*86400000" size="18" x="40+#__i%7*80" y="50+int(#__i/7)*80+70" align="center" color="#ffffff" alpha="int(120+135*eq(#__i-#dw0_1+2,#date))" visibility="int(#__i-#dw0_1+2)*le(int(#__i-#dw0_1+2),#max_date)"  />
    </Array>
</Layer>
返回手势
<!-- 返回手势 -->
<Group name="Return" >
    <Image x="#about*1080" y="#touch_begin_y" w="#ReturnMove*0.5" h="858" alignV="center" rotation="#about*180" pivotY="429" src="bg/gesture_back_background.png" />
    <Image x="#ReturnMove/4+#about*(1080-#ReturnMove/2)" y="#touch_begin_y" align="center" alignV="center" src="bg/gesture_back_arrow.png" visibility="#ReturnMove }= 100" />
    <Var name="ReturnMove" expression="ifelse(#ReturnDown==1,min(abs(#touch_begin_x-#touch_x),168),min(abs(#touch_begin_x-#touch_x),168)*(1-#ReturnBack)*int(#ReturnMove}0))"/>
    <Var name="ReturnBack">
        <VariableAnimation initPause="true" loop="false">
            <Item value="0" time="0" easeType="QuadEaseOut" />
            <Item value="1" time="200" />
        </VariableAnimation>
    </Var>
    <Button w="1080" h="#screen_height" >
        <Triggers>
            <Trigger action="down" condition="#touch_x{50 || #touch_x}1030" >
                <VariableCommand name="ReturnDown" expression="1"/>
                <VariableCommand name="about" expression="#touch_x}540"/>
            </Trigger>
            <Trigger action="up,cancel" >
                <VariableCommand name="ReturnDown" expression="0" />
                <AnimationCommand target="ReturnBack" command="play" />
                <!-- 当移动距离大于100px时,执行动画 -->
                <AnimationCommand target="" command="play" condition="#ReturnMove}100" />
            </Trigger>
        </Triggers>
    </Button>
</Group>
# 外部数据
VariableBinders
定义各种变量绑定到的源。支持 ContentProviderBinder、SensorBinder。需要注意一个XML文件中只能存在一个VariableBinders
VariableBinders内可以包含多个ContentProviderBinder和SensorBinder,还需要注意多个ContentProviderBinder的uri需要不同,SensorBinder的传感器需要不同。
ContentProviderBinder ContentProviderBinder提供了查询应用程序信息的通用接口,定义了新的xml代码来查询contentProvider,并查询到的信息绑定到变量上,用来显示第三方应用程序的信息,只要第三方应用提供相应的contentProvider。比如:可以显示 天气信息、运动计步、待办事项、便签 等。
<VariableBinders>
    <ContentProviderBinder name="name1" uri="content://sample/test" uriFormat="" uriParas="" columns="col1,col2" where="" args="" order="" countName="count_name">
        <Variable name="variable_name1" type="int" column="col1" row="0"/>
        <Variable name="variable_name2" type="string" column="col2" row="0"/>
    </ContentProviderBinder>
    <ContentProviderBinder name="name2" dependency="name1" />
</VariableBinders>
VariableBinders 定义各种变量绑定到的源。支持 ContentProviderBinder、WebServiceBinder、SensorBinder
ContentProviderBinder 定义一个 content provider 源和绑定到它上面的变量
| 属性 | 释义 |
|---|---|
| uir | 指定选用哪个ContentProvider |
| uriFormat | 如果 uri 需要添加变量,可以用格式化,需要和 uriParas 一起使用 |
| uriParas | 同 Text element 的格式 |
| columns | 需要查询的列名,用逗号分隔 |
| where | 查询条件,同 SQL |
| args | “where” 的参数. |
| order | 排序条件, 同 SQL |
| countName | 将查询结构数量绑定到该变量名 |
- Variable 定一个绑定变量
| 属性 | 释义 |
|---|---|
| name | 变量名 |
| type | content provider 中的数据类型: string/double/float/int/long |
| column | 变量绑定到的列的名称. |
| row | 变量绑定到的行数,默认为 0. |
- 支持 where 的格式化 where="" whereFormat="" whereParas=""
- dependency 支持依赖关系,即某个 ContentProviderBinder 查询结束后获取的变量作为下一个 ContentProviderBinder 查询的参数()
<ContentProviderBinder name="name1" />
<ContentProviderBinder name="name2" dependency="name1" />
- name1 查询结束后会触发 name2 的查询
- name2 的查询可以使用 name1 的变量
- 并且如果 name1 数据发生变化重新查询后,会触发 name2 的重新查询
# 消息通知
<!-- 查询通知 -->
<VariableBinders>
    <ContentProviderBinder name="data" uri="content://keyguard.notification/notifications" columns="icon,title,content,time,info,subtext,key" countName="hasnotifications">
        <List name="notice_list" />
    </ContentProviderBinder>
</VariableBinders>
<!-- 通知列表;maxHeight 列表最大显示高度,超出部分不显示,可上下滚动列表 -->
<List name="notice_list" x="0" y="0" w="858" maxHeight="370" data="icon:bitmap,title:string,content:string,time:string,info:string,subtext:string,key:int" visibility="#hasnotifications">
    <Item x="0" y="0" w="858" h="185">
        <!-- 单条消息的显示大小和点击区域 -->
        <Button x="0" y="0" w="858" h="185" alignChildren="true">
            <Normal>
                <Image x="0" y="0" src="notice_bg.png" />
            </Normal>
            <Pressed>
                <Image x="0" y="0" src="notice_bg.png" alpha="200" />
            </Pressed>
            <Image x="50" y="21" w="114" h="114" name="notice_icon" />
            <Text x="190" y="42" size="32" color="#ee000000" bold="true" w="500" h="36" marqueeSpeed="30" name="notice_title" />
            <Text x="190" y="80" size="28" color="#b4000000" w="500" h="42" marqueeSpeed="30" name="notice_content" />
            <Text x="800" y="64" size="28" align="right" color="#b4000000"  name="notice_time" />
            <Triggers>
                <Trigger action="up">
                    <IntentCommand action="com.miui.app.ExtraStatusBarManager.action_remove_keyguard_notification" broadcast="true">
                        <Extra name="com.miui.app.ExtraStatusBarManager.extra_notification_key" type="int" expression="#notice_list.key" />
                        <Extra name="com.miui.app.ExtraStatusBarManager.extra_notification_click" type="int" expression="1" />
                    </IntentCommand>
                </Trigger>
            </Triggers>
        </Button>
    </Item>
    <AttrDataBinders>
        <AttrDataBinder target="notice_icon" attr="bitmap" data="icon" />
        <AttrDataBinder target="notice_title" attr="text" data="title" />
        <AttrDataBinder target="notice_content" attr="text" data="content" />
        <AttrDataBinder target="notice_time" attr="text" data="time" />
    </AttrDataBinders>
</List>
# 带滑动删除的消息通知
<VariableBinders>
    <!-- 查询通知 -->
    <ContentProviderBinder name="data" uri="content://keyguard.notification/notifications" columns="icon,title,content,time,key" countName="hasnotifications">
        <Variable name="notice_icon0" type="blob.bitmap" column="icon" row="0"/>
        <Variable name="notice_icon1" type="blob.bitmap" column="icon" row="1"/>
        <Variable name="notice_icon2" type="blob.bitmap" column="icon" row="2"/>
        <Variable name="notice_icon3" type="blob.bitmap" column="icon" row="3"/>
        <Variable name="notice_title" type="string[]" column="title"/>
        <Variable name="notice_content" type="string[]" column="content"/>
        <Variable name="notice_time" type="string[]" column="time"/>
        <Variable name="notice_key" type="string[]" column="key"/>
        <Trigger>
            <AnimationCommand target="noticeUp" command="play(0,0)" />
            <AnimationCommand target="_noticeAni" command="play(0,0)" />
        </Trigger>
    </ContentProviderBinder>
</VariableBinders>

<!-- 通知 -->
<Group y="688">
    <Var name="_noticeMove" expression="int(#touch_x-#touch_begin_x)*#noticeMoveDown+#_noticeAni" />
    <Var name="_noticeAni">
        <VariableAnimation loop="false" initPause="true">
            <Item value="0" time="0" />
            <Item value="int(#touch_x-#touch_begin_x)" time="100" />
            <Item value="ifelse(int(#touch_x-#touch_begin_x)}=300,1080,0)" time="300"/>
            <Triggers>
                <Trigger action="end" condition="#_noticeAni == 1080">
                    <AnimationCommand target="noticeUp" command="play" />
                </Trigger>
            </Triggers>
        </VariableAnimation>
    </Var>
    <Var name="noticeUp">
        <VariableAnimation name="noticeUpAni" loop="false" initPause="true">
            <Item value="0" time="0" />
            <Item value="1" time="300"/>
            <Triggers>
                <Trigger action="end" condition="#noticeUpAni.current_frame == -1" >
                    <MultiCommand>
                        <IntentCommand action="com.miui.app.ExtraStatusBarManager.action_remove_keyguard_notification" broadcast="true" >
                            <Extra name="com.miui.app.ExtraStatusBarManager.extra_notification_key" type="int" expression="@notice_key[#noticeDown]" />
                            <Extra name="com.miui.app.ExtraStatusBarManager.extra_notification_click" type="int" expression="0" />
                        </IntentCommand>
                    </MultiCommand>
                </Trigger>
            </Triggers>
        </VariableAnimation>
    </Var>
    <!-- count="4" 最多显示4条消息;size="4" 消息时间,显示几条消息就有几个时间 -->
    <Array count="4" indexName="_notice" visibility="#hasnotifications}0" >
        <Button x="ifelse(#noticeDown==#_notice,#_noticeMove,0)" y="#_notice*193 - ifelse(#_notice}#noticeDown,#noticeUp*193,0)" w="1080" h="183" alignChildren="true" alpha="ifelse(#noticeDown==#_notice,255-int(#_noticeMove)/3,255)" visibility="#_notice { #hasnotifications" >
            <Normal>
                <Rectangle x="28" w="1024" h="183" fillColor="#ffffff" cornerRadius="28" />
            </Normal>
            <Pressed>
                <Rectangle x="28" w="1024" h="183" fillColor="#eeeeee" cornerRadius="28" />
            </Pressed>
            <Text name="noticeTime" x="#screen_width-66" y="62" align="right" alignV="center" color="#BFB7BE" size="32" spacingAdd="1" textExp="@notice_time[#_notice]"/>
            <Text x="194" y="62" w="#screen_width-194-66- ifelse(#time_format,100,150)" alignV="center" color="#000000" size="38" marqueeSpeed="30" textExp="@notice_title[#_notice]" bold="true" />
            <Text x="194" y="121" w="#screen_width-194-66" alignV="center" color="#606160" size="36" marqueeSpeed="30" textExp="@notice_content[#_notice]" fontFamily="miui-regular" />
            <Triggers>
                <Trigger action="down">
                    <VariableCommand name="noticeDown" expression="#_notice"/>
                    <VariableCommand name="noticeMoveDown" expression="1"/>
                </Trigger>
                <Trigger action="up,cancel">
                    <VariableCommand name="noticeMoveDown" expression="0"/>
                    <AnimationCommand target="_noticeAni" command="play(100,300)" />
                    <IntentCommand action="com.miui.app.ExtraStatusBarManager.action_remove_keyguard_notification" broadcast="true" condition="abs(#touch_x-#touch_begin_x){10" >
                        <Extra name="com.miui.app.ExtraStatusBarManager.extra_notification_key" type="int" expression="@notice_key[#noticeDown]" />
                        <Extra name="com.miui.app.ExtraStatusBarManager.extra_notification_click" type="int" expression="1" />
                    </IntentCommand>
                </Trigger>
            </Triggers>
        </Button>
    </Array>
    <!-- 头像坐标;50 x坐标,30 y坐标;60 w宽度;60 h高度 -->
    <Var name="noticeIconXYWH" type="number[]" values="60,36,110,110" const="true" />
    <!-- 通知图标;name 图标名称,从0-3,表示共计四条;visibility,用 hasnotifications 控制是否需要显示头像  -->
    <Image name="notice_icon0" x="#noticeIconXYWH[0]+ifelse(#noticeDown==0,#_noticeMove,0)" y="#noticeIconXYWH[1]+0*193 - ifelse(0}#noticeDown,#noticeUp*193,0)" w="#noticeIconXYWH[2]" h="#noticeIconXYWH[3]" alpha="ifelse(#noticeDown==0,255-int(#_noticeMove)/3,255)" visibility="#hasnotifications}=1" />
    <Image name="notice_icon1" x="#noticeIconXYWH[0]+ifelse(#noticeDown==1,#_noticeMove,0)" y="#noticeIconXYWH[1]+1*193 - ifelse(1}#noticeDown,#noticeUp*193,0)" w="#noticeIconXYWH[2]" h="#noticeIconXYWH[3]" alpha="ifelse(#noticeDown==1,255-int(#_noticeMove)/3,255)" visibility="#hasnotifications}=2" />
    <Image name="notice_icon2" x="#noticeIconXYWH[0]+ifelse(#noticeDown==2,#_noticeMove,0)" y="#noticeIconXYWH[1]+2*193 - ifelse(2}#noticeDown,#noticeUp*193,0)" w="#noticeIconXYWH[2]" h="#noticeIconXYWH[3]" alpha="ifelse(#noticeDown==2,255-int(#_noticeMove)/3,255)" visibility="#hasnotifications}=3" />
    <Image name="notice_icon3" x="#noticeIconXYWH[0]+ifelse(#noticeDown==3,#_noticeMove,0)" y="#noticeIconXYWH[1]+3*193 - ifelse(3}#noticeDown,#noticeUp*193,0)" w="#noticeIconXYWH[2]" h="#noticeIconXYWH[3]" alpha="ifelse(#noticeDown==3,255-int(#_noticeMove)/3,255)" visibility="#hasnotifications}=4" />
</Group>
# 天气查询
# 接口返回字段
uri="content://weather/actualWeatherData/1"
| ColIndex | 字段名 | 说明 | 类型(type) | 字段值示例 | 备注 |
|---|---|---|---|---|---|
| 0 | publish_time | 实时天气信息发布时间(time mills) | string | 1508143200000 | 可用于实时信息的时效判断 |
| 1 | city_id | 城市唯一标识 | string | 39.959_116.298 | 经纬度(北纬_东经) |
| 2 | city_name | 城市/街道名称 | string | 安宁庄南路 | 能定位到街道时优先返回街道名,否则返回城市名 |
| 3 | description | 天气现象(实时) | string | 多云 | |
| 4 | temperature | 气温(实时) | string | 18℃ | |
| 5 | temperature_range | 气温(预报) | string | 8℃~18℃ | 支持数组,type="string[]" |
| 6 | aqilevel | AQI 等级 | int | 90 | 参考见:AQI 等级 |
| 7 | locale | 语言 | string | zh_CN | |
| 8 | weather_type | 天气类型(实时) | int string | 1 | type="int"时不支持数组,type="string[]"时支持数组 与天气现象对应关系参考见:天气现象代码对照表 |
| 9 | humidity | 湿度 | int | 68% | 单位:% |
| 10 | sunrise | 日出时间 | int | 80760000 | 距 0 点过去的毫秒数(换算成时间时只取 Hour 和 Minute,例如 80760000 换算后为 06:26) |
| 11 | sunset | 日落时间 | int | 34440000 | 距 0 点过去的毫秒数(换算成时间时只取 Hour 和 Minute,34440000 换算后为 17:34) |
| 12 | wind | 风向,风力 | string | 东南风,2 级 | |
| 13 | day | 日期偏移量 | int | 1 | 0 代表昨天,1 代表今天,2 代表明天 |
| 14 | pressure | 气压 | int | 1016hPa | 单位:hPa |
| 15 | timestamp | 预报天气信息发布时间(time mills) | string | 1508055000000 | |
| 16 | tmphighs | 最高温(预报) | string | 18 | 支持数组,type="string[]" |
| 17 | tmplows | 最低温(预报) | string | 8 | 支持数组,type="string[]" |
| 18 | forecast_type | 天气类型(预报) | int string | 1 | type="int"时不支持数组,type="string[]"时支持数组 与天气现象对应关系参考见:天气现象代码对照表 |
| 19 | weathernamesfrom | 天气现象(预报) | string | 多云 | 支持数组,type="string[]" |
| 20 | weathernamesto | 同上 | |||
| 21 | temperature_unit | 气温单位 | int | 1 | 1 代表摄氏度,0 代表华氏度 |
| 22 | water | 暂时无用(降水概率) | - | 50% | 暂时无用 |
# AQI等级 中国大陆标准
| 等级 | 范围 |
|---|---|
| 优 | aqi >= 0 && aqi <= 50 |
| 良 | aqi > 50 && aqi <= 100 |
| 轻度污染 | aqi > 100 && aqi <= 150 |
| 中度污染 | aqi > 150 && aqi <= 200 |
| 重度污染 | aqi > 200 && aqi <= 300 |
| 严重污染 | aqi > 300 |
- 最多可以获取到未来 5 天天气详情(包含今天)
<ExternalCommands>
    <Trigger action="init,resume">
        <!-- ContentProvider接口在切屏时必须主动更新一次  -->
        <BinderCommand name="WeatherProvider" command="refresh" />
    </Trigger>
</ExternalCommands>
<VariableBinders>
    <!-- MIUI天气代码;uri 老接口:content://weather/weather,旧主题更新时请更换为新接口:content://weather/actualWeatherData/1 -->
    <ContentProviderBinder name="WeatherProvider" uri="content://weather/actualWeatherData/1" columns="city_id,city_name,weather_type,aqilevel,description,temperature,temperature_range,forecast_type,tmphighs,tmplows,wind,humidity,sunrise,sunset,pressure,weathernamesfrom,publish_time,temperature_unit,somatosensory,kinect" countName="hasweather">
        <!-- 城市北纬东经 -->
        <Variable name="city_id" type="string" column="city_id"/>
        <!-- 城市/街道名称 -->
        <Variable name="weather_location" type="string" column="city_name"/>
        <!-- 天气类型(实时) -->
        <Variable name="weather_id" type="int" column="weather_type"/>
        <Variable name="weather_type" type="string[]" column="weather_type"/>
        <!-- 今日温度 -->
        <Variable name="weather_temperature" type="string" column="temperature"/>
        <!-- 今日温度区间(20℃~30℃) -->
        <Variable name="weather_temperature_range" type="string" column="temperature_range"/>
        <!-- 天气现象(实时):晴 -->
        <Variable name="weather_description" type="string" column="description"/>
        <!-- 日出时间 -->
        <Variable name="weather_sunrise" type="int" column="sunrise"/>
        <!-- 日落时间 -->
        <Variable name="weather_sunset" type="int" column="sunset"/>
        <!-- 风力 -->
        <Variable name="weather_wind" type="string" column="wind"/>
        <!-- 气压 -->
        <Variable name="weather_pressure" type="int" column="pressure"/>
        <!-- 湿度 -->
        <Variable name="weather_humidity" type="int" column="humidity"/>
        <!-- 天气类型(预报) -->
        <Variable name="weather_forecast_type" type="string[]" column="forecast_type"/>
        <!-- 天气现象(预报) -->
        <Variable name="weather_weathernamesfrom" type="string[]" column="weathernamesfrom"/>
        <!-- 最高温度 -->
        <Variable name="weather_temphigh" type="string[]" column="tmphighs"/>
        <!-- 最低温度 -->
        <Variable name="weather_templow" type="string[]" column="tmplows"/>
        <!-- 实时天气信息发布时间 -->
        <Variable name="weather_publish_time" type="string" column="publish_time"/>
        <!-- 气温单位,1代表摄氏度,0代表华氏度 -->
        <Variable name="weather_temperature_unit" type="int" column="temperature_unit" />
        <!-- AQI等级 -->
        <Variable name="weather_aqi" type="int" column="aqilevel"/>
        <Trigger>
            <!-- 空气质量 -->
            <VariableCommand name="air_quality" expression="ifelse(#weather_aqi}=0**#weather_aqi{=50,'空气优',#weather_aqi}50**#weather_aqi{=100,'空气良好',#weather_aqi}100**#weather_aqi{=150,'轻度污染',#weather_aqi}150**#weather_aqi{=200,'中度污染',#weather_aqi}200**#weather_aqi{=300,'重度污染',#weather_aqi}300,'严重污染','获取信息异常')" type="string"/>
            <!-- 天气现象简化版;可用于天气图标展示。例如:srcid="#weatherId" -->
            <VariableCommand name="weatherId" expression="ifelse(#weather_id}25||#weather_id{0,0, (#weather_id}=4**#weather_id{=6||#weather_id}=8**#weather_id{=11||#weather_id==25),4,#weather_id}=13**#weather_id{=17,13 ,#weather_id}=18**#weather_id{=21||#weather_id==23,18,#weather_id)"/>
        </Trigger>
    </ContentProviderBinder>
    <ContentProviderBinder name="WeatherAqi" dependency="WeatherProvider" uriFormat="content://weatherinfo/aqi/%s" uriParas="@city_id" columns="aqi,pm25,pm10,so2,no2" countName="hasweatherinfo">
        <Variable name="aqi" type="int" column="aqi"/>
        <Variable name="pm25" type="int" column="pm25"/>
        <Variable name="no2" type="int" column="no2"/>
        <Variable name="pm10" type="int" column="pm10"/>
        <Variable name="so2" type="int" column="so2"/>
    </ContentProviderBinder>
</VariableBinders>

<!-- 把数据以文本的方式展示出来 -->
<Text x="100" y="200" size="24" color="#ffffff" textExp="@weather_description+' '+@weather_location+' '+#pm25+' '+@air_quality"/>

<Array count="5" indexName="__w" >
    <Text x="100" y="300+60*#__w"  color="#FFFFFF" size="40" textExp="@weather_forecast_type[#__w]"/>
</Array>
就是将查询到的数据以文本或者是图形的方式展示出来,具体作用可以翻译 column 的值,再通过 Variable 自定义的变量名 展示出来。
# 天气现象代码对照表:
#weather_id=0代表晴天,=1代表多云...
| 天气现象编码 / 天气现象 | 天气现象编码 / 天气现象 | 天气现象编码 / 天气现象 |
|---|---|---|
| 0 :晴 | 9 : 大雨 | 18 : 强沙尘暴 |
| 1 :多云 | 10 : 中雨 | 19 : 沙尘暴 |
| 2 :阴 | 11 : 小雨 | 20 : 沙尘 |
| 3 :雾 | 12 : 雨夹雪 | 21 : 扬沙 |
| 4 :特大暴雨 | 13 : 暴雪 | 22 : 冰雹 |
| 5 :大暴雨 | 14 : 阵雪 | 23 : 浮尘 |
| 6 :暴雨 | 15 : 大雪 | 24 : 霾 |
| 7 :雷阵雨 | 16 : 中雪 | 25 : 冻雨 |
| 8 :阵雨 | 17 : 小雪 | 99 : 无 |
# 简化版天气图标使用
在日常制作中如果画 26 个天气图标工作量较大,所以我们可以把一个类型的图标集合为一个图标即可。
如下示例:
<ExternalCommands>
    <Trigger action="init,resume">
        <!-- ContentProvider接口在切屏时必须主动更新一次  -->
        <BinderCommand name="WeatherProvider" command="refresh" />
    </Trigger>
</ExternalCommands>
<VariableBinders>
    <ContentProviderBinder name="WeatherProvider" uri="content://weather/actualWeatherData/1" columns="city_name,weather_type,aqilevel,description,temperature,temperature_range" countName="hasweather">
        <Variable name="weather_location" type="string" column="city_name"/>
        <Variable name="weather_id" type="int" column="weather_type"/>
        <Variable name="weather_temperature" type="string" column="temperature"/>
        <Variable name="weather_description" type="string" column="description"/>
        <Variable name="weather_aqi" type="int" column="aqilevel"/>
        <Trigger>
            <!-- 空气质量 -->
            <VariableCommand name="air_quality" expression="ifelse(#weather_aqi}=0**#weather_aqi{=50,'空气优',#weather_aqi}50**#weather_aqi{=100,'空气良好',#weather_aqi}100**#weather_aqi{=150,'轻度污染',#weather_aqi}150**#weather_aqi{=200,'中度污染',#weather_aqi}200**#weather_aqi{=300,'严重污染',#weather_aqi}300,'重度污染','获取信息异常')" type="string"/>
            <!-- 天气类型简化版;可用于天气图标展示。例如:srcid="#weatherId" -->
            <VariableCommand name="weatherId" expression="ifelse(#weather_id}25||#weather_id{0,0, (#weather_id}=4**#weather_id{=6||#weather_id}=8**#weather_id{=11||#weather_id==25),4,#weather_id}=13**#weather_id{=17,13 ,#weather_id}=18**#weather_id{=21||#weather_id==23,18,#weather_id)"/>
        </Trigger>
    </ContentProviderBinder>
</VariableBinders>

<!-- 用图展示天气现象 -->
<Image x="100" y="100" src="weather.png" srcid="#weatherId"/>
简化版图标对应天气现象示图:
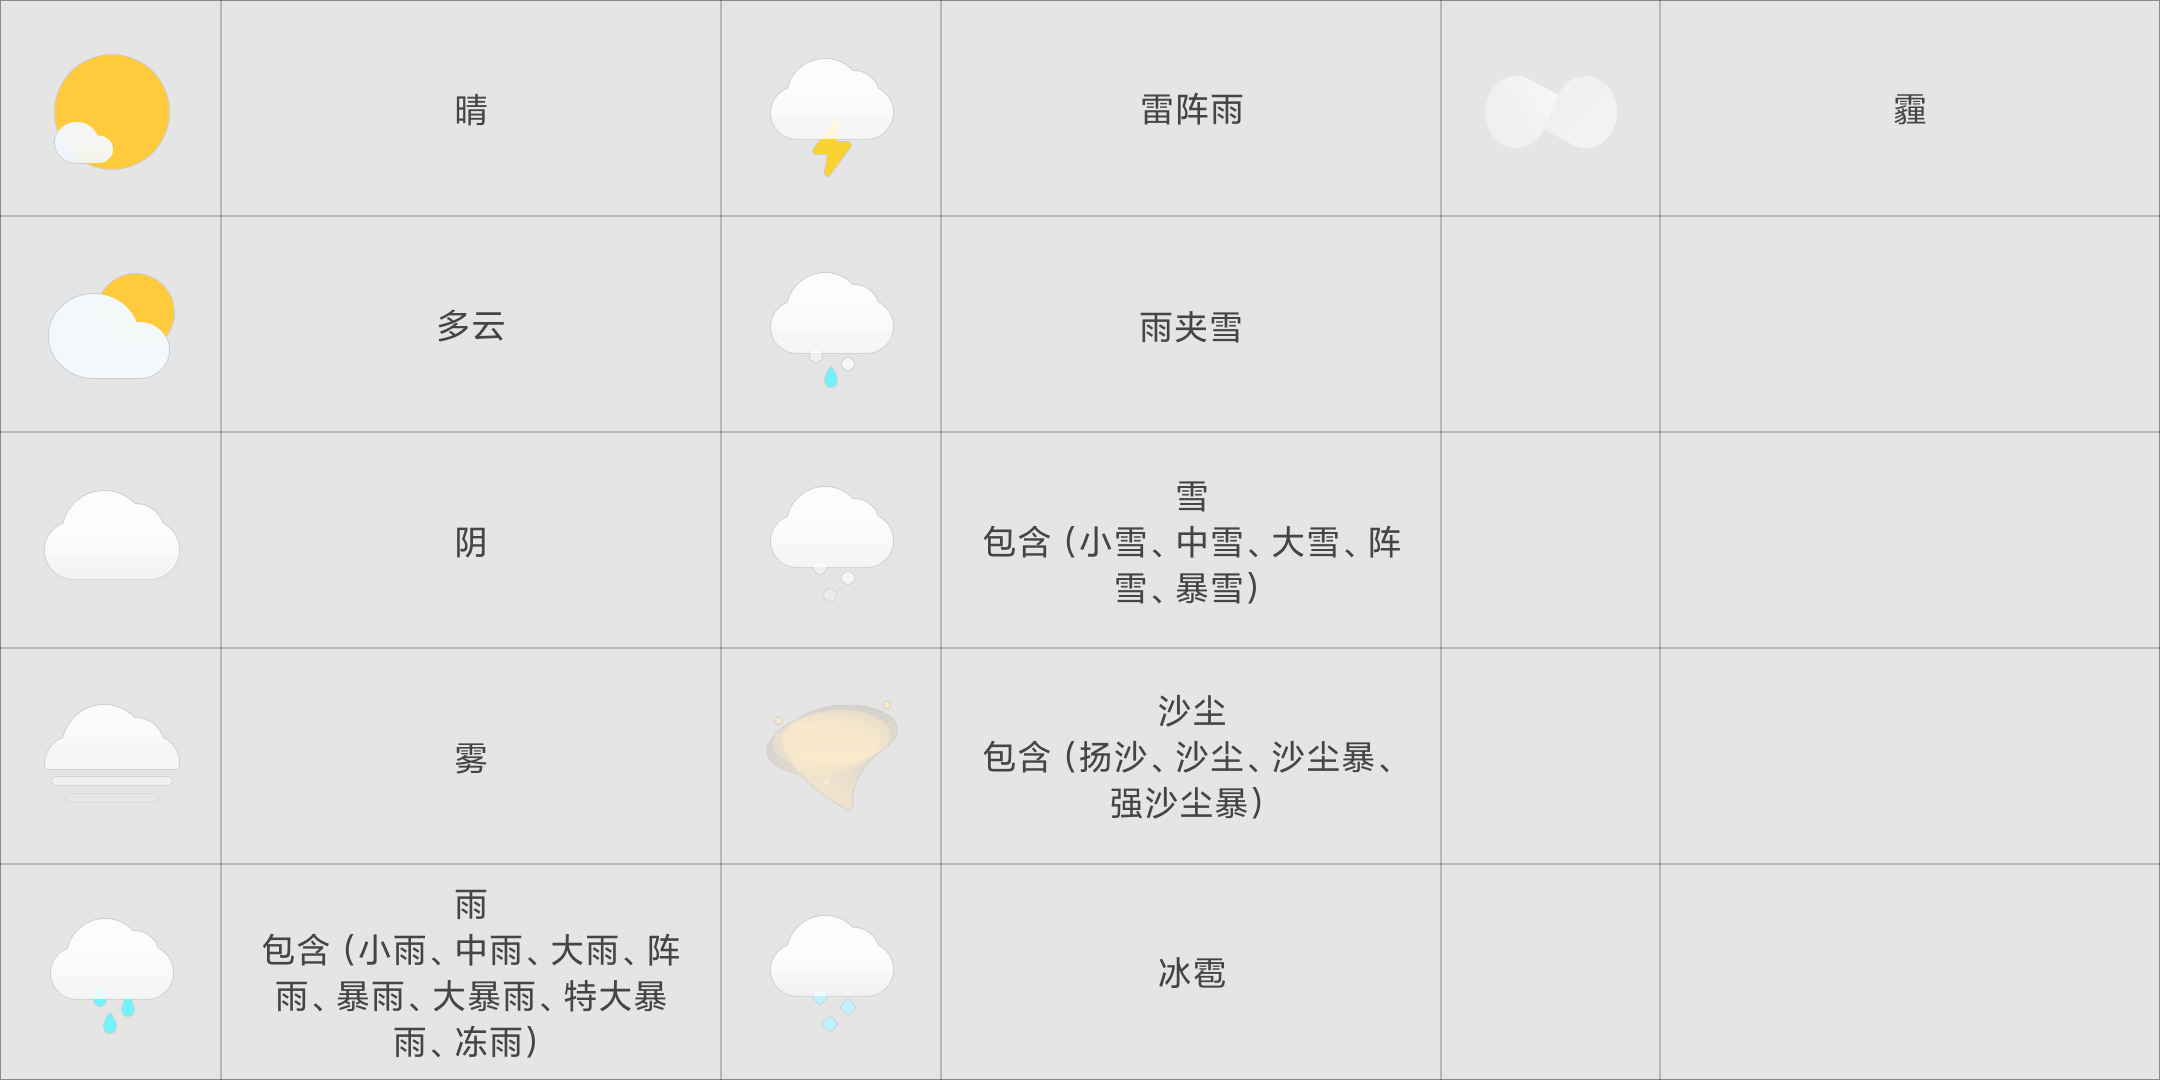
11 个天气图标附件下载:11 个天气图标素材.zip (opens new window)
# 运动计步
MIUI12新增
<ExternalCommands>
    <Trigger action="resume">
        <!-- 开屏刷新 运动记录数据 -->
        <BinderCommand name="MiSteps" command="refresh" />
    </Trigger>
</ExternalCommands>

<VariableBinders>
    <!-- 注意:不可卸载 小米健康App -->
    <ContentProviderBinder name="MiSteps" uri="content://com.mi.health.provider.main/activity/steps/brief" column="steps,goal,distance,energy,strength_duration,summary" countName="hasSteps" >
        <!-- 步数 -->
        <Variable name="MiSteps_steps" type="string" column="steps"/>
        <!-- 目标步数 -->
        <Variable name="MiSteps_goal" type="string" column="goal"/>
        <!-- 距离 -->
        <Variable name="MiSteps_distance" type="string" column="distance"/>
        <!-- 消耗卡路里 -->
        <Variable name="MiSteps_energy" type="string" column="energy"/>
        <!-- 运动中高强度时长 -->
        <Variable name="MiSteps_strength_duration" type="string" column="strength_duration"/>
        <!-- 运动是否达标 -->
        <Variable name="MiSteps_summary" type="string" column="summary"/>
    </ContentProviderBinder>
</VariableBinders>

<Text x="100" y="300" alignV="center" color="#ffffffff" size="42" textExp="'今日步数:' +@MiSteps_steps+ '步'"/>
| 属性 | 释义 | 单位 | 类型 |
|---|---|---|---|
| steps | 步数 | 步 steps | string |
| goal | 目标步数 | 步 steps | string |
| distance | 距离 | 公里 km | string |
| energy | 消耗卡路里 | 千卡 kcal | string |
| strength_duration | 运动中高强度时长 | 分钟 minute | string |
| summary | 运动是否达标; 0 暂无 1 尚未达标 2 运动不足 3 运动达标 | string |
获取数据时异常处理,参考下面示例代码:
- 未安装「小米健康」app 时,点击跳转至应用商店下载页面
- 已安装 但从未打开提示用户获取数据,并且点击后跳转 健康运动 页面
<!-- 判断是否有 小米健康应用 -->
<Image name="app_health" x="0" y="0" w="168" h="168" srcType="ApplicationIcon" srcExp="'com.mi.health,com.mi.health.home.HomeActivity'" alpha="0"/>
<Button x="540" y="1000" w="300" h="140" align="center" alignV="center" alignChildren="true">
<Normal>
<Rectangle w="300" h="140" fillColor="#33ffffff" cornerRadius="70"/>
</Normal>
<Pressed>
<Rectangle w="300" h="140" fillColor="#66ffffff" cornerRadius="70"/>
</Pressed>
<Text x="150" y="70" align="center" alignV="center" color="#ffffffff" size="42" textExp="ifelse(#app_health.bmp_width,'打开','安装')"/>
<!-- 提示 -->
<Text x="150" y="-60" align="center" alignV="center" color="#ffffffff" size="39" textExp="ifelse(!#app_health.bmp_width,'无法获取数据,请安装小米健康',strIsEmpty(@MiSteps_goal),'点击获取数据','查看运动详情')"/>
<Triggers>
<Trigger action="up">
<ExternCommand command="unlock"/>
<!-- 未安装 跳转到应用商店 -->
<IntentCommand action="android.intent.action.VIEW" uri="market://details?id=com.mi.health&ref=mithemelocksreen" flags="268435456" condition="!#app_health.bmp_width" />
<!-- 已安装 打开运动页面 -->
<IntentCommand action="android.intent.action.VIEW" uri="com.mi.health://localhost/d?action=steps&origin=mithemelocksreen" condition="#app_health.bmp_width"/>
</Trigger>
</Triggers>
</Button>
# 语音文字
用来获取用户说了什么内容?可以用语音来加强锁屏的能力,也给了更多的可能性。比如:锁屏语音输入法,锁屏记事本 等。发挥你的想象,没有什么是做不到的。不是很明白怎么写?可以先看关于 外部数据的介绍
<VariableBinders>
<!-- 启动录音 -->
<ContentProviderBinder name="MiAi" uriFormat="content://com.miui.voiceassist.speech.api/%s" uriParas="@t1" queryAtStart="false" />
<!-- 识别结果 -->
<ContentProviderBinder name="MiAiResult" uri="content://com.miui.voiceassist.speech.api/status" columns="AsrStatus,AsrResult" countName="MiAiResult" queryAtStart="true">
<Variable name="Asr_Status" type="string" column="AsrStatus"/>
<Variable name="Asr_Result" type="string" column="AsrResult"/>
</ContentProviderBinder>
</VariableBinders>
<Var expression="#second" threshold="5" >
<Trigger>
<ExternCommand command="pokewakelock"/>
</Trigger>
</Var>
<Rectangle w="1080" h="#screen_height" fillColor="#f2f2f2" />
<Rectangle y="#screen_height-160" w="1080" h="2" fillColor="#000000" alpha="255*0.05" />
<Text x="540" y="1000" align="center" alignV="center" color="#000000" size="45" textExp="@AsrResult"/>
<!-- 识别结果刷新 -->
<Var expression="#time" threshold="10" visibility="#MiAiResultRefresh" >
<Trigger>
<BinderCommand name="MiAiResult" command="refresh" />
<VariableCommand name="AsrResult" expression="@Asr_Result" type="string"/>
</Trigger>
</Var>
<Button x="540" y="#screen_height - 80" w="#screen_width-140" h="100" align="center" alignV="center" alignChildren="true" interceptTouch="true">
<Normal>
<Rectangle x="0" y="0" w="#screen_width-140" h="100" fillColor="#FFFFFF" cornerRadius="20"/>
</Normal>
<Pressed>
<Rectangle x="0" y="0" w="#screen_width-140" h="100" fillColor="#E8E8E8" cornerRadius="20"/>
</Pressed>
<Text x="(#screen_width-140)/2" y="50" align="center" alignV="center" color="#000000" size="42" textExp="ifelse(#MiAiResultRefresh,'松开结束','按下说话')"/>
<Triggers>
<Trigger action="down">
<!-- 开始刷新识别结果 -->
<VariableCommand name="MiAiResultRefresh" expression="1" />
<AnimationCommand target="moveAni" command="play(0,200)"/>
<!-- exe 是否需要语音内容执行 -->
<VariableCommand name="t1" type="string" expression="'start?session=20190401&vad=false&exe=false"/>
<BinderCommand name="MiAi" command="refresh" />
<VariableCommand name="Asr_Result" expression="''" type="string" />
</Trigger>
<Trigger action="up,cancel">
<VariableCommand name="MiAiResultRefresh" expression="0" />
<AnimationCommand target="moveAni" command="play(1000,1200)"/>
<VariableCommand name="t1" type="string" expression="'cancel'"/>
</Trigger>
</Triggers>
</Button>
通过 ContentProviderBinder 刷新接口 来启动启动小爱录音或者是停止录音
<!-- 启动录音 -->
content://com.miui.voiceassist.speech.api/start?session=20190401&vad=false&exe=false
<!-- 取消 -->
content://com.miui.voiceassist.speech.api/cancel
<!-- 停止收音 表示说完话了,区别于取消 -->
content://com.miui.voiceassist.speech.api/stop
| 属性 | 释义 |
|---|---|
| vad | 是否开启自动判停,若开启了,则不需要松手停止说(false,true) |
| exe | 是否需要执行语音内容,既用户说的内容(false,true) |
重点来了
根据 ContentProviderBinder 返回的值做一些交互,比如显示文字,录音时的动画等
content://com.miui.voiceassist.speech.api/status
| 属性 | 释义 |
|---|---|
| AsrStatus | 状态;0 识别结束,空闲中,1 表示录音中,2 录音结束识别中 |
| AsrResult | 识别结果 |
| AsrVoiceVolume | 实时录音的音量大小,最大 100 |
# 作息
MIUI13新增
<!-- 作息 -->
<ExternalCommands>
    <Trigger action="init,resume">
        <!-- ContentProvider接口在切屏时必须主动更新一次  -->
        <BinderCommand name="clockProvider" command="refresh" />
    </Trigger>
</ExternalCommands>
<VariableBinders>
    <ContentProviderBinder name="clockProvider" uri="content://com.android.deskclock.bedtimeProvider/bedtime" countName="hasdeskclock">
        <!-- 未设置作息管理,获取的睡眠数据无效 -->
        <Variable name="clock_bedtime_state" type="int" column="bedtime_state"/>
        <!-- 入睡时间的小时,24小时制 -->
        <Variable name="clock_sleep_hour" type="int" column="sleep_hour"/>
        <!-- 入睡时间的分 -->
        <Variable name="clock_sleep_minute" type="int" column="sleep_minute"/>
        <!-- 起床时间的小时,24小时制 -->
        <Variable name="clock_wake_hour" type="int" column="wake_hour"/>
        <!-- 起床时间的分 -->
        <Variable name="clock_wake_minute" type="int" column="wake_minute"/>
        <!-- 重复周期 -->
        <Variable name="clock_repeat_type" type="int" column="repeat_type"/>
    </ContentProviderBinder>
</VariableBinders>
| uri | content://com.android.deskclock.bedtimeProvider/bedtime | |||
|---|---|---|---|---|
| 字段名 | 说明 | 数据类型 | 字段名示意 | 备注 |
| bedtime_state | 作息管理设置状态,0关闭;1开启 | int | ||
| sleep_hour | 入睡时间的小时 | int | 24小时制 | |
| sleep_minute | 睡时间的分 | int | ||
| wake_hour | 起床时间的小时 | int | 24小时制 | |
| wake_minute | 起床时间的分 | int | ||
| repeat_type | 重复周期 | int | 每天:127 法定工作日:-1 周一至周五:31 自定义:其他数值 |
# 闹钟
MIUI13新增
<ExternalCommands>
    <Trigger action="init,resume">
        <!-- ContentProvider接口在切屏时必须主动更新一次  -->
        <BinderCommand name="DeskClockProvider" command="refresh" />
    </Trigger>
</ExternalCommands>
<VariableBinders>
    <ContentProviderBinder name="DeskClockProvider" uri="content://com.android.deskclock/alarm" countName="hasdeskclock">
        <!-- 备注 -->
        <Variable name="clock_message" type="string[]" column="message"/>
        <!-- 开关 -->
        <Variable name="clock_enabled" type="string[]" column="enabled"/>
        <!-- 时 -->
        <Variable name="clock_hour" type="string[]" column="hour"/>
        <!-- 分 -->
        <Variable name="clock_minute" type="string[]" column="minutes"/>
        <!-- 响铃时间 -->
        <Variable name="clock_alarmtime" type="string[]" column="alarmtime"/>
        <!-- 重复方式 -->
        <!-- 0: 一次性 -->
        <!-- 1: 周一 -->
        <!-- 2: 周二 -->
        <!-- 4: 周三 -->
        <!-- 8: 周四 -->
        <!-- 16: 周五 -->
        <!-- 32: 周六 -->
        <!-- 64: 周日 -->
        <!-- 128: 法定工作日 -->
        <!-- 256: 法定节假日 -->
        <Variable name="clock_daysofweek" type="string[]" column="daysofweek"/>
    </ContentProviderBinder>
</VariableBinders>
| uri | "content://com.android.deskclock/alarm | |||
|---|---|---|---|---|
| 字段名 | 说明 | 数据类型 | 字段名示意 | 备注 |
| message | 备注 | string[] | ||
| enabled | 开关 | string[] | ||
| hour | 时 | string[] | ||
| minutes | 分 | string[] | ||
| alarmtime | 响铃时间 | string[] | ||
| daysofweek | 重复方式 | string[] | 0: 一次性 1: 周一 2: 周二 4: 周三 8: 周四 16: 周五 32: 周六 64: 周日 128: 法定工作日 256: 法定节假日 |
# 日程
<ExternalCommands>
<Trigger action="init,resume">
<!-- ContentProvider接口在切屏时必须主动更新一次 -->
<BinderCommand name="calendarEvents" command="refresh" />
</Trigger>
</ExternalCommands>
<VariableBinders>
<ContentProviderBinder name="calendarEvents" uri="content://com.android.calendar/events" order="dtstart ASC" whereFormat="hasExtendedProperties=='%d' AND dtstart>='%d' AND dtstart<='%d'" whereParas="0,int((#time_sys-#hour24*3600000-#minute*60000-#second*1000)/1000)*1000,int((#time_sys-#hour24*3600000-#minute*60000-#second*1000+86400000)/1000)*1000" countName="events">
<!-- 标题 -->
<Variable name="calendar_title" type="string[]" column="title"/>
<!-- 地点,没有则为null -->
<Variable name="calendar_eventLocation" type="string[]" column="eventLocation"/>
<!-- 提醒开始时间-->
<Variable name="calendar_dtstart" type="string[]" column="dtstart"/>
<!-- 提醒结束时间 -->
<Variable name="calendar_dtend" type="string[]" column="dtend"/>
<!-- 全天事件 -->
<Variable name="calendar_allDay" type="string[]" column="allDay"/>
<!-- 事件的最后时间, 空表示无限 -->
<Variable name="calendar_lastDate" type="string[]" column="lastDate"/>
<!-- 日程的类型 -->
<Variable name="calendar_hasExtendedProperties" type="string[]" column="hasExtendedProperties"/>
</ContentProviderBinder>
</VariableBinders>
| uri | content://com.android.calendar/events | |||
|---|---|---|---|---|
| 字段名 | 说明 | 数据类型 | 字段名示意 | 备注 |
| title | 标题 | string[] | ||
| eventLocation | 地点,没有则为null | string[] | ||
| dtstart | 提醒开始时间 | string[] | ||
| dtend | 提醒结束时间 | string[] | ||
| allDay | 全天事件 | string[] | 0不是;1是 | |
| lastDate | 事件的最后时间, 空表示无限 | string[] | 10800000 | 距离0点的时间戳表示形式 |
| hasExtendedProperties | 类型 | string[] | 日程的类型(倒数日;纪念日;生日;日程) |
# 传感器调用
SensorBinder 支持重力感应,方向感应,加速度感应,气压感应(海拔高度)
# 重力传感器
<VariableBinders>
    <SensorBinder type="gravity"  rate="2">
        <Variable name="gravity_x" index="0"/>
        <Variable name="gravity_y" index="1"/>
        <Variable name="gravity_z" index="2" />
    </SensorBinder>
</VariableBinders>
| 属性 | 释义 |
|---|---|
| index="0" | x 方向的重力加速度 |
| index="1" | y 方向的重力加速度 |
| index="2" | z 方向的重力加速度 |
rate;常量,单位是微秒,有 4 种特殊值 0,1,2,3;默认为 3 (不写的话)。
注意:值越小刷新越高/运动越流畅,也会相对耗电一点。
- 0 表示 0 微秒
- 1 是 20000 微秒
- 2 是 66667 微秒
- 3 是 200000 微秒
# 方向传感器
<VariableBinders>
    <SensorBinder type="orientation">
        <Variable name="orientation0" index="0"/>
        <Variable name="orientation1" index="1"/>
        <Variable name="orientation2" index="2" />
    </SensorBinder>
</VariableBinders>
| 属性 | 释义 |
|---|---|
| index="0" | 方位角,0~359,0=北,90=东,180=南,270=西 |
| index="1" | 俯仰角,-180 ~ 180,z 轴转向 y 轴为正方向 |
| index="2" | 滚转角,-90 ~ 90,x 轴转向 z 轴为正方向 |
# 加速度传感器
<VariableBinders>
    <SensorBinder type="accelerometer">
        <Variable name="accelerometer_x" index="0"/>
        <Variable name="accelerometer_y" index="1"/>
        <Variable name="accelerometer_z" index="2"/>
    </SensorBinder>
</VariableBinders>
| 属性 | 释义 |
|---|---|
| index="0" | x 方向的加速度 |
| index="1" | y 方向的加速度 |
| index="2" | z 方向的加速度 |
# 线性加速度传感器
<VariableBinders>
    <SensorBinder type="linear_acceleration">
        <Variable name="line_x" index="0"/>
        <Variable name="line_y" index="1"/>
        <Variable name="line_1" index="2"/>
    </SensorBinder>
</VariableBinders>
线性加速度是去掉了重力加速度影响的:加速度 = 线性加速度 + 重力加速度
# 气压传感器
注意仅支持压力传感器的设备可以获取到值 查看方法:设置/我的设备/全部参数与信息/内核版本(快速连续点击多次)/在弹出界面能找到《压力感应器测试》则代表该设备支持压力传感器
<VariableBinders>
    <SensorBinder type="pressure">
        <Variable name="pressure" index="0"/>
    </SensorBinder>
</VariableBinders>
| 属性 | 释义 |
|---|---|
| index="0" | 气压值,单位 hPa。海平面的平均气压是 1013.25hPa,可以根据气压值估计海拔高度 |
# 广播
广播分成两部分:发送与接收
- 发送部分一般放 Trigger 中
<ExternalCommands>
    <Trigger action="pause">
        <IntentCommand action="initialization" broadcast="true">
            <Extra name="bg_number" type="number" expression="#rand_num" />
        </IntentCommand>
    </Trigger>
</ExternalCommands>
- 接收部分在 VariableBinders 里
<VariableBinders>
    <BroadcastBinder action="initialization">
        <Variable name="wallpaper_num" type="number" extra="bg_number" />
    </BroadcastBinder>
</VariableBinders>
action 属性中的名字可自己定义,一致即可。
# 深色模式
使用说明
设计师可根据全局变量 #__darkmode_wallpaper #__darkmode 自定义开启 【深色模式】后的显示效果。
首先需要在 xml 的根节点增加 customizedDarkModeWallpaper="true" 属性,如:
- 百变壁纸
<!-- customizedDarkModeWallpaper="true" 自定义深色模式 开启 -->
<MiWallpaper version="2" frameRate="5" screenWidth="1080" customizedDarkModeWallpaper="true">

    <Var name="bgScale" expression="ifelse(#screen_height}2160,#screen_height/2160,1)" const="true" />
    <!-- #__darkmode_wallpaper 打开深色模式 并 启用调暗效果 时值为 1;srcid="1" 则显示图片 "bg_1.jpg" -->
    <Image pivotX="540" pivotY="0" scale="#bgScale" src="bg.jpg" srcid="#__darkmode_wallpaper" />

</MiWallpaper>
- 百变锁屏
<!-- customizedDarkModeWallpaper="true" 自定义深色模式 开启 -->
<Lockscreen version="2" frameRate="60" screenWidth="1080" customizedDarkModeWallpaper="true">

</Lockscreen>
customizedDarkModeWallpaper 默认为 false,在【深色模式且壁纸调暗】开启时,默认 统一调暗效果;若为 true,则支持自定义调暗效果。
MIUI12 20.6.1 之后的开发版 支持
| 全局变量 | 释义 | 说明 |
|---|---|---|
| __darkmode_wallpaper | 是否开启深色模式且支持调暗壁纸 | 0 表示未开启 1 表示已开启 |
| __darkmode | 是否开启深色模式 | 0 表示未开启 1 表示已开启 |
# 锁屏设置
锁屏个性化设置
主题可以带一个配置描述文件描述可以个性化配置的项目(config.xml 和 manifest.xml 放在同一个目录下)
可配置项目有:
- 开关
- 文字输入
- 文字选择
- 数字输入
- 数字选择
- 程序快捷方式
- 自定义图片
示例:
<!-- 根节点 -->
<Config>
    <!-- 设置组  text 设置组名称,显示在设置界面中的文本 -->
    <Group text="日期时间">
        <!-- 开关(summary:设置项详细说明;id:设置项对应的变量名称;default:缺省值) -->
        <CheckBox text="" summary="" id="show_date" default="0"/>
        <!-- 文字输入 -->
        <StringInput text="日期格式" summary="" id="format" default="M月d日"/>
        <!-- 数字输入 -->
        <NumberInput text="文字大小" summary="文字大小" id="size_date" default="28"/>
    </Group>
    <Group text="请选择">
        <!-- 文字选择 -->
        <StringChoice text="" summary="" customizable="true" id="time_format">
            <!-- 文字选择项目 value变量值 text界面显示文字 -->
            <Item value="hh:mm" text="12小时"/>
            <Item value="kk:mm" text="24小时"/>
        </StringChoice>
        <!-- 数字选择 -->
        <NumberChoice text="" summary="" id="">
            <!-- 数字选择项目 value数值 text界面显示文字 -->
            <Item value="0" text="模式1"/>
            <Item value="1" text="模式2"/>
        </NumberChoice>
    </Group>
    <Group text="自定义图片" summary="请先将图片裁剪到合适大小和部位以确保显示效果">
        <ImagePicker text="图片一" summary="选择图片一" id="img1"/>
        <ImagePicker text="图片二" summary="选择图片二" id="img2"/>
    </Group>
    <Group text="快捷方式">
        <AppPicker text="左边快捷方式" id="left_task"/>
        <AppPicker text="右边快捷方式" id="right_task"/>
    </Group>
</Config>
清除图片(将相应变量置空即可);最新自定义图片用法可查看:自定义图片
<Image x="0" y="0" src="@img1" srcType="Uri"/>
<Image x="0" y="500" src="@img2" srcType="Uri"/>
<Button x="540" y="#screen_height/2" w="280" h="280" alignChildren="true" visibility="#img1.has_bitmap">
    <Rectangle w="280" h="280" fillColor="#ffffff" alpha="128" />
    <Triggers>
        <Trigger action="up">
            <VariableCommand name="img1" expression="" type="string" persist="true" />
        </Trigger>
    </Triggers>
</Button>
快速进入锁屏个性化设置界面的快捷方式(Button)
<Button x="540" y="#screen_height/2+300" w="280" h="280" alignChildren="true">
    <Rectangle w="280" h="280" fillColor="#ffffff" alpha="128" />
    <Triggers>
        <Trigger action="up">
            <IntentCommand action="android.intent.action.MAIN" package="com.android.thememanager" class="miui.maml.MamlConfigSettings">
                <Extra name="maml_code" type="string" expression="'lockstyle'"/>
            </IntentCommand>
            <ExternCommand command="unlock"/>
        </Trigger>
    </Triggers>
</Button>
# 多语言适配
MAML 支持多语言,下面以锁屏为例(锁屏的文件都在 lockscreen/advance 文件夹下,在这我们就其为根目录) 多语言的适配有图片资源的适配和字符串的适配两种:
- 图片资源的适配 都放在根目录下,只不过非默认的需新建相应语言的文件夹(如:images_en、images_cn_TW) 默认图片:a.png 中文繁体:images_zh_TW/a.png 英文:images_en/a.png
- 字符串资源的适配 默认:strings/strings.xml 中文简体:strings/strings_zh_CN.xml 中文繁体:strings/strings_zh_TW.xml
看下面的示例:
<!-- strings.xml 内容 -->
<strings>
    <string name="musicName" value="Music player"/>
</strings>
<!-- strings_zh_CN.xml 内容 -->
<strings>
    <string name="musicName" value="打开音乐播放器"/>
</strings>
<!-- strings_zh_TW.xml 内容 -->
<strings>
    <string name="musicName" value="打開音樂播放器"/>
</strings>
manifest.xml 中可直接使用变量 @musicName
- 自定义配置文件的适配(config 文件直接加后缀即可)
| 属性 | 释义 |
|---|---|
| 英文 | config.xml |
| 简体 | config_zh_CN.xml |
| 繁体 | config_zh_TW.xml |
适配多语言时,推荐 config.xml 为英文语言,再适配其他语言。
# 高级教程
# 动态帧率
- 普通用法
<?xml version="1.0" encoding="utf-8"?>
<Lockscreen version="1" frameRate="30" screenWidth="1080">
</Lockscreen>
- 普通用法二(充电有动画特效时可以在跟标签加入 充电/电量满/电量低 指定帧率,让指定电量状态帧率为 60-120,从而使动画更流畅)
<?xml version="1.0" encoding="utf-8"?>
<Lockscreen version="1" frameRate="30" frameRateCharging="60" frameRateBatteryLow="20" frameRateBatteryFull="30"  screenWidth="1080">
</Lockscreen>
| 属性 | 代码 |
|---|---|
| frameRate | 指定帧率,默认为 30。 注:目前小米手机屏幕刷新率最高为 120hz。 |
| frameRateCharging | 充电状态下 锁屏帧率 |
| frameRateBatteryLow | 电量低时 锁屏帧率 |
| frameRateBatteryFull | 电量满(100%)时 锁屏帧率 |
- 高级用法
动态调整帧率,比如在播放动画或者滑动屏幕的时候把帧率提高到 60fps 或者 120fps,以保证动画和滑动不卡顿;其余时候可以降低到 30fps,在保证流畅度的前提下又可以兼顾省电。
注:frameRate="120"为目前高刷新率手机所支持的,在不支持 120 的手机上面还是以手机硬件所支持的最高刷新率为准。(比如写 120 时在 60hz 的机型上面最高只会到达 60hz)
<FramerateController name="framerateControllerAni" initPause="true" loop="false" >
    <ControlPoint frameRate="120" time="0"/>
    <ControlPoint frameRate="120" time="2000"/>
    <ControlPoint frameRate="30" time="2001"/>
</FramerateController>

<!-- 在需要提高帧率时播放;比如有开屏动画时,在开屏时播放 -->
<AnimationCommand target="framerateControllerAni" command="play"/>

<!-- 点击/滑动屏幕时提高帧率 -->
<Button x="0" y="0" w="#screen_width" h="#screen_height">
    <Triggers>
        <Trigger action="down,up,cancel">
            <AnimationCommand target="framerateControllerAni" command="play"/>
        </Trigger>
        <Trigger action="move">
            <AnimationCommand target="framerateControllerAni" command="play" condition="#frame_rate{55" />
        </Trigger>
    </Triggers>
</Button>
# 元素数组
就是界面元素(图形、文字…)以特定规律的形式展现,避免类似代码的重复。
例如:我要把 100 张 80x80 的矩形按 10 行 10 列(间距为 20 像素)的形式显示出来,如果是平常,我们至少得写 100 行代码,但现在用元素数组几行代码就行了。
示例:
<Array x="50" y="500" count="100" indexName="__i" >
    <!-- % 与 int 的用法请看 表达式 -->
    <Rectangle x="#__i%10*100" y="int(#__i/10)*100" w="80" h="80" fillColor="#99ffffff" />
    <Text textExp="#__i" size="36" align="center" x="#__i%10*100+40" y="int(#__i/10)*100+20"  color="#000000" />
</Array>
| 属性 | 释义 |
|---|---|
| Array | 元素数组的标签(就是对各元素进行排列) |
| indexName | 指数名称,可理解为元素数组内,用来给各元素编号的变量名 |
| count | 规定这个元素数组内同类型元素的个数,也就是 indexName 中你自定义的变量名的范围,在 Array 中的 count 不支持表达 |
# 循环
主要与数组配合使用,可节省大量的代码,并提高效率。
示例:
<Var name="find" type="number[]" size="100" const="true" />
<Array x="100" y="300" count="100" indexName="__i" >
    <Text textExp="#find[#__i]" size="30" align="center" x="#__i%10*90" y="int(#__i/10)*90" color="#ffffffff" />
</Array>
<Button x="0" y="0" w="1080" h="1920">
    <Triggers>
        <Trigger action="up">
            <LoopCommand count="100" indexName="col">
                <VariableCommand name="find" type="number[]" index="#col" expression="#col"  />
            </LoopCommand>
        </Trigger>
    </Triggers>
</Button>
| 属性 | 释义 |
|---|---|
| LoopCommand | 循环标签 |
| indexName | 指数名称,用来标注循环计算次数的变量名(#col 等于 0 时,说明是第一次计算) |
| count | 规定循环次数 |
| begin | indexName 指定的变量到达某个值时开始计算 |
| end | indexName 指定的变量到达某个值时终止计算 |
| loopCondition | 循环条件,可以用来中断循环 |
下面这段与前面 <LoopCommand/> 代码等效
<LoopCommand begin="0" end="99" indexName="col">
    <VariableCommand name="find" type="number[]" index="#col" expression="#col"  />
</LoopCommand>
# 贝塞尔曲线
重点:CanvasDrawer 是独立的,必须先计算在其它分辨率下的缩放比,
<?xml version="1.0" encoding="UTF-8"?>
<Lockscreen version="2" frameRate="60" screenWidth="1080">
    <Var name="orix" type="number" expression="400" const="true"/>
    <Var name="oriy" type="number" expression="400" const="true"/>
    <Var name="startx" type="number" expression="0" const="true"/>
    <Var name="starty" type="number" expression="0" const="true"/>
    <Var name="endx" type="number" expression="800" const="true"/>
    <Var name="endy" type="number" expression="0" const="true"/>
    <!-- 先初始化 -->
    <ExternalCommands>
        <Trigger action="init">
            <!-- scale_mum:CanvasDrawer是独立的,先计算在其它分辨率下的缩放比 -->
            <VariableCommand name="scale_mum"  expression="int(#raw_screen_width/1.08)/1000" />
            <MethodCommand targetType="ctor" class="android.graphics.Path" return="path" returnType="object"/>
            <MethodCommand target="path" targetType="var" method="moveTo" paramTypes="float,float" params="#startx,#starty"/>
            <MethodCommand target="path" targetType="var" method="quadTo" paramTypes="float,float,float,float" params="#orix,#oriy,#endx,#endy"/>
            <MethodCommand targetType="ctor" class="android.graphics.Paint" return="paint" returnType="object"/>
            <MethodCommand targetType="var" class="miui.maml.util.ReflectionHelper" method="getEnumConstant" paramTypes="String,String" params="'android.graphics.Paint$Style','STROKE'" return="style" returnType="object"/>
            <MethodCommand target="paint" targetType="var" method="setStyle" paramTypes="android.graphics.Paint$Style" params="'style'"/>
        </Trigger>
    </ExternalCommands>
    <Rectangle x="0" y="0" w="1080" h="1920" fillColor="argb(255,255,255,255)" touchable="true">
        <Triggers>
            <Trigger action="down" >
                <!-- 初始点 -->
                <VariableCommand name="x0" type="number" expression="#touch_x"/>
                <VariableCommand name="y0" type="number" expression="#touch_y"/>
            </Trigger>
            <!-- 滑动过程会刷新数据 -->
            <Trigger action="move" >
                <VariableCommand name="dx" type="number" expression="#touch_x-#x0"/>
                <VariableCommand name="dy" type="number" expression="#touch_y-#y0"/>
                <MethodCommand target="path" targetType="var" method="reset"/>
                <MethodCommand target="path" targetType="var" method="moveTo" paramTypes="float,float" params="#startx,#starty"/>
                <MethodCommand target="path" targetType="var" method="quadTo" paramTypes="float,float,float,float" params="#orix+#dx,#oriy+#dy,#endx,#endy"/>
            </Trigger>
            <Trigger action="up" >
                <VariableCommand name="orix" type="number" expression="#orix+#dx"/>
                <VariableCommand name="oriy" type="number" expression="#oriy+#dy"/>
            </Trigger>
        </Triggers>
    </Rectangle>
    <Group x="140" y="240" scale="#scale_mum">
        <!-- CanvasDrawer;画布哦!对这功能给跪了!大家好好用!谢谢MAML之父 -->
        <CanvasDrawer x="0" y="0">
            <Triggers>
                <Trigger action="draw" >
                    <MethodCommand target="paint" targetType="var" method="setStrokeWidth" paramTypes="float" params="8"/>
                    <MethodCommand target="paint" targetType="var" method="setColor" paramTypes="int" params="0xff00ff00"/>
                    <MethodCommand target="__objCanvas" targetType="var" method="drawPath" paramTypes="android.graphics.Path,android.graphics.Paint" params="'path','paint'"/>
                    <MethodCommand target="paint" targetType="var" method="setStrokeWidth" paramTypes="float" params="0"/>
                    <MethodCommand target="paint" targetType="var" method="setColor" paramTypes="int" params="0xff000000"/>
                    <MethodCommand target="paint" targetType="var" method="setTextSize" paramTypes="float" params="40"/>
                    <MethodCommand target="__objCanvas" targetType="var" method="drawTextOnPath" paramTypes="String,android.graphics.Path,float,float,android.graphics.Paint" params="'Hello World! This is a new awesome feature. 你好,这是很牛的新功哦!','path',0,-25,'paint'"/>
                </Trigger>
            </Triggers>
        </CanvasDrawer>
    </Group>
</Lockscreen>
# 其他相关
# 锁屏常亮
<!-- 初期测试锁屏时防止黑屏,可加入该代码,方便测试锁屏效果 -->
<!-- 注意:主题最终上线时该代码不可直接展示,不然锁屏会一直亮屏不会息屏;可以用条件控制什么时候可执行 -->
<Var expression="#second" threshold="5" >
    <Trigger>
        <ExternCommand command="pokewakelock"/>
    </Trigger>
</Var>
相当于每 5 秒(second)触发一次; pokewakelock 唤醒屏幕
# 全机型壁纸自适应算法
<Image name="i_bg" x="#screen_width/2" y="#screen_height/2" pivotX="#screen_width/2" pivotY="#screen_height/2" scale="max(#screen_width/#i_bg.bmp_width,#screen_height/#i_bg.bmp_height)" align="center" alignV="center" src="bg.jpg"/>
适用对象:任意尺寸图片。(自定义的 Image 非
<Wallpaper/>,因为 Wallpaper 自带自适应缩放算法)
原理:宽不够拉宽,高不够拉高. 即:壁纸按照屏幕中心对齐平铺的情况下,未铺满区域的就把壁纸整体按照前两者的比值进行等比缩放以填充未充满区域。
# 自定义图片
选择任意图片显示:
config.xml 新增 ImagePicker 条目,可以让用户选择手机中的某个图片,获取其地址到变量中(注意:图片过大可能不能显示,比如像素过大的照片。)
<Config>
       <Group text="自定义图片" summary="请先将图片裁剪到合适大小和部位以确保显示效果,尺寸过大的照片请先缩小至屏幕大小,否则可能不能正常显示或费内存">
               <ImagePicker text="图片一" summary="选择图片一" id="img1"/>
               <ImagePicker text="图片二" summary="选择图片二" id="img2"/>
       </Group>
</Config>
manifest.xml 中 Image 支持 Uri 类型的 src,即 config 中选择的图片地址,@img1 @img2
<!-- 个性化定制锁屏设置中 文件管理和相册选择图片不生效,故使用下列代码即可解决 -->
<Var name="img1" expression="ifelse(strContains(@img1,'com.android.fileexplorer'),strReplaceAll(@img1,'content://com.android.fileexplorer.myprovider/external_files/','file:///sdcard/'),strContains(@img1,'com.miui.gallery'),strReplaceAll(@img1,'content://com.miui.gallery.open/raw/%2Fstorage%2Femulated%2F0%2F','file:///sdcard/'),@img1)" type="string" const="true"/>
<Var name="img2" expression="ifelse(strContains(@img2,'com.android.fileexplorer'),strReplaceAll(@img2,'content://com.android.fileexplorer.myprovider/external_files/','file:///sdcard/'),strContains(@img2,'com.miui.gallery'),strReplaceAll(@img2,'content://com.miui.gallery.open/raw/%2Fstorage%2Femulated%2F0%2F','file:///sdcard/'),@img2)" type="string" const="true"/>

<Image  x="300" y="300" w="300" h="300" src="@img1" srcType="Uri"/>
<Image  x="300" y="800" w="300" h="300" src="@img2" srcType="Uri"/>
清除图片(将相应变量置空即可):
<Button x="300" y="300" w="60" h="60" visibility="#img1.has_bitmap">
    <Triggers>
        <Trigger action="up">
            <VariableCommand name="img1" expression="''" type="string" persist="true"/>
        </Trigger>
    </Triggers>
</Button>
示例文件:image_picker.mtz (opens new window)
# 全面屏机型锁屏元素适配
目前手机分辨率各有所异,那么我们在制作锁屏时书写代码就需要注意在锁屏中处于底部的元素就需要用相对坐标来写,而非绝对坐标。
解决方案:
- 在全局变量中有一个screen_height,表示在你当前代码设定分辨率下相对应的屏幕高度
- 屏幕底的按钮坐标,以屏幕高度(screen_height)为参照,通俗地讲就是从底部上去多少像素
示例(这里以系统默认锁屏底部两边的小图标为例):
<!-- 底部左右小图标 -->
<Group y="#screen_height-110">
    <Image x="115" y="0" align="center" alignV="center" src="icon_left.png"/>
    <Image x="#screen_width-115" y="0" align="center" alignV="center" src="icon_right.png"/>
</Group>
释义:y="#screen_height-110" 这里的坐标表示用屏幕高度减去 110 就是底部图标最终显示的位置,不管任何机型都是用机型的分辨率高度减去 110;这样就保障了在不同机型底部按钮都会在底部位置。
个性化设置中 文件管理和相册 选择图片不生效,用这行代码解决
<Var name="diy_img_var" type="string" expression="ifelse(strContains(@diy_img,'com.android.fileexplorer'),strReplaceAll(@diy_img,'content://com.android.fileexplorer.myprovider/external_files/','file:///sdcard/'),strContains(@diy_img,'com.miui.gallery'),strReplaceAll(@diy_img,'content://com.miui.gallery.open/raw/%2Fstorage%2Femulated%2F0%2F','file:///sdcard/'),@diy_img)"/>
<Image x="540" y="#screen_height/2" align="center" alignV="center" w="200" h="200" srcType="Uri" srcExp="@diy_img_var" />
记得把下面代码放到 config.xml 中
<?xml version="1.0" encoding="utf-8"?>
<Config>
    <Group text="自定义图片">
        <ImagePicker text="自定义图片" summary="图片最佳尺寸:200x200" id="diy_img"/>
    </Group>
</Config>
在百变壁纸为时钟插件添加大背景
放时钟插件内:
<ExternalCommands>
    <Trigger action="resume">
        <!-- 每次用不同的值发送一个广播(用于百变壁纸收到广播后触发计算) -->
        <IntentCommand action="initialization" broadcast="true">
            <Extra name="bg_number" type="number" expression="#time%1000000" />
        </IntentCommand>
    </Trigger>
</ExternalCommands>
放百变壁纸内:
<VariableBinders>
    <!-- 收到时钟插件发的广播后开始计算有时钟时wallpaper_offset_x的值,并用ui_num记录 -->
    <BroadcastBinder action="initialization">
        <Variable name="bg_num" type="number" extra="bg_number" />
        <Trigger condition="#bg_num">
            <VariableCommand name="ui_num" expression="int(#wallpaper_offset_x*10000000)" />
        </Trigger>
    </BroadcastBinder>
</VariableBinders>
<!-- 背景 -->
<Rectangle x="0" y="0" w="1080" h="2160" fillColor="#fffcfed8"   >
<!-- wallpaper_offset_step:wallpaper_offset_x等于ui_num时,透明度为255;单屏偏移量,wallpaper_offset_x当前值与ui_num的差值的绝对值等于wallpaper_offset_step时,透明度为0 -->
<Rectangle x="0" y="0" w="1080" h="1080" fillColor="#fffcfed8" alpha="255-int(255*abs(int(#wallpaper_offset_x*10000000)-#ui_num)/10000000/#wallpaper_offset_step)"  >
    <FillShaders>
        <LinearGradient x="0" y="0" x1="0" y1="1080" tile="clamp">
            <GradientStop color="#ff46e1c6" position="0"/>
            <GradientStop color="#fffcfed8" position="1"/>
        </LinearGradient>
    </FillShaders>
</Rectangle>
倒计时
倒计时的计算逻辑其实很简单,看下面之前, 先搞清楚两点 日历的规律(四年一闰、百年不闰、四百年又闰 闰年时 2 月份多一天) 下面的倒计时以 0000 年为参照年份,计算方法是:目标年份至 0000 年过了多少天,现在的时间过了多少天,求两值的差值。
<?xml version="1.0" encoding="UTF-8"?>
<Lockscreen frameRate="30" screenWidth="1080" version="1">
    <ExternalCommands>
        <Trigger action="resume">
            <VariableCommand name="djs_text" expression="ifelse(strIsEmpty(@djs_text),'距离过年',@djs_text)" type="string" persist="true" />
            <VariableCommand name="lya" expression="eq((#year%4),0)*ne((#year%100),0)+eq((#year%400),0)" />
            <VariableCommand name="da" expression="(ge(#month,1)*31+(28+#lya)*ge(#month,2)+ge(#month,3)*31+ge(#month,4)*30+ge(#month,5)*31+ge(#month,6)*30+ge(#month,7)*31+ge(#month,8)*31+ge(#month,9)*30+ge(#month,10)*31+ge(#month,11)*30+ge(#month,12)*31)+(365*#year+int(#year/4)+int(#year/400)-int(#year/100))+#date-1" />
            <VariableCommand name="fa" expression="#hour24*60+#minute" />
            <!-- 目标日期(2021/2/12 23:59)与计算 -->
            <VariableCommand name="y1" expression="ifelse(isnull(#y1),2021,#y1)" persist="true" />
            <VariableCommand name="m1" expression="ifelse(isnull(#m1),2,#m1)" persist="true" />
            <VariableCommand name="d1" expression="ifelse(isnull(#d1),12,#d1)" persist="true" />
            <VariableCommand name="h1" expression="ifelse(isnull(#h1),23,#h1)" persist="true" />
            <VariableCommand name="f1" expression="ifelse(isnull(#f1),59,#f1)" persist="true" />
            <VariableCommand name="lyz1" expression="eq((#y1%4),0)*ne((#y1%100),0)+eq((#y1%400),0)" />
            <VariableCommand name="dz1" expression="(gt(#m1,1)*31+(28+#lyz1)*gt(#m1,2)+gt(#m1,3)*31+gt(#m1,4)*30+gt(#m1,5)*31+gt(#m1,6)*30+gt(#m1,7)*31+gt(#m1,8)*31+gt(#m1,9)*30+gt(#m1,10)*31+gt(#m1,11)*30+gt(#m1,12)*31)+(365*#y1+int(#y1/4)+int(#y1/400)-int(#y1/100))+#d1-1" />
            <VariableCommand name="fz1" expression="#h1*60+#f1" />
        </Trigger>
    </ExternalCommands>

    <Var name="vvv1" expression="ge(#dz1*1440+#fz1,#da*1440+#fa)" />
    <Var name="date1" expression="ifelse(#vvv1,int(abs(#dz1-#da)-gt(#fa,#fz1)),int(abs(#dz1-#da)-gt(#fz1,#fa)))" />
    <Var name="hour1" expression="ifelse(#vvv1,int((gt(#fa,#fz1)*1440+#fz1-#fa)/60),int((gt(#fz1,#fa)*1440+#fa-#fz1)/60))" />
    <Var name="minute1" expression="ifelse(#vvv1,int((gt(#fa,#fz1)*1440+#fz1-#fa)%60),int((gt(#fz1,#fa)*1440+#fa-#fz1)%60))" />

    <!--
            lya     今年是否闰年
            da      计算现在至0000年有多少天
            dz1     计算目标日期至0000年有多少天
            fa      今天过了多少分
            vvv1    判断目标日期在现在之前还是之后
     -->
    <Wallpaper x="0" y="0"  />
    <Text x="540" y="500" align="center" color="#ffffff" size="35" textExp="@djs_text+ifelse(#to,'('+#y1+'/'+#m1+'/'+#d1+'/'+#h1+':'+#f1+')','')+ifelse(#vvv1,'还有','已经')+#date1+'天'+#hour1+'时'+#minute1+'分'" />
</Lockscreen>
将下面代码放入锁屏中的 config.xml 文件内可实现自定义倒计时目标时间:
<Config>
    <Group text="锁屏倒计时设置">
        <StringInput text="倒计时自定义文字" id="djs_text" default="" />
        <NumberInput text="目标 年" id="y1" default="2021" />
        <NumberInput text="目标 月" id="m1" default="2" />
        <NumberInput text="目标 日" id="d1" default="12" />
        <NumberInput text="目标 时" id="h1" default="23" />
        <NumberInput text="目标 分" id="f1" default="59" />
    </Group>
</Config>
摇一摇调出 NFC 界面
<VariableBinders>
    <SensorBinder type="linear_acceleration" rate="2">
        <Variable name="va_x" index="0" />
        <Variable name="va_y" index="1" />
        <Variable name="va_z" index="2" />
        <Trigger condition="abs(#va_x*10)}120">
            <!-- 线性加速度数据校正(取最大值),解决不同硬件灵敏度不同造成的问题 -->
            <VariableCommand name="va_num" expression="abs(#va_x*10)"  persist="true" condition="(abs(#va_x*10))}#va_num" />
            <!-- 如果va_x实时值大于va_num*0.8,则打开NFC界面 -->
            <IntentCommand action="com.miui.intent.action.DOUBLE_CLICK" package="com.miui.tsmclient" condition="abs(#va_x*10)}(0.8*#va_num)">
                <Extra name="event_source" type="string" expression="'key_volume_down'"/>
            </IntentCommand>
        </Trigger>
    </SensorBinder>
</VariableBinders>
# 性能优化
优化中需要注意的几点:
一个好的锁屏,不仅需要很好的视觉效果,还需要流畅的体验(用户手机的性能、玩机水平有高低,制作主题时,要考虑下如何用户最大化)。
- 测试时尽量不要用顶配机,frameRate 写 60,实测效果:普通手机不要低于 30 帧/s,好一点的手机必需高于 40 帧/s(这里指的是能够达到的最高帧率,并非你在开头限定的帧率或是你在代码中写的动态帧率)。
- 降低图片文件大小,减少缓存时读取的时间,节省运行内存:存储图片必需导出为 web 格式,或者后期压缩;能用 jpg 绝不用 png,webp 也是一个很好的选择!
- 尽量用合适尺寸的图片,能用小尺寸绝不用大尺寸,有效减少计算量!
- 代码逻辑上不要有冲突,必须精减。
- 充分利用 visibility 控制各模块可见性,用
通过变量 #num 是否大于 0 来判断只显示当前需要显示的部分。
Layer 优化利器详解
Layer,这个部件是一个 Group,但是可以单独设置帧率,实现 Layer 内部元素独立于其它部分的单独渲染刷新控制。这个部件在 MAML 渲染引擎底层对应到 Android 中的单独一个 View ,于是这个元素就可以像 View 一样设置 layer 类型来实现 GPU 硬件缓冲,提高绘制性能。
<Layer name="layer" x="25" y="300" hardware="true" width="800" height="600" pivotX="400" pivotY="200" touchable="true" interceptTouch="true" frameRate="0">
</Layer>
| 属性 | 释义 |
|---|---|
| hardware | 是否使用硬件绘图缓冲,true 更快速但更占内存,false 相反 |
| frameRate | 指定 Layer 内部元素 |
| updatePosition | Layer 位置(x y)是否需要更新, true/false |
| updateSize | Layer 大小(w h) 是否需要更新, true/false |
| updateTranslation | Layer 的 pivot/rotation/scale/alpha 等属性是否需要更新 |
以上三个 updatePosition/updateSizeupdateTranslation 属性默认都为 true,如果某些属性值是固定的不需要更新(例如 x 不是表达式,或没有位移动画),设置成 false 会提高性能。
优化步骤:
- 当界面某块部分(如一个日历面板或天气面板等)和其它界面部分刷新率不同时,可以考虑把这块界面元素放到 Layer 中,先尝试 hardware="false",给 Layer 单独指定一个合适的刷新帧率 frameRate,看一下性能有没有问题,
- 如果还是有问题可以把 hardware 设成 true 再测试,这时会额外耗费内存,不是必要的话最好不用。
- 如果确实需要 hardware="true",但是内存使用又超出预算的话, Layer 提供一个函数接口 setHardwareLayer(boolean) 通过 MethodCommand 调用,在动画开始前设为 true,动画结束后设为 false 即可
- 可以减少界面重复代码编写的数组和循环类组件: 部件数组、变量数组、LoopCommand 等等
适用情景:
- 整体更新频率较高,但是部分区域(比如常见的日历)不需要频繁更新,可以把这部分放到一个 Layer 中指定较低帧率
- 整体更新频率较低,但是有部分区域有动画需要频繁更新的,可以把这部分放到一个 Layer 单独指定动画帧率
- 较复杂的动画滑进滑出面板,提高动画流畅度,用 Layer 设置合适的 hardware 属性
注意,zorder 问题,Layer 内部元素在一个单独的图层中,类似如下:
<Lockscreen>
    <Wallpaper />
    <Image src="img1.jpg"/>
    <Layer name="layer1"/>
    <Image src="img2.jpg"/>
    <!-- layer1在最上的图层, img1和img2在原有默认的底图层,所以img2在layer1下面,如果必须要img2在Layer上面,则需要另建一个Layer -->
    <Image src="img1.jpg"/>
    <Layer name="layer1"/>
    <Layer name="layer2">
    <Image src="img2.jpg"/>
    </Layer>
</Lockscreen>
# Aod-息屏
主题包结构
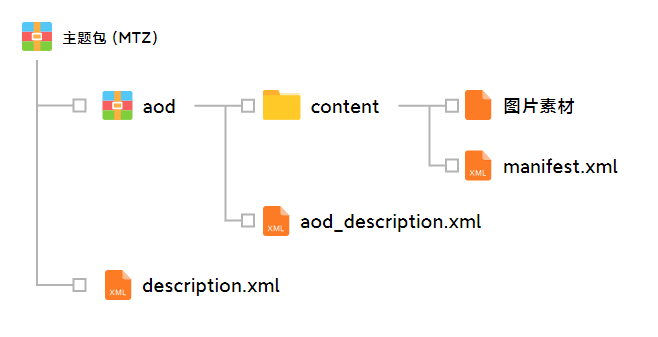
制作须知:
- 百变息屏基于 maml,可使用 maml 已有的全局变量;息屏效果仅做展示(时间、日期、通知 等),禁止使用 传感器/Button 跳转等 交互功能。
- 息屏首次展示时,可播放动画,动画总时长不可超过 4000ms,超时的动画动会被强制停止,最高帧率建议使用 30 或 60,且无需使用动态帧率。
- 息屏状态下,系统规定:1min/次 刷新时间;2min/次 刷新位置。(无法通过 maml 代码修改)
- 限制大小;AOD 模块需保证 10M 之内,越小越好。
- 含动画的效果,在初始化和动画结束 需规范代码书写方式,供系统获取动画状态。
- 支持配置息屏通用开关(电量、通知、农历),支持用户关闭或开启。
- 通知仅展示 icon,且与桌面图标一致,无法自行适配。
- 尽量避免使用大量的 序列帧图片
AOD 设置页相关配置(aod_description.xml) 支持通过代码配置,可自定义支持用户控制开关项显示,且支持配置开关的默认状态。
<?xml version='1.0' encoding='utf-8' standalone='yes' ?>
<MIUI_Theme_Values>
    <!-- 类型;百变框架 maml_style -->
    <theme_type>maml_style</theme_type>

    <!-- 是否支持显示 农历、电量、通知 开关;1 支持,0 不支持,默认为 0 -->
    <support_lunar_calendar>0</support_lunar_calendar>
    <support_battery>1</support_battery>
    <support_notification>1</support_notification>

    <!-- 开关初始状态;农历、电量、通知,1 开启,0 关闭,默认为 0 -->
    <lunar_calendar_enable>0</lunar_calendar_enable>
    <battery_enable>1</battery_enable>
    <notification_enable>1</notification_enable>
</MIUI_Theme_Values>
| 配置项 | 参数 | 说明 |
|---|---|---|
| theme_type | maml_style | 类型:百变框架(必写) |
| support_lunar_calendar | 1 支持,0 不支持(默认) | 是否支持用户配置 农历 开关 |
| support_battery | 1 支持,0 不支持(默认) | 是否支持用户配置 电量 开关 |
| support_notification | 1 支持,0 不支持(默认) | 是否支持用户配置 通知 开关 |
| 全局变量 | 状态 | 说明 |
| lunar_calendar_enable | 1 显示,0 不显示(默认) | 当支持 农历 开关时,开关状态 |
| battery_enable | 1 显示,0 不显示(默认) | 当支持 电量 开关时,开关状态 |
| notification_enable | 1 显示,0 不显示(默认) | 当支持 通知 开关时,开关状态 |
| preview_mode | 1 预览模式,0 息屏模式 | 支持通知开关时, 需使用此变量确保设置页面内支持预览效果 |
含动画的效果,在初始化和动画结束 需规范代码书写方式,供系统获取动画状态。
<ExternalCommands>
    <Trigger action="init">
        <!-- 初始化后,给系统一个状态;必须有 -->
        <ExternCommand command="animationState" strPara="'init'" />
    </Trigger>
    <!-- 首次展示的时候,播放的所有动画;action="play" 与 action="resume" 类似,但这里用 play -->
    <Trigger action="play">
        <AnimationCommand target="endAni" command="play"/>
    </Trigger>
</ExternalCommands>

<Var name="endAni">
    <VariableAnimation name="endAnimation" loop="false" initPause="true">
        <Item value="0" time="0" easeType="CubicEaseOut" />
        <Item value="1" time="1200"/>
        <Triggers>
            <!-- #endAnimation.current_frame==-1 动画结束 -->
            <Trigger action="end" condition="#endAnimation.current_frame==-1">
                <!-- 在最长的动画结束后,给系统发个命令;注意:此命令只能存在一个,请勿重复使用 -->
                <ExternCommand command="animationState" strPara="'finish'" />
            </Trigger>
        </Triggers>
    </VariableAnimation>
</Var>
AOD 通知消息 aod 通知与锁屏通知有所不同,aod 通知仅显示图标,不显示具体的内容信息。aod 会过滤 app 发出的重复通知,比如 同一应用只展示一个图标,不会重复。具体可参考下方代码:
<VariableBinders>
    <!-- aod通知;content://aod.notification/notifications -->
    <ContentProviderBinder name="data" uri="content://aod.notification/notifications" columns="pkg" countName="hasnotifications">
        <Variable name="noticePkg" type="string[]" column="pkg"/>
        <Trigger>
            <VariableCommand name="noticeCount" type="number" expression="min(#hasnotifications-1,3)"/>
        </Trigger>
    </ContentProviderBinder>
</VariableBinders>

<Var name="noticeApp" type="string[]" const="true" expression="" values="'com.android.contacts,com.android.contacts.activities.TwelveKeyDialer','com.android.mms','com.miui.securitycenter','com.android.thememanager'" />
<Array y="945+int((#timeAni-1)*140)" count="4" indexName="_i" alpha="#timeAni*255" visibility="#notification_enable">
    <!-- 预览通知图标 -->
    <Image x="540+#_i*132-132/2*3" w="72" h="72" align="center" srcType="ApplicationIcon" srcExp="@noticeApp[#_i]" visibility="#preview_mode" />
    <!-- 真实通知图标 -->
    <Image x="540+#_i*132-132/2*#noticeCount" w="72" h="72" align="center" srcType="ApplicationIcon" srcExp="@noticePkg[#_i]" visibility="#_i{=#noticeCount ** !#preview_mode" />
</Array>
点击下载附件
预览息屏主题 APP.zip (opens new window) 若遇到预览app旧版无法使用,请安装新版。
# 常用包名类名及获取方法
获取方法
1、下载并安装编辑器 (opens new window),提取密码:123a
2、在手机上打开需要跳转的软件
3、打开编辑器,并将手机用数据线连接至电脑
4、在编辑器中点击“当前界面跳转按钮”(点击后会自动复制包名类名)
5、在你的代码中粘贴使用即可
下列IntentCommand在锁屏中需要搭配解锁命令使用
若遇到无法正常跳转的问题,可能是因为app更改了相关包名类名,按照获取方法重新获取即可
拨号 ▽
<IntentCommand package="com.android.contacts" class="com.android.contacts.activities.TwelveKeyDialer"/>

联系人 ▽
<IntentCommand package="com.android.contacts" class="com.android.contacts.activities.PeopleActivity"/>

短信 ▽
<IntentCommand package="com.android.mms" class="com.android.mms.ui.MmsTabActivity"/>

相机 ▽
<IntentCommand package="com.android.camera" class="com.android.camera.Camera"/>

个性主题/主题壁纸 旧(为了兼容两个都要加上) ▽
<IntentCommand package="com.android.thememanager" class="com.android.thememanager.ThemeResourceTabActivity"/>

主题商店 新(为了兼容两个都要加上) ▽
<IntentCommand package="com.android.thememanager" class="com.android.thememanager.ThemeResourceProxyTabActivity" />

日历 ▽
<IntentCommand package="com.android.calendar" class="com.android.calendar.AllInOneActivity"/>

天气 ▽
<IntentCommand package="com.miui.weather2" class="com.miui.weather2.ActivityWeatherMain"/>

时钟 ▽
<IntentCommand package="com.android.deskclock" class="com.android.deskclock.DeskClockTabActivity"/>

便签 ▽
<IntentCommand package="com.miui.notes" class="com.miui.notes.ui.NotesListActivity"/>

图库 ▽
<IntentCommand package="com.miui.gallery" class="com.miui.gallery.app.Gallery"|/>

相册 ▽
<IntentCommand package="com.miui.gallery" class="com.miui.gallery.activity.HomePageActivity"/>

浏览器 ▽
<IntentCommand package="com.android.browser" class="com.android.browser.BrowserActivity"/>

计算器 ▽
<IntentCommand package="com.miui.calculator" class="com.miui.calculator.cal.CalculatorActivity"/>

指南针 ▽
<IntentCommand package="com.miui.compass" class="com.miui.compass.CompassActivity"/>

设置 ▽
<IntentCommand package="com.android.settings" class="com.android.settings.MiuiSettings"/>

米家 ▽
<IntentCommand package="com.xiaomi.smarthome" class="com.xiaomi.smarthome.SmartHomeMainActivity"/>

文件管理 ▽
<IntentCommand package="com.android.fileexplorer" class="com.android.fileexplorer.FileExplorerTabActivity"/>

小米视频 ▽
<IntentCommand package="com.miui.video" class="com.miui.video.HomeActivity"/>

应用商店 ▽
<IntentCommand package="com.xiaomi.market" class="com.xiaomi.market.ui.MarketTabActivity"/>

小爱同学、语音助手 ▽
<IntentCommand category="android.intent.category.LAUNCHER" package="com.miui.voiceassist" class="com.xiaomi.voiceassistant.CTAAlertActivity"/>

安全中心 ▽
<IntentCommand package="com.android.settings" class="com.miui.securitycenter.Main"/>

电子邮件 ▽
<IntentCommand package="com.android.email" class="com.android.email.activity.Welcome"/>

收音机 ▽
<IntentCommand package="com.miui.fmradio" class="com.miui.fmradio.FmRadioActivity"/>

录音机 ▽
<IntentCommand package="com.android.soundrecorder" class="com.android.soundrecorder.SoundRecorder"/>

下载管理 ▽
<IntentCommand package="com.android.providers.downloads.ui" class="com.android.providers.downloads.ui.DownloadList"/>

UC浏览器 ▽
<IntentCommand package="com.UCMobile" class="com.UCMobile.main.UCMobile"/>

小米商城 ▽
<IntentCommand package="com.xiaomi.shop" class="com.xiaomi.shop.activity.MainTabActivity"/>

小米音乐 ▽
<IntentCommand package="com.miui.player" class="com.miui.player.ui.MusicBrowserActivity"/>

QQ音乐 ▽
<IntentCommand package="com.tencent.qqmusic" class="com.tencent.qqmusic.activity.AppStarterActivity"/>

网易云音乐 ▽
<IntentCommand package="com.netease.cloudmusic" class="com.netease.cloudmusic.activity.LoadingActivity"/>

酷狗音乐 ▽
<IntentCommand package="com.kugou.android" class="com.kugou.android.app.splash.SplashActivity"/>

虾米音乐 ▽
<IntentCommand package="fm.xiami.main" class="fm.xiami.main.SplashActivity"/>

百度地图 ▽
<IntentCommand package="com.baidu.BaiduMap" class="com.baidu.baidumaps.WelcomeScreen"/>

今日头条 ▽
<IntentCommand package="com.ss.android.article.news" class="com.ss.android.article.news.activity.SplashActivity"/>

淘宝 ▽
<IntentCommand package="com.taobao.taobao" class="com.taobao.tao.welcome.Welcome"/>

新浪微博 ▽
<IntentCommand package="com.sina.weibo" class="com.sina.weibo.SplashActivity"/>

手机QQ ▽
<IntentCommand package="com.tencent.mobileqq" class="com.tencent.mobileqq.activity.SplashActivity"/>

微信 ▽
<IntentCommand package="com.tencent.mm" class="com.tencent.mm.ui.LauncherUI"/>

微信 扫一扫 ▽
<IntentCommand package="com.tencent.mm" class="com.tencent.mm.plugin.scanner.ui.BaseScanUI"/>

微信 付款码 ▽
<IntentCommand package="com.tencent.mm" class="com.tencent.mm.plugin.offline.ui.WalletOfflineEntranceUI"/>

微信 收款码 ▽
<IntentCommand package="com.tencent.mm" class="com.tencent.mm.plugin.collect.ui.CollectAdapterUI"/>

微信 朋友圈 ▽
<IntentCommand package="com.tencent.mm" class="com.tencent.mm.plugin.sns.ui.SnsTimeLineUI"/>

微信 我的名片 ▽
<IntentCommand package="com.tencent.mm" class="com.tencent.mm.plugin.setting.ui.setting.SelfQRCodeUI"/>

支付宝 ▽
<IntentCommand package="com.eg.android.AlipayGphone" class="com.eg.android.AlipayGphone.AlipayLogin"/>

支付宝 扫一扫 ▽
<IntentCommand package="com.eg.android.AlipayGphone" class="com.alipay.mobile.scan.as.main.MainCaptureActivity"/>

支付宝 付款码 ▽
<IntentCommand package="com.eg.android.AlipayGphone" class="com.eg.android.AlipayGphone.FastStartActivity"/>

公交卡(小米钱包) ▽
<IntentCommand package="com.miui.tsmclient" class="com.miui.tsmclient.ui.quick.DoubleClickActivity"/>
不解锁使用
<!-- 录音机 -->
<IntentCommand action="android.intent.action.MAIN" package="com.android.soundrecorder" class="com.android.soundrecorder.SoundRecorder">
    <Extra name="StartActivityWhenLocked" type="boolean" expression="1"/>
    <Extra name="navigation_tab" expression="2" type="int" />
</IntentCommand>

<!-- 计算器 -->
<IntentCommand action="android.intent.action.MAIN" package="com.miui.calculator" class="com.miui.calculator.cal.CalculatorActivity">
    <Extra name="StartActivityWhenLocked" type="boolean" expression="1"/>
    <Extra name="navigation_tab" expression="2" type="int"/>
</IntentCommand>

<!-- 相机 -->
<IntentCommand action="android.intent.action.MAIN" package="com.android.camera" class="com.android.camera.Camera">
    <Extra name="ShowCameraWhenLocked" type="boolean" expression="1"/>
    <Extra name="StartActivityWhenLocked" type="boolean" expression="1"/>
</IntentCommand>

<!-- 手电筒 -->
<VariableCommand name="lightSwitch" expression="!(#lightSwitch)"/>
<IntentCommand action="miui.intent.action.TOGGLE_TORCH" broadcast="true">
    <Extra name="miui.intent.extra.IS_ENABLE" type="boolean" expression="ifelse(int(@__miui_version_code)}=8,#lightSwitch,1)"/>
</IntentCommand>